こんにちは!
WEB制作、Bubble開発で生計を立て、2023年までにフィンランド起業を目指している、まさひで(@john01tgmck)です。
2021年10月よりフリーランスになりました!
主な仕事内容
- WEB制作(サーバー契約からデザイン、WordPressでの公開〜保守まで担当可能)
- ノーコードツールを使ったWEBアプリ開発
そしてそして、2021年3月より日本最大のノーコードコミュニティ【NoCodeCamp】のコミュニティマネージャーとなりました。
イベントの企画・運営を行っており、「朝からBubbleでじょん」という朝活イベントを毎朝5:00~6:00開催しております。
NoCodeCamp詳細は以下のリンクより確認することができます。
それではさっそくLINE風アプリ「LOIN」を作っていきましょう。
前提条件
- Bubbleに登録している(FreeプランでOK)
- Bubbleの触り方がなんとなくわかる
- ログイン機能や投稿機能を作ったことがある
チャット画面の作成
今回はLOINの目玉であるチャットページを作成します。
一応この章でLOINは完成になります。
この章で学べること
- 作成者によって表示を変更する
- メッセージ送信
- 画像投稿機能
チャットルーム作成
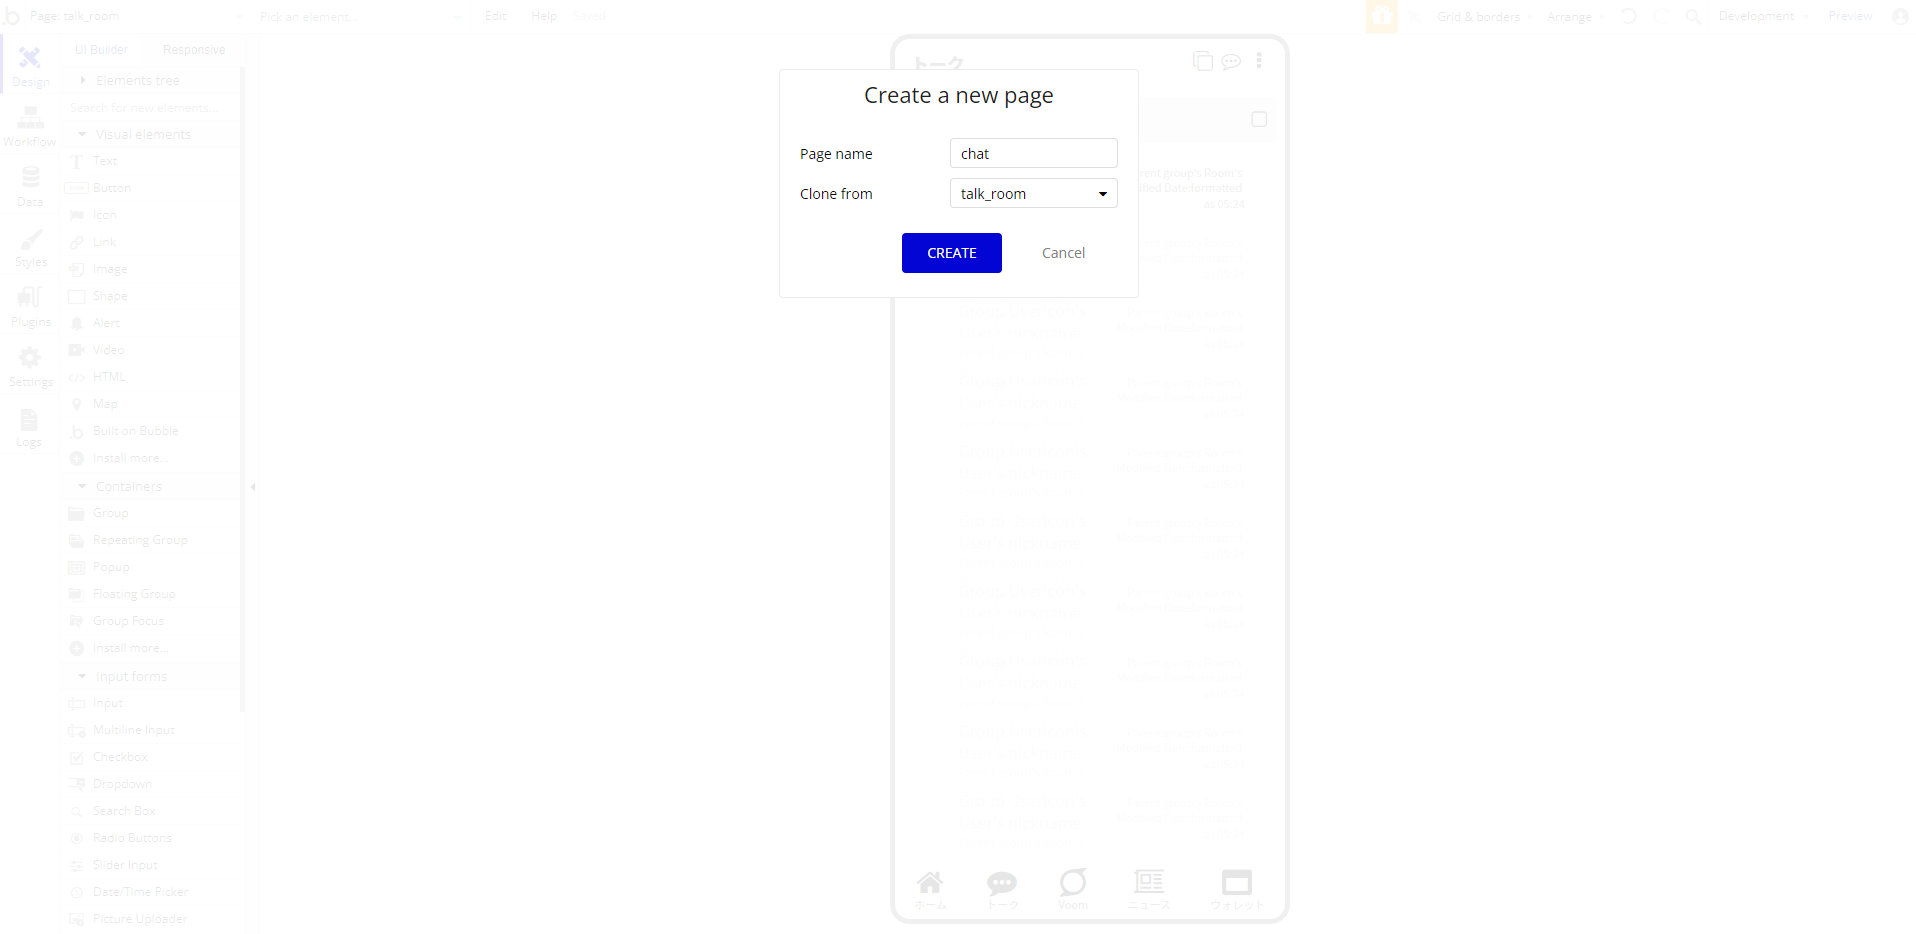
Add a new page...からchatページを作成します。Clonefromはtalk_roomにします。
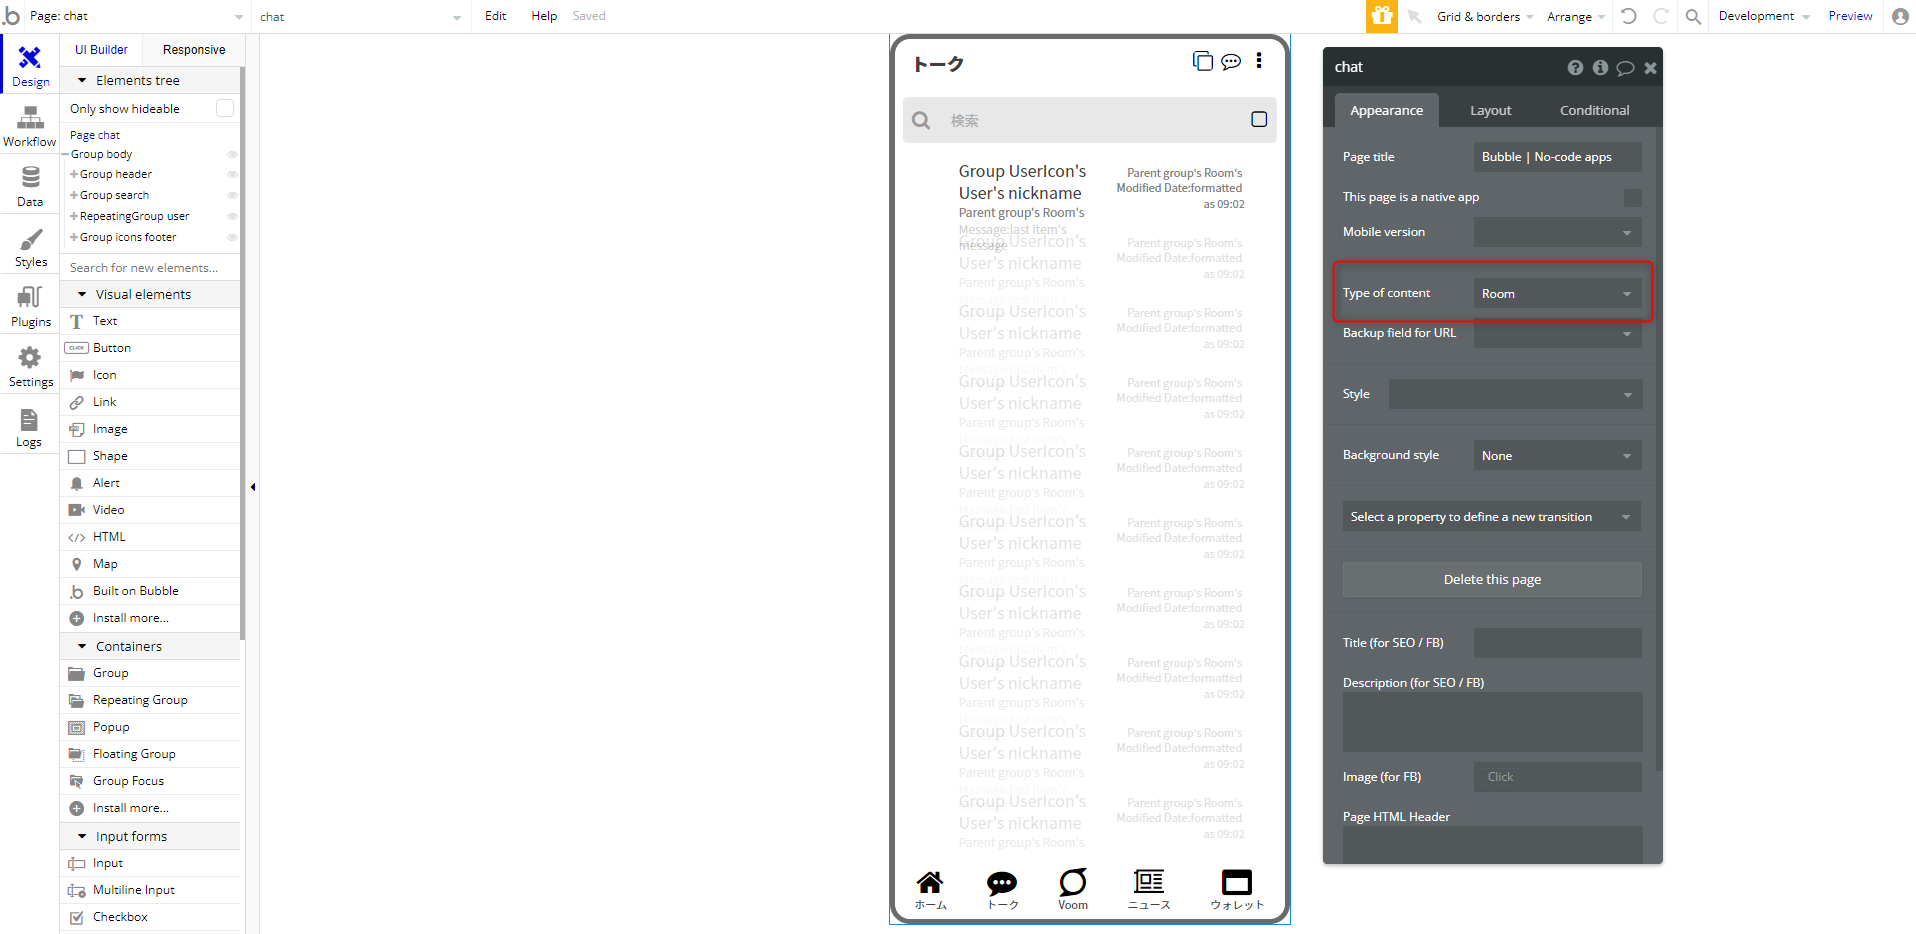
ページ全体のType of contentをRoomにしておきます。
ヘッダー部分の作成
Group headerの修正
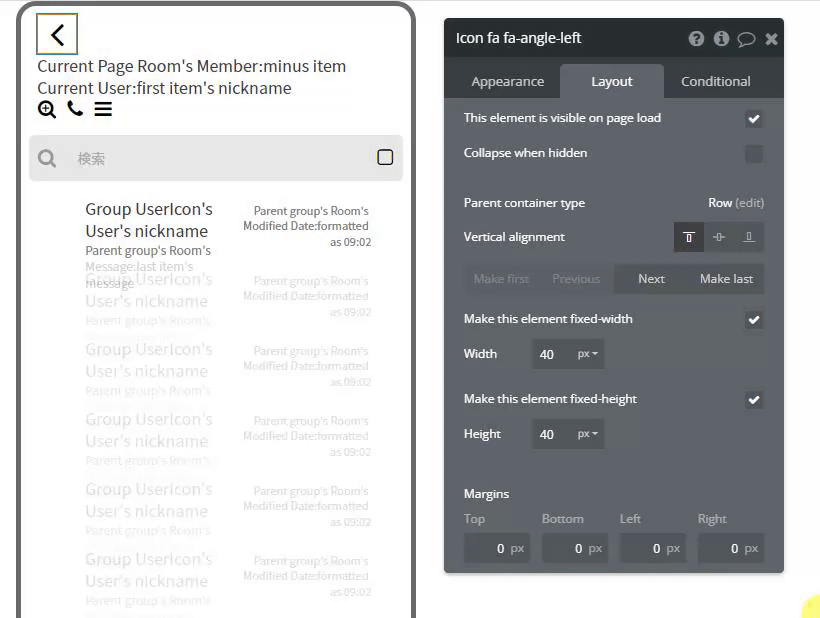
- text トークを削除し、fa-angle-leftアイコンを設置
- Width,Height = 40px
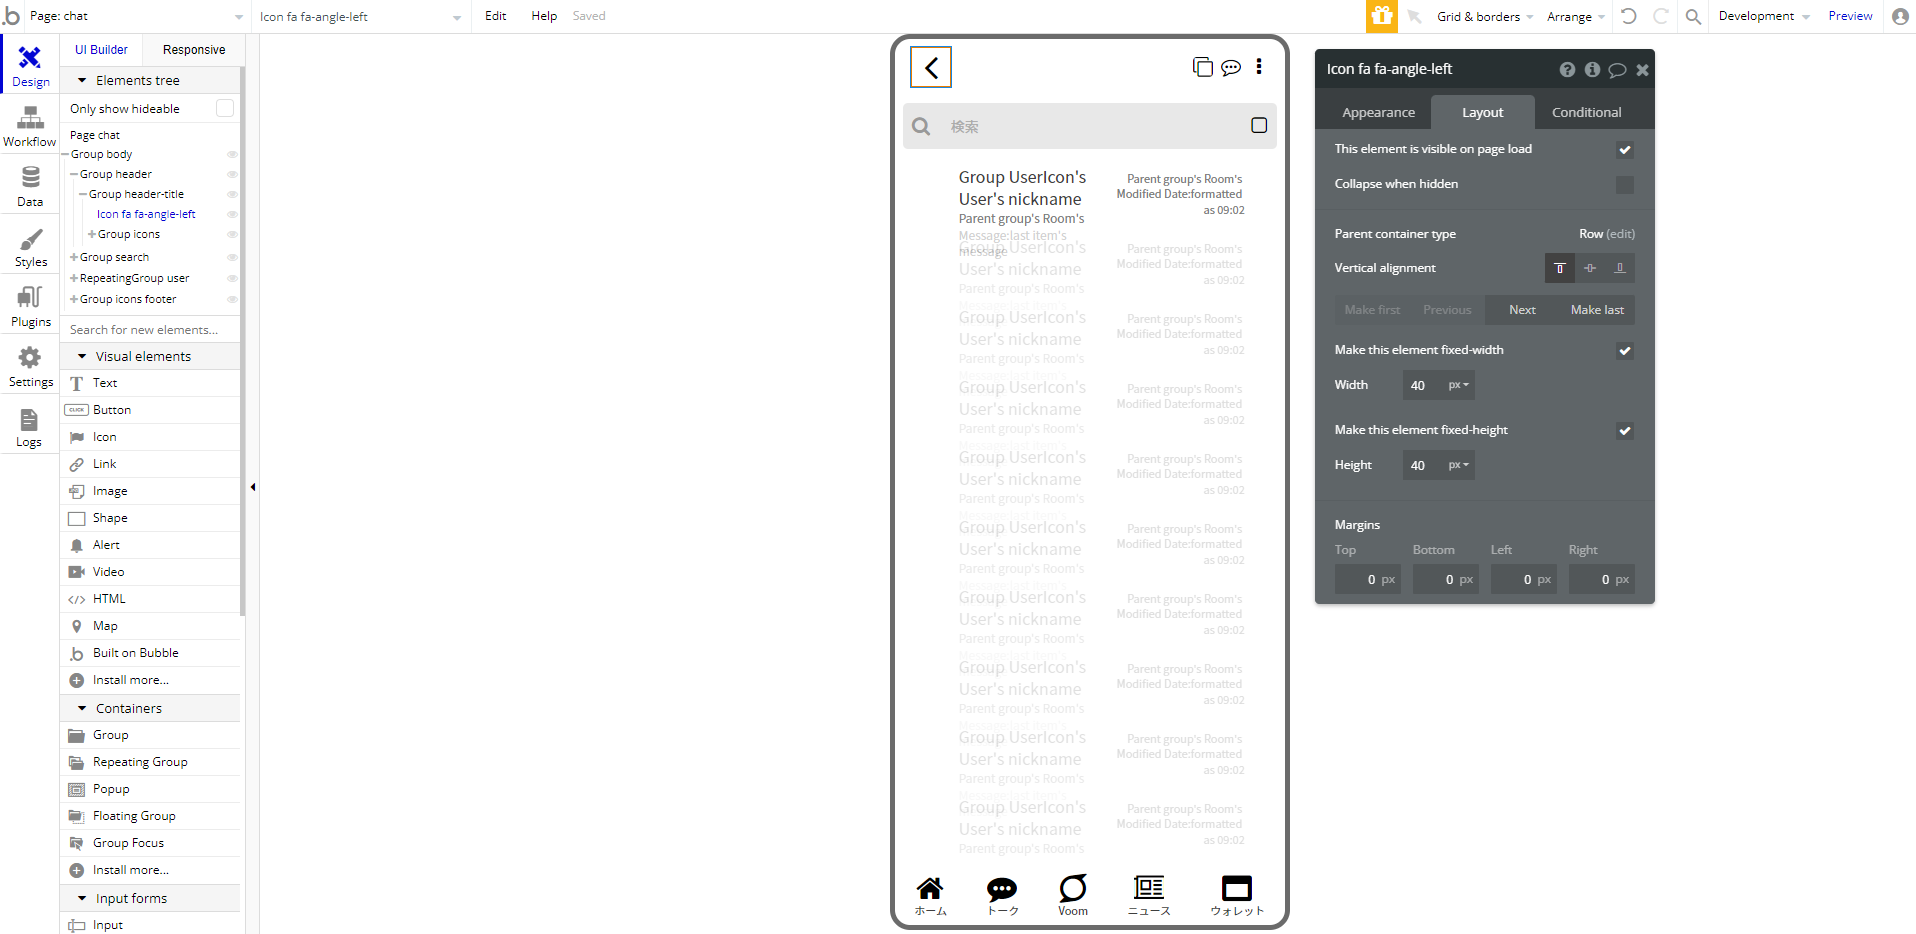
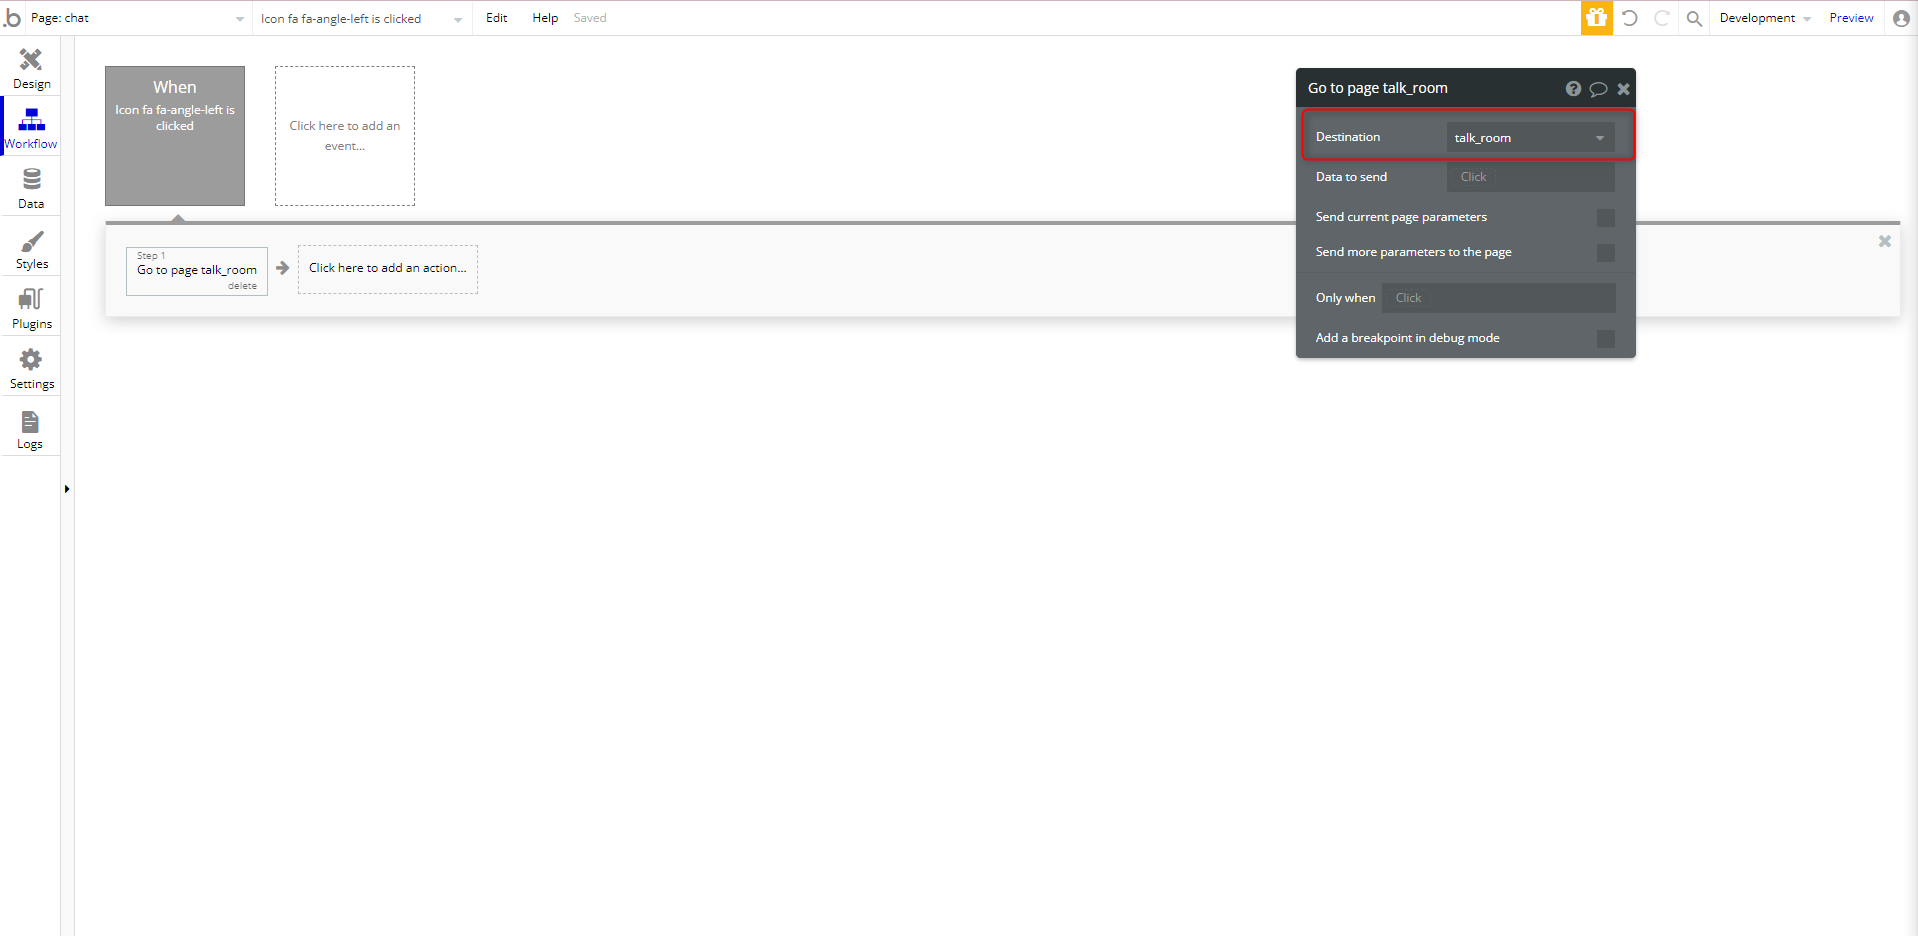
前ページに戻る機能を作成
Icon fa fa-angle-left を選択し、Start/Edit workflowをクリック
NavigationのGo to pageよりDestinarionをtalk_roomに設定
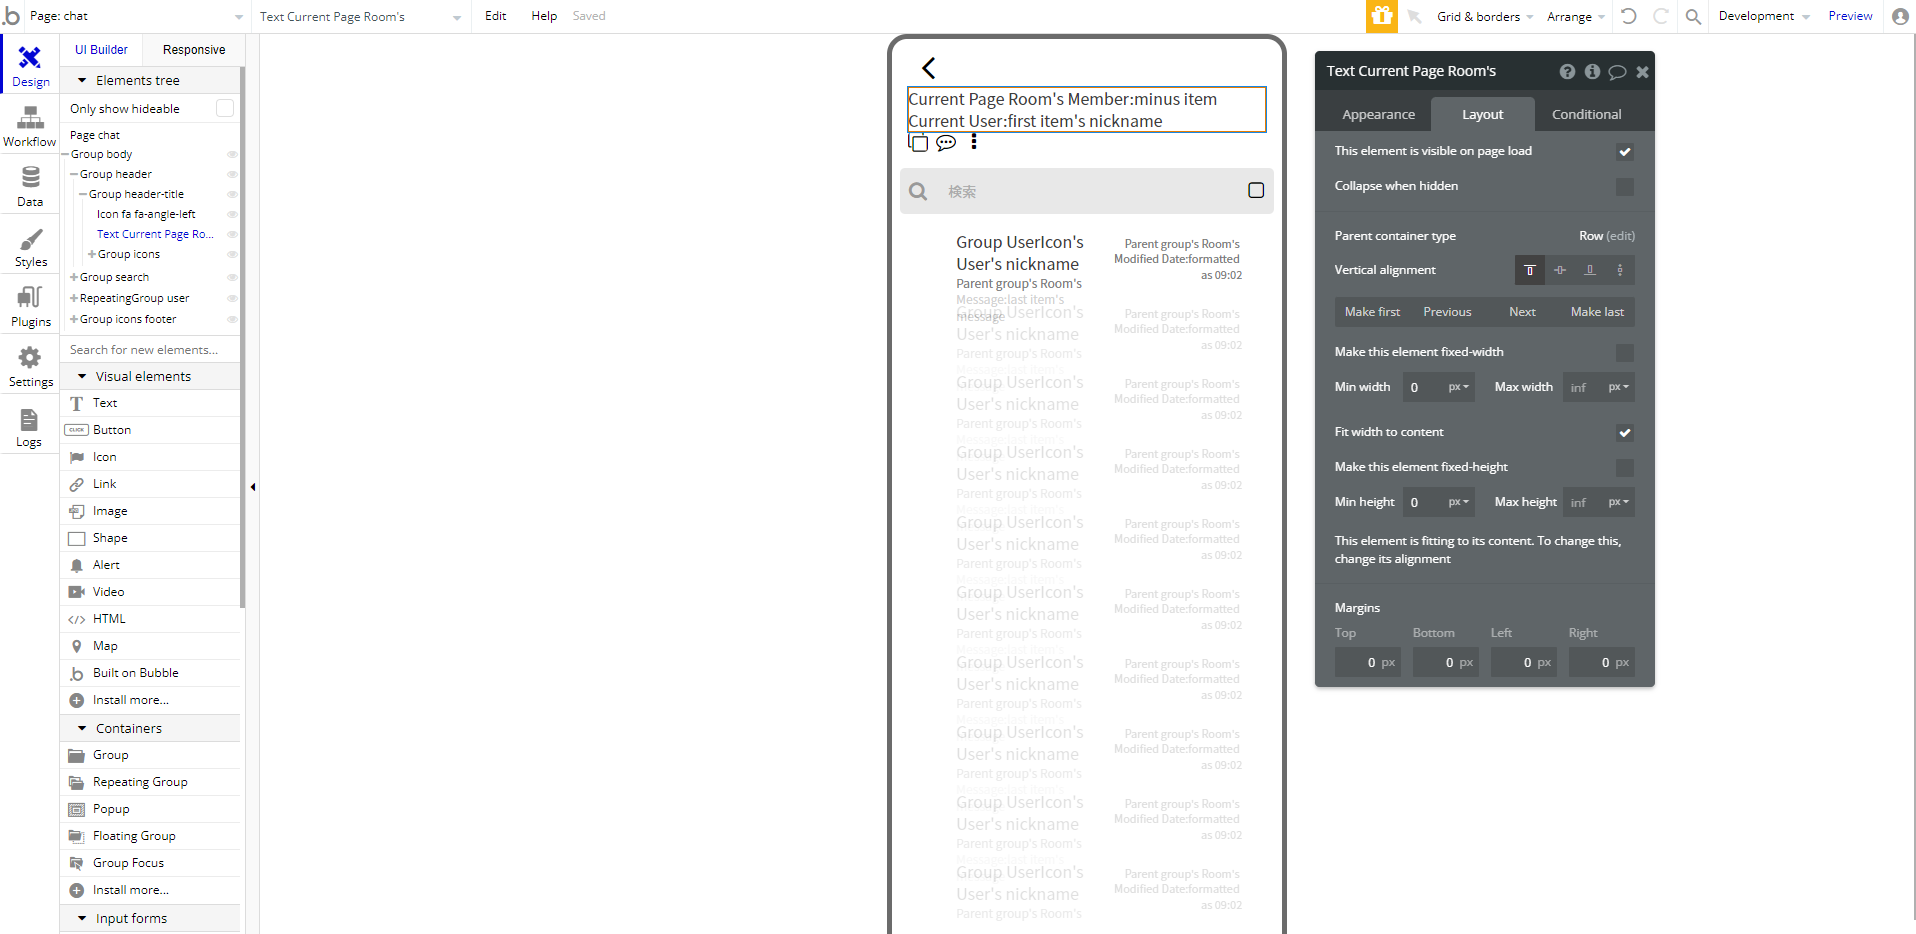
Roomの話し相手の名前を表示
Group header-title内にtextを配置
Appearance
- Current Page Room's Member:minus item Current User:first item's nickname
※このルーム内のカレントユーザーを除いて最初のユーザー名を表示 - font = Noto sans jp(regular)
- font-size = 16px
Layout
- Make this element fixed-width = チェック外す
- Fit width to content = チェック
- Min width = 0px
- Min height = 0px
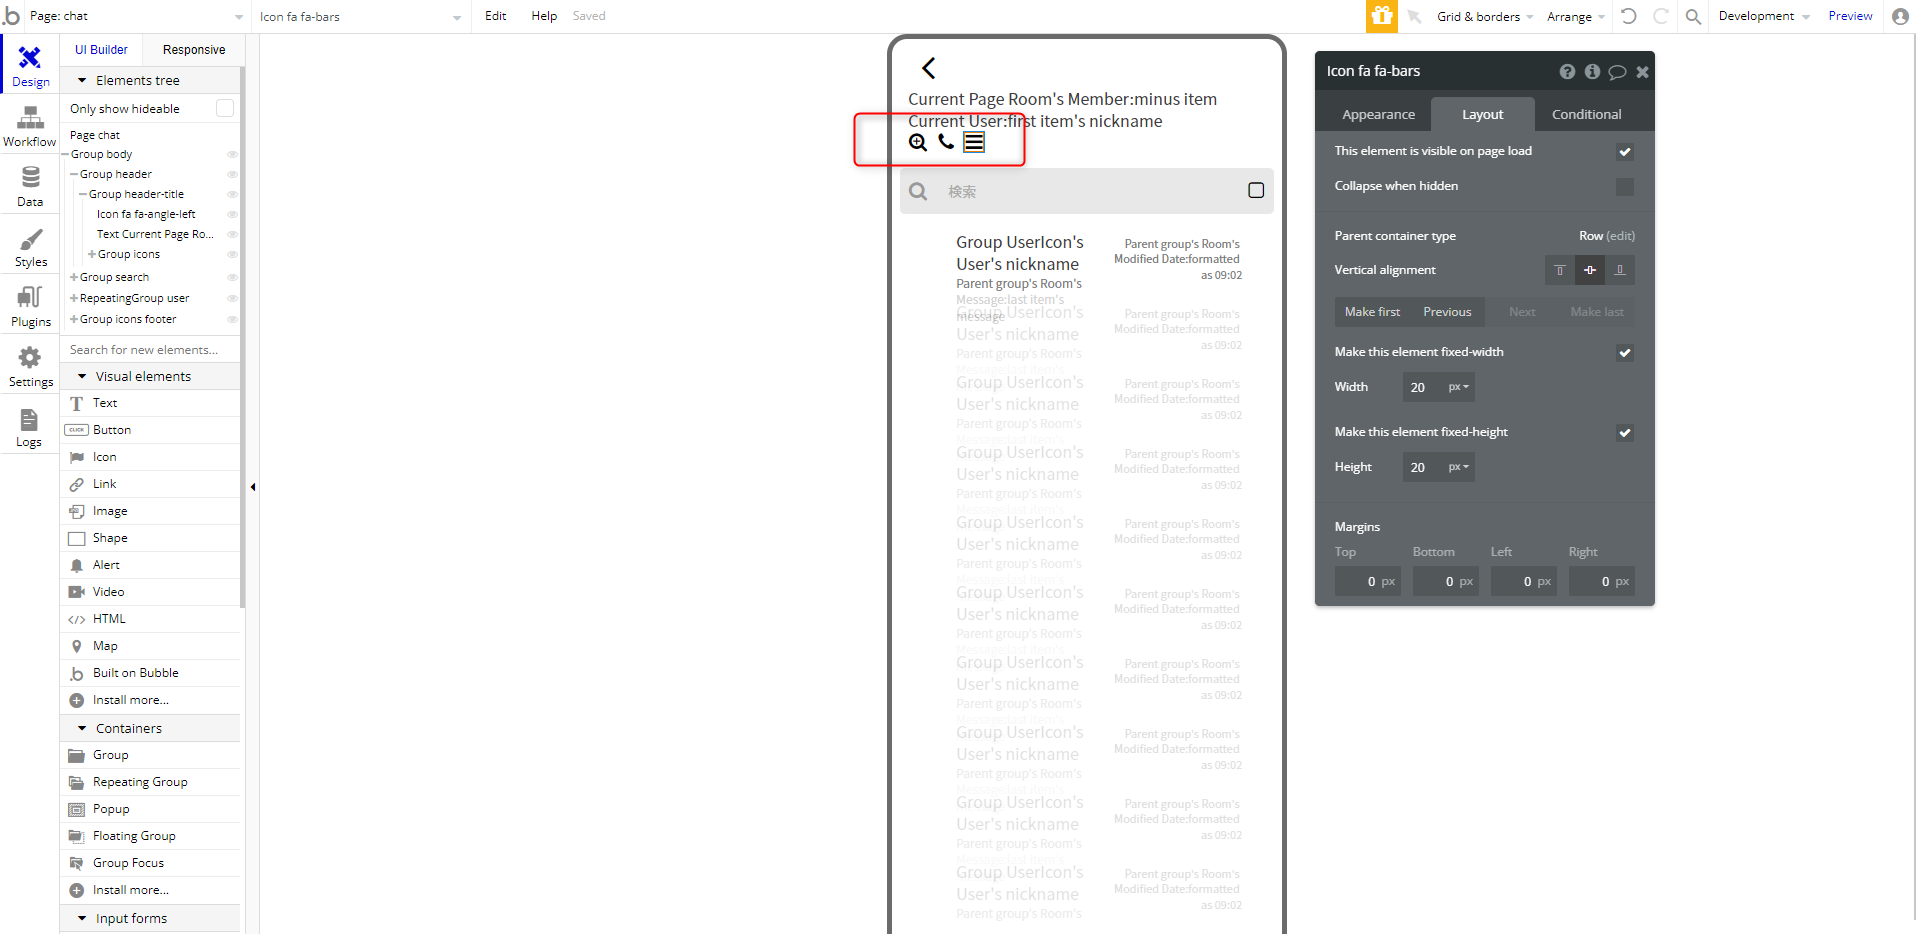
アイコンの変更
- fa-clone -> fa-search-plus
- fa-commenting -> fa-phone
- fa-ellipsis -> fa-bars
ヘッダーアイテムの配置を修正
fa-angle-leftアイコンとユーザーネーム用テキストをGroup化(Row)
- Make this element fixed-width = チェック外す
- Fit width to content = チェック
- Min width = 0px
- Min height = 0px
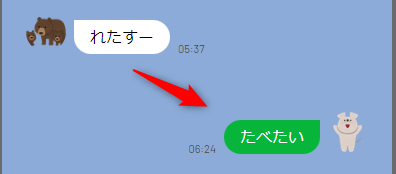
Previewしたときに以下のようになっていればOKです。
配置がおかしい時は、Group header-titleのContainer alignmentがSpace betweenになっているか確認してください。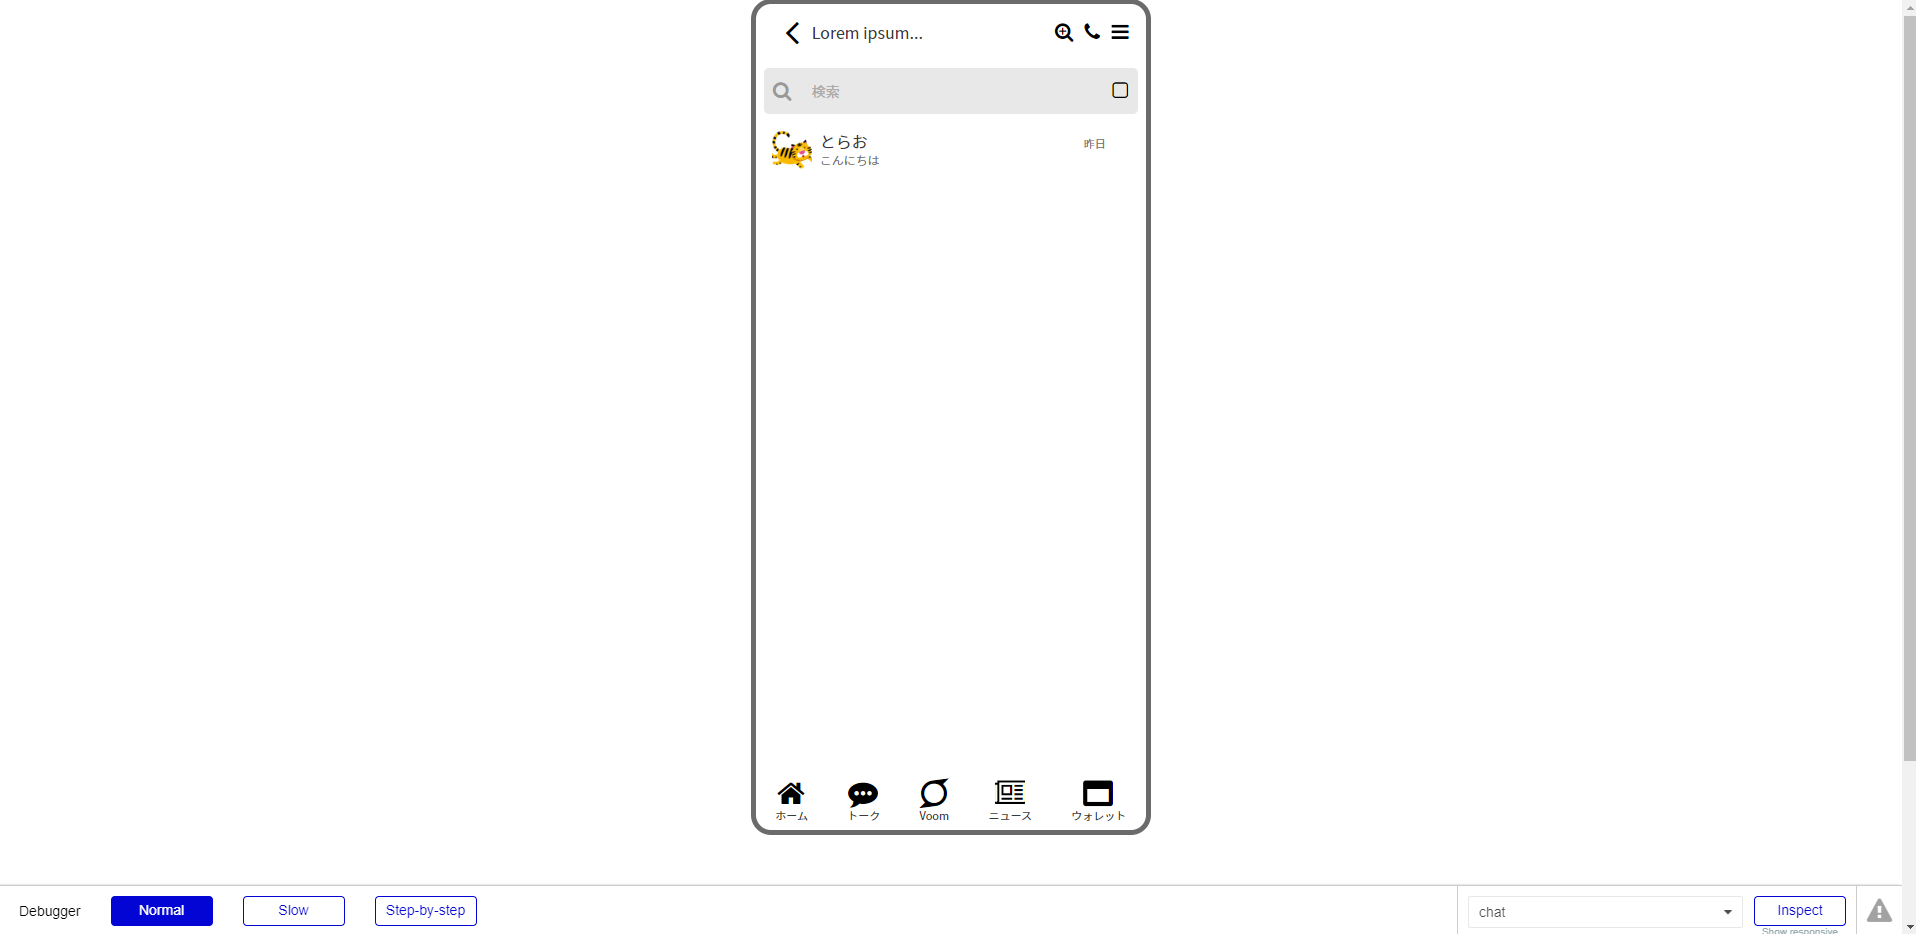
Group searchは必要ないので、削除しておきましょう。
チャット表示機能作成
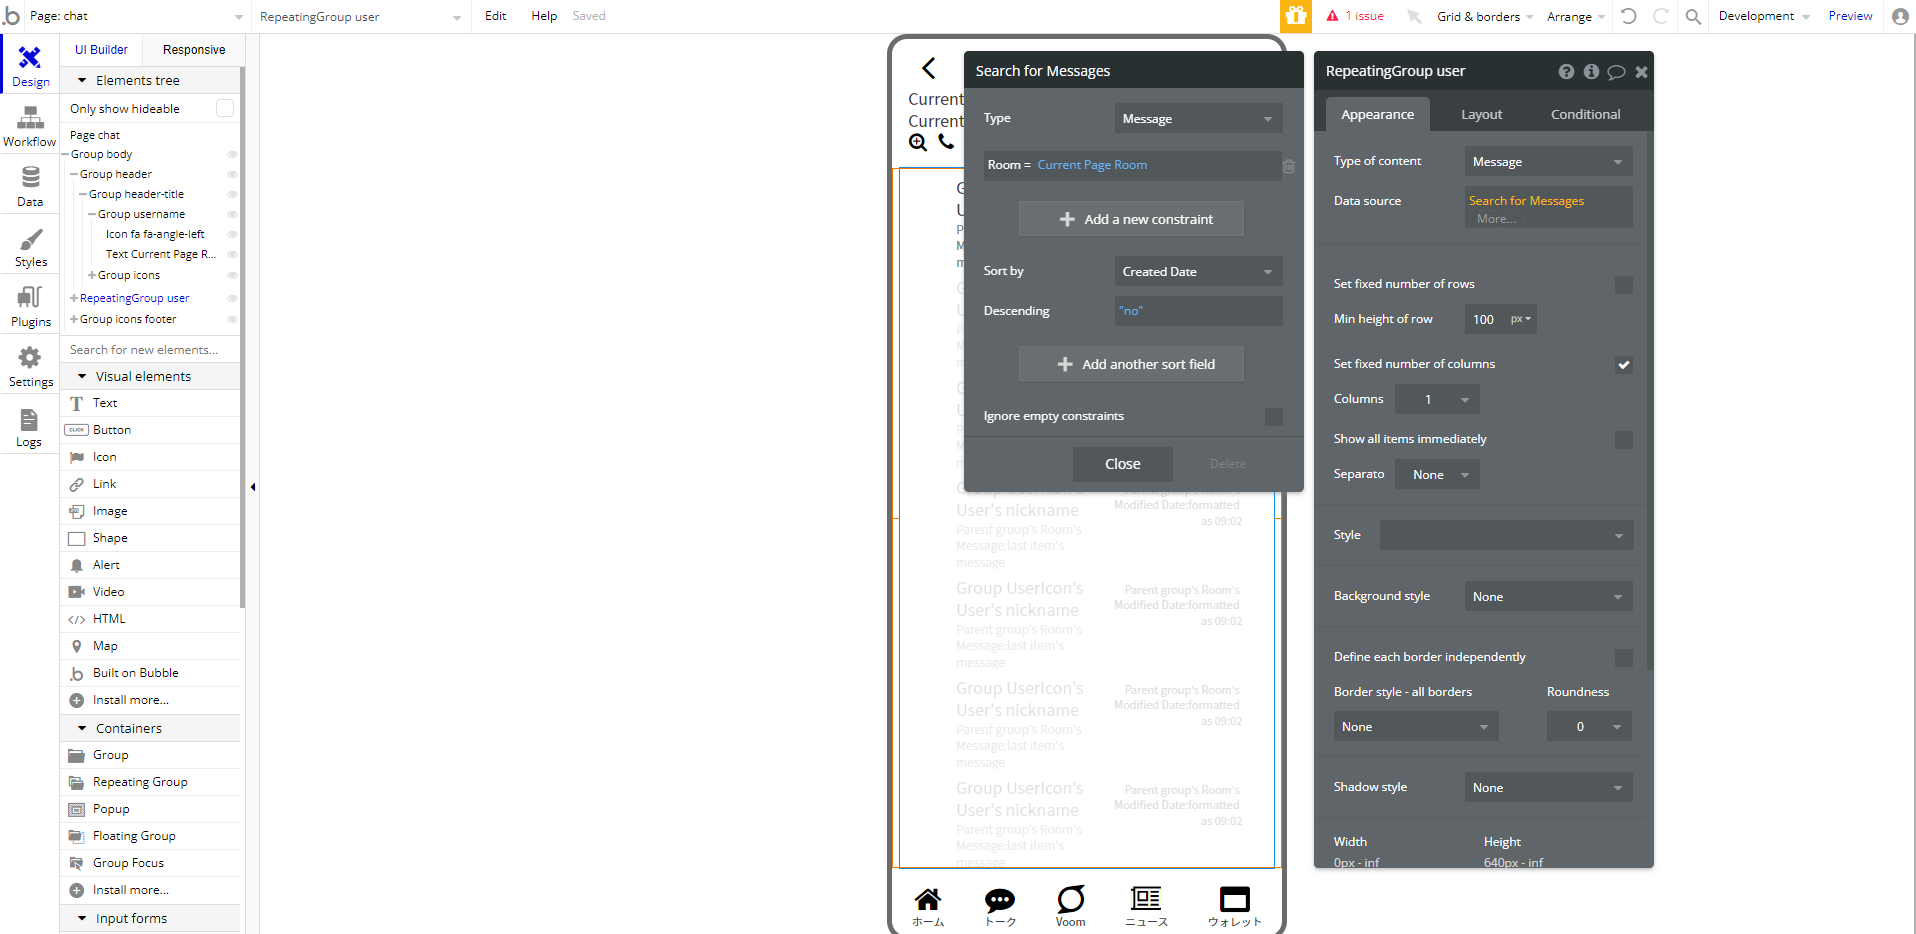
RepeatingGroup chatを作成
- Type of content = Message
- Date source = Search for Messages
Room = Current Page Room
Sort by = Created Date
Descending = no - Min height of row = 100px
Group RoomをGroup chatsに変更
Appearance
- Type of content = Message
- Background style = None
Layout
- Container alignment = Centered
- Apply gap spacing between elements = チェック外す
- Padding = Top: 0px, Bottom: 0px, Left: 16px, Right: 16px
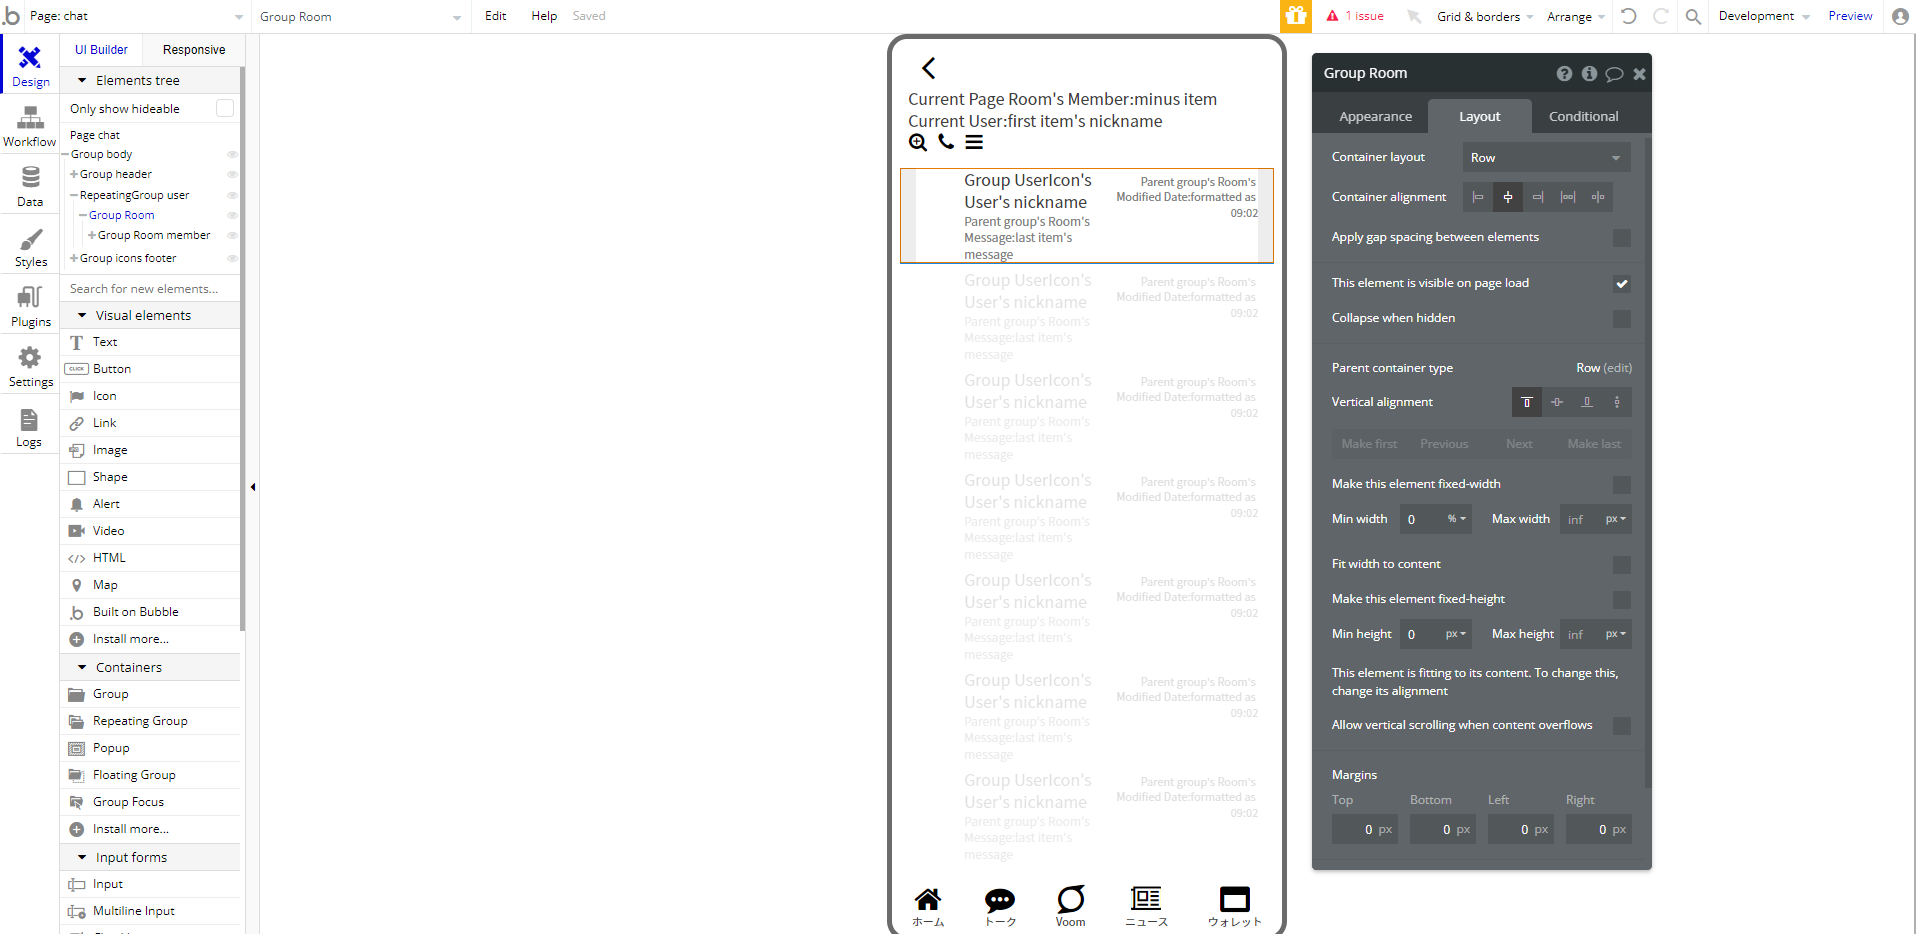
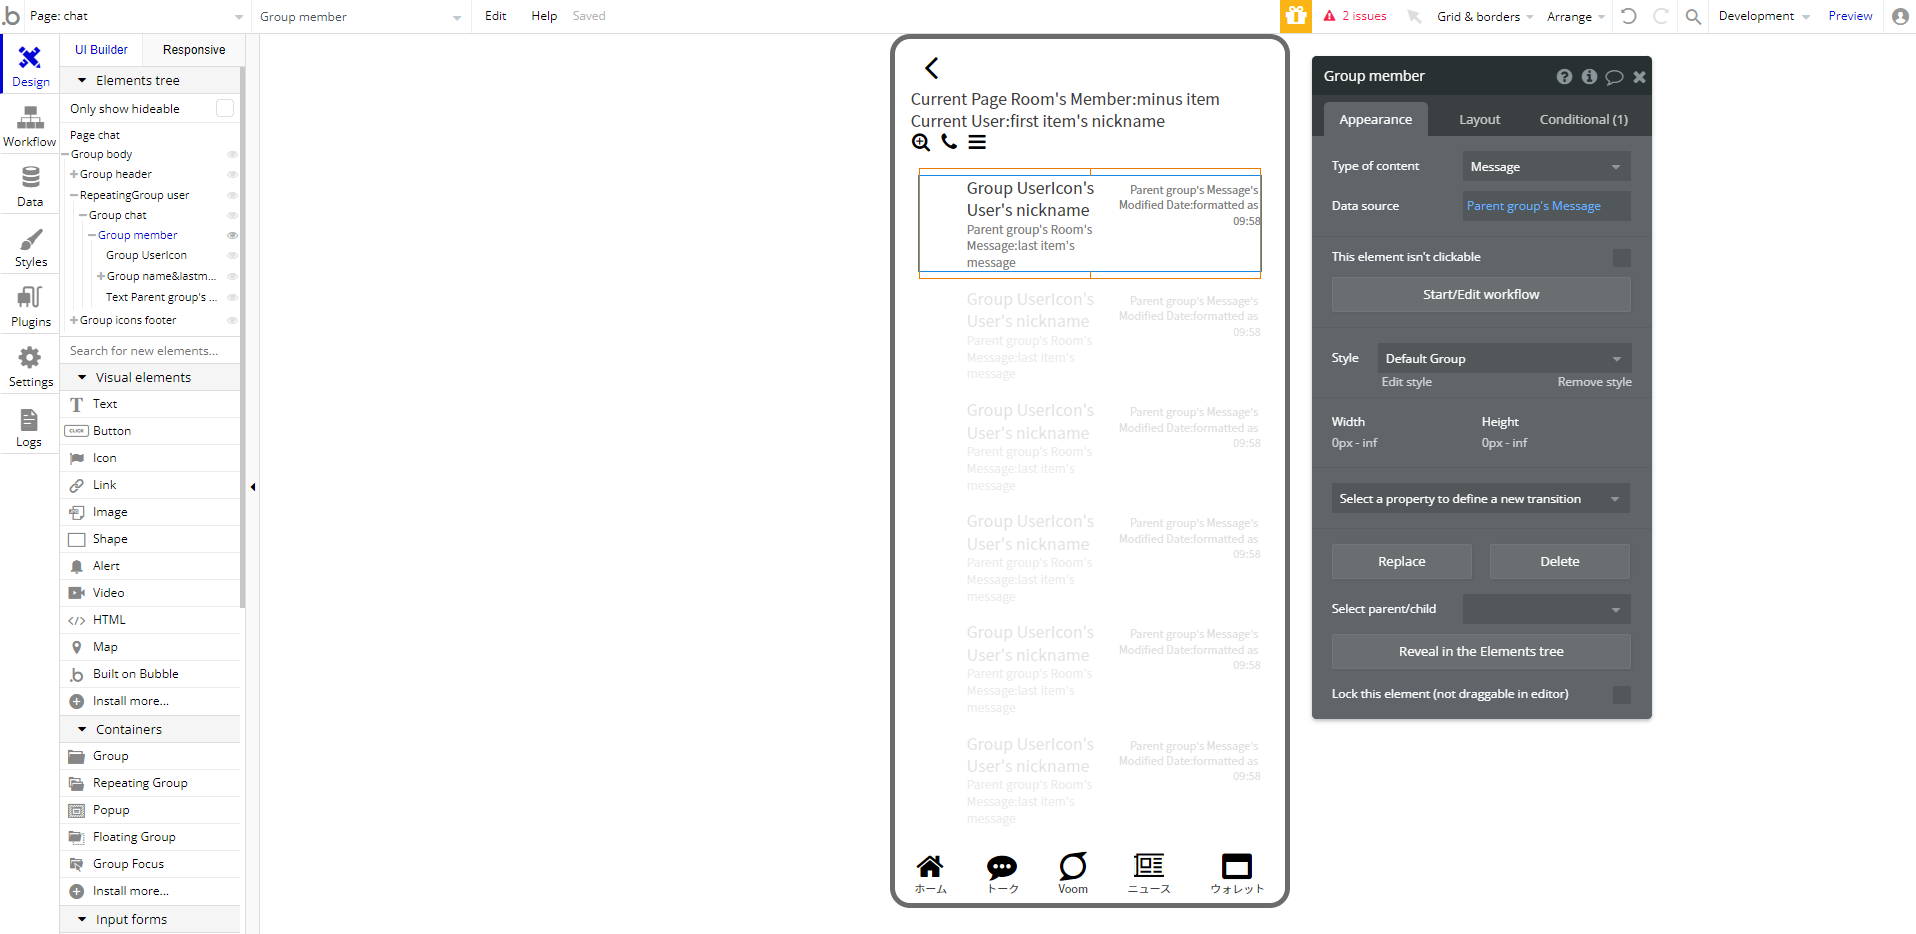
Group Room memberをGroup memberに変更
Appearance
- Type of content = Message
- Date source = Parent group's Message
Layout
- This element is visible on page load = チェック外す
- Collapse when hidden = チェック
非表示の際に空白ができないようにする - Margins = Top: 8px, Bottom: 8px
Conditional
- Parent group's Message's Creator is not Current User
- This element is visible = チェック

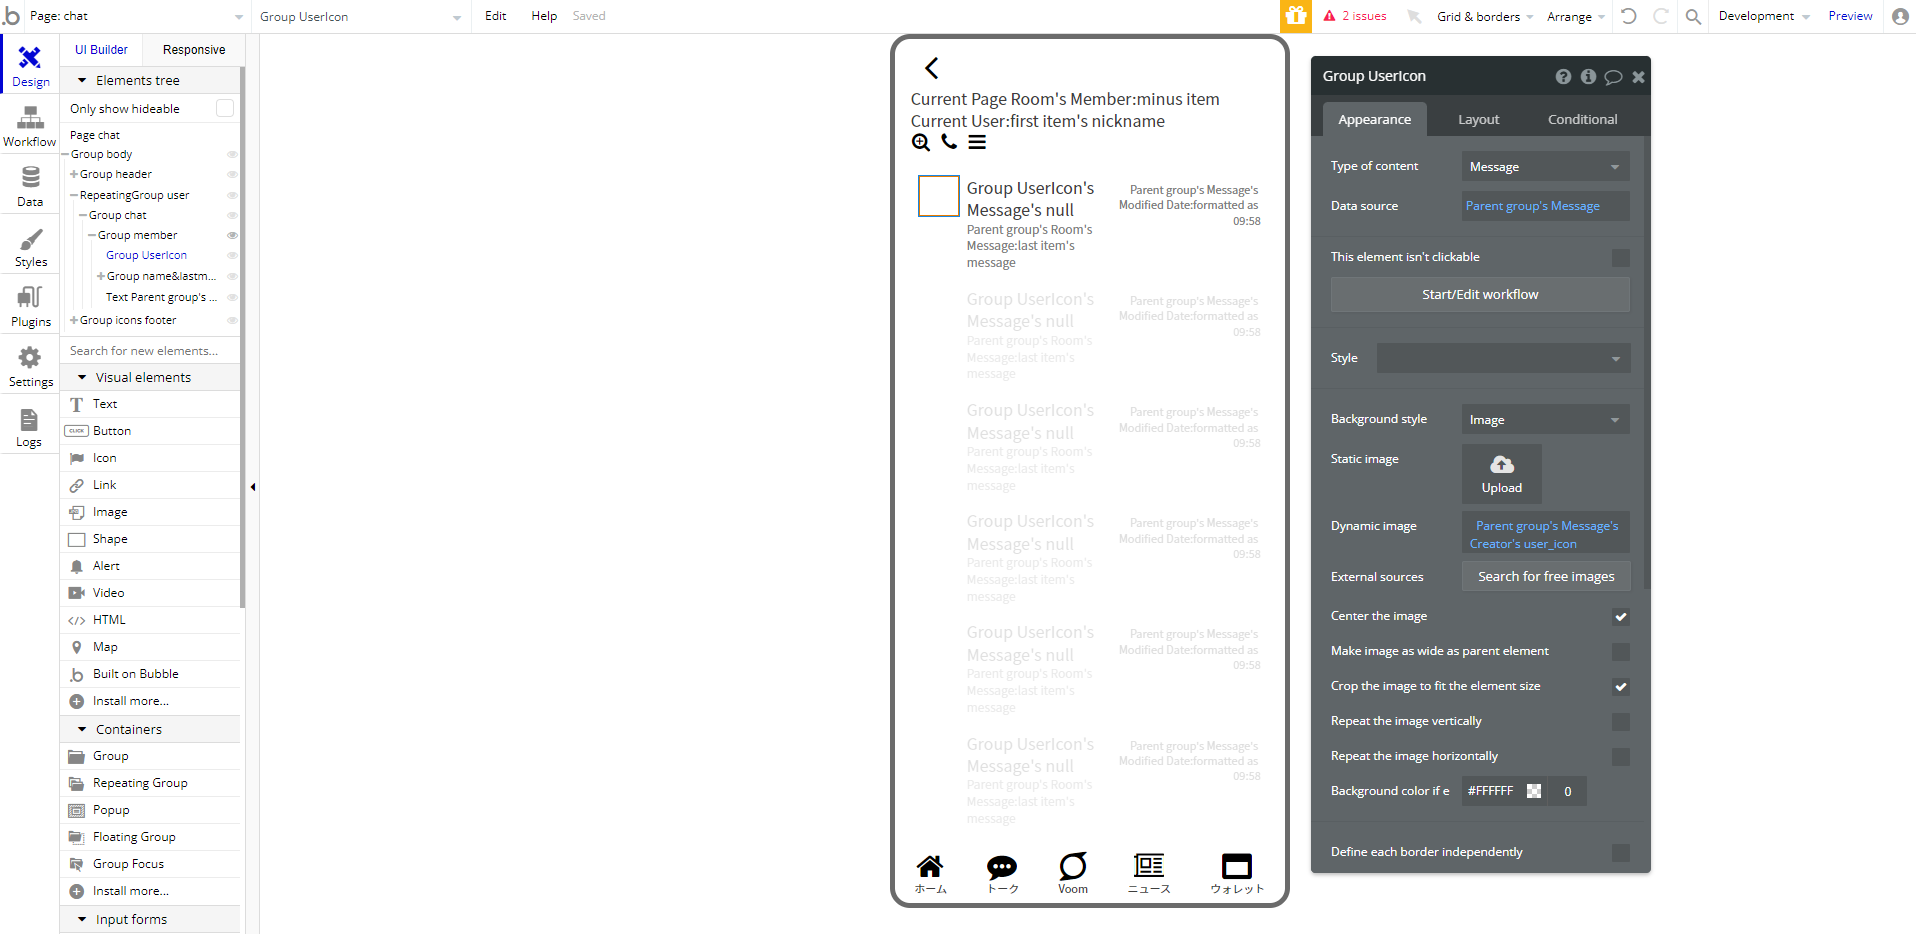
Group UserIconの編集
- Type of content = Message
- Date source = Parent group's Message
- Dynamic image = Parent group's Message's Creator's user_icon
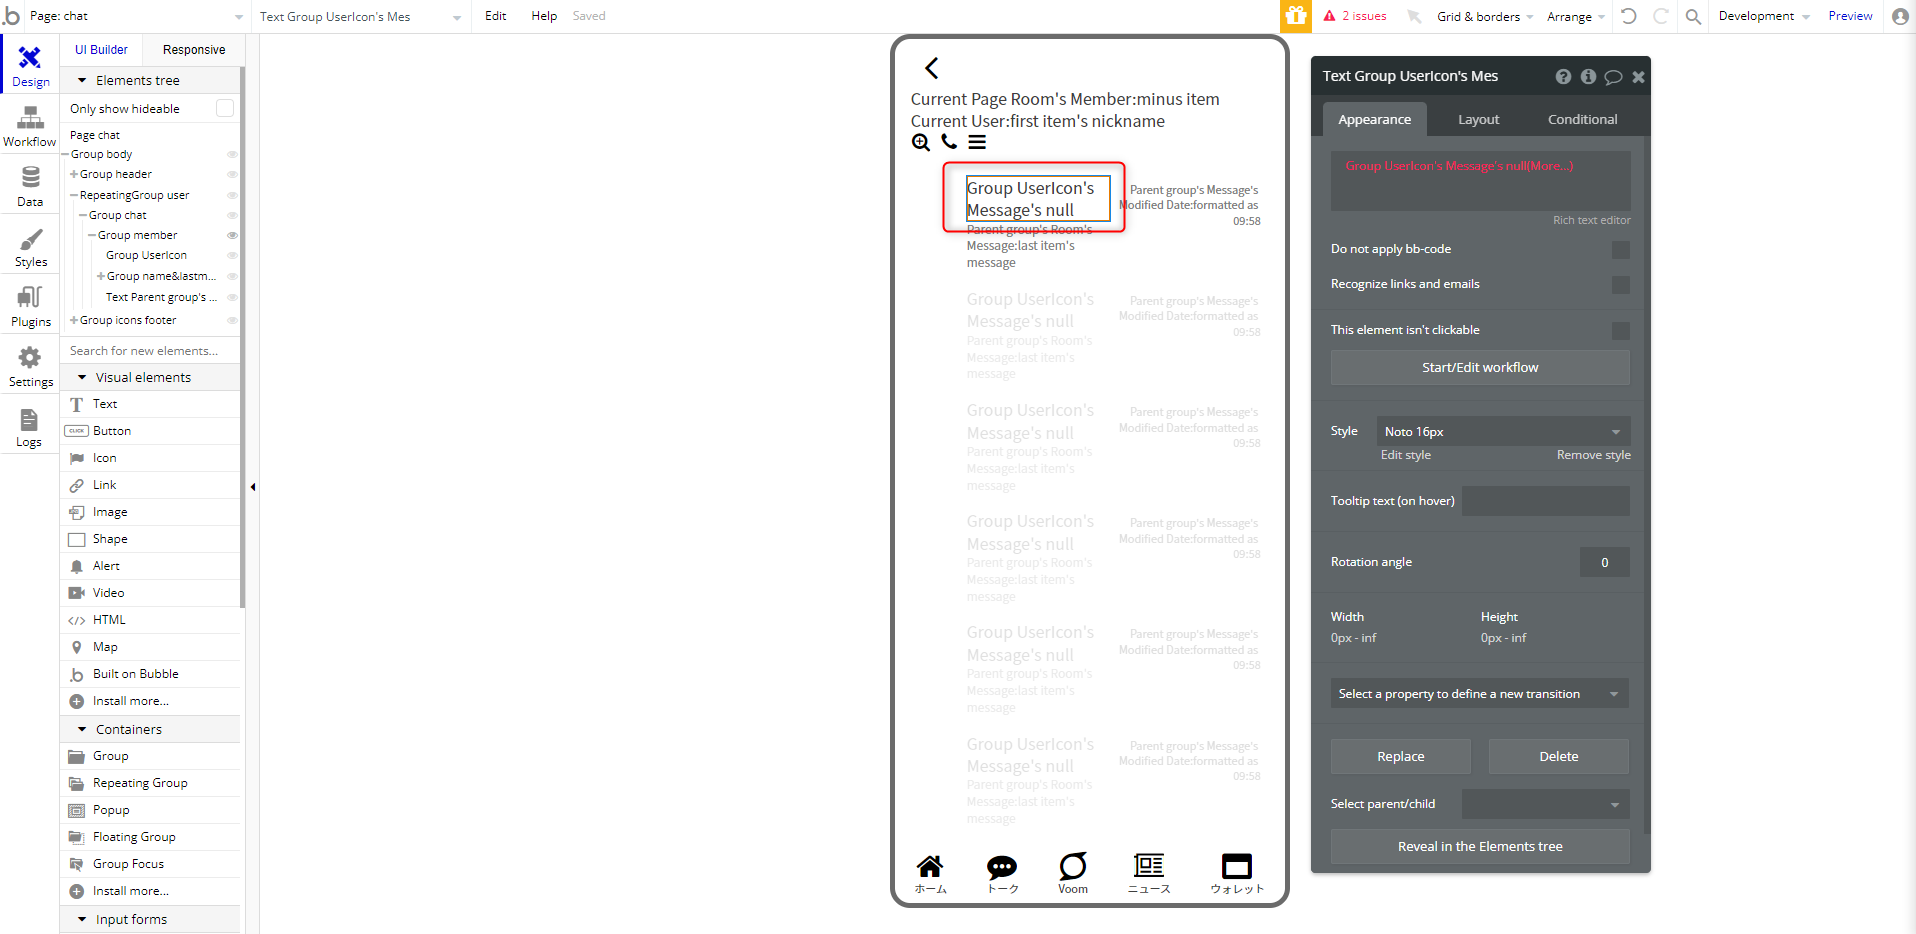
Text Group UserIcon's Message...を削除
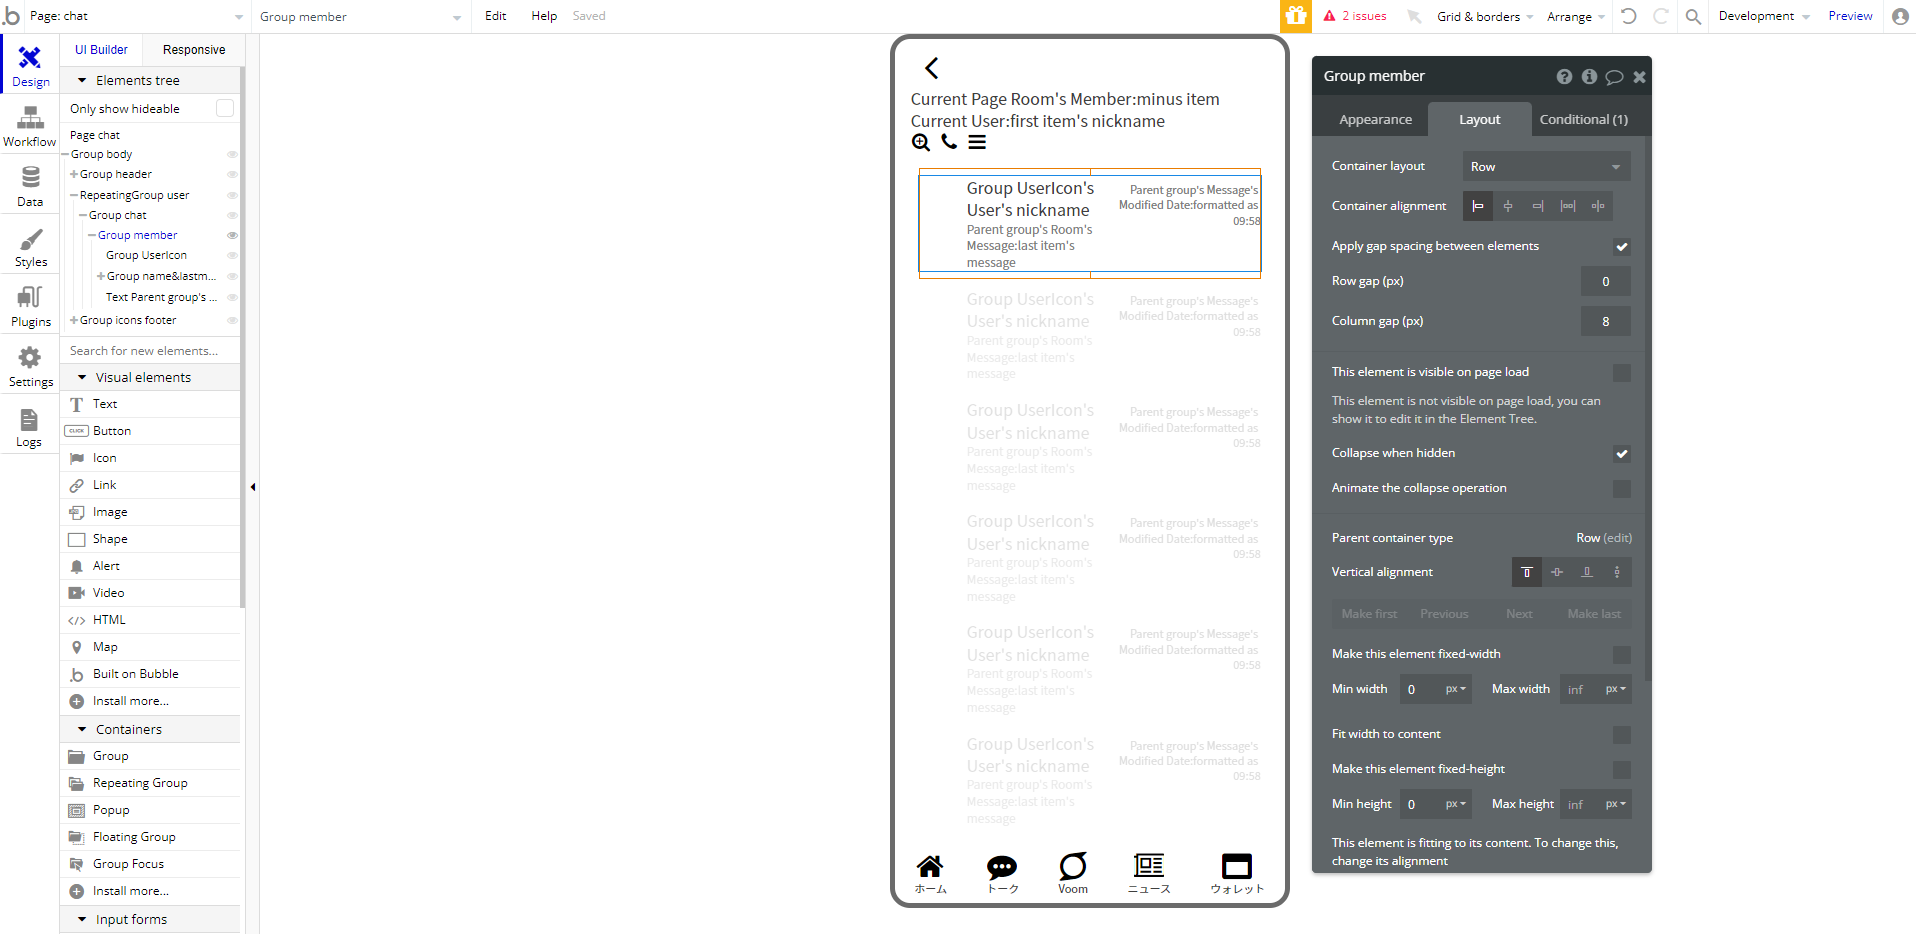
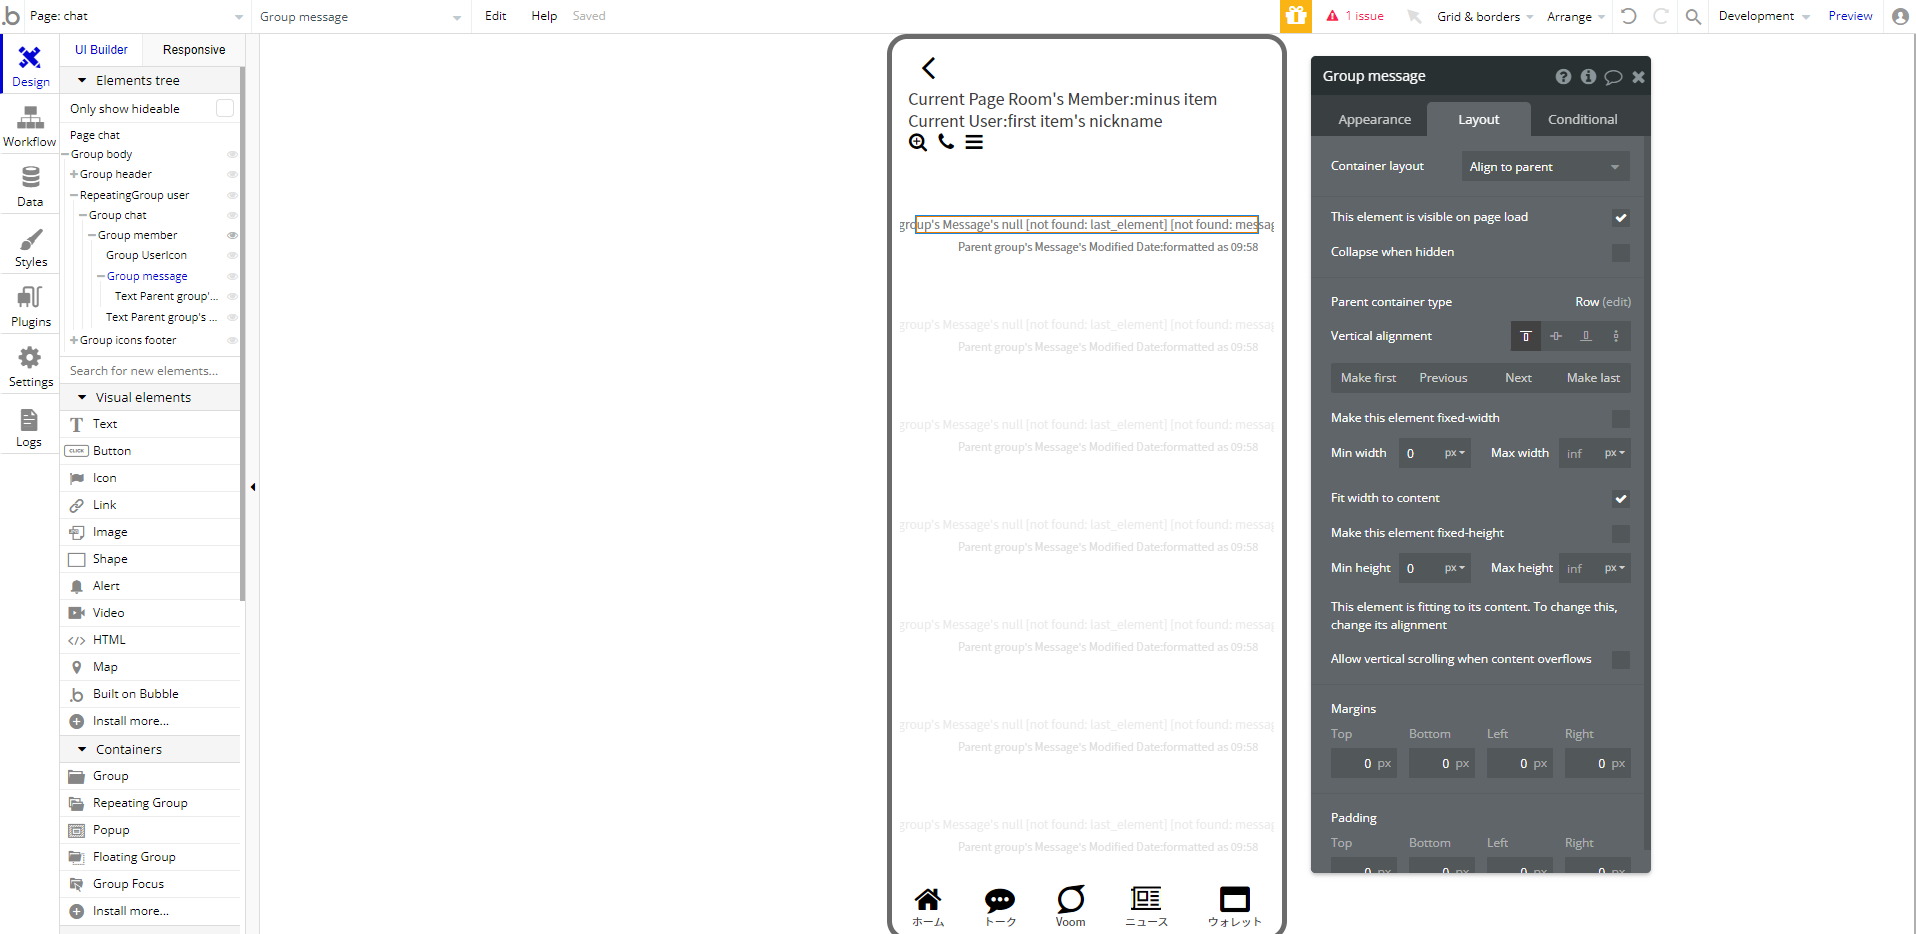
Group name&lastmessageをGroup messageに変更
Appearance
- Type of content = Message
Layout
- Container layout = Align to parent
- Fir width to content = チェック

チャット用吹き出しTextの作成
Text Parent group's Messageを編集していきます。
Appearance
- Parent group's Message's message
- font-size = 16px
- font-color = #000000
- Background style = Flat color
- Color = #FFFFFF
- Defin each border independently = チェック
- Top-right = 20
- Bottom- right = 20
- Bottom-left = 20
右上、右下、左下の角が丸くなり、吹き出し感がでます。 - Padding = V: 6, H: 16
Layout
- This element is visible on page load = チェック外す
- Collapse when hidden = チェック
非表示の際に空白ができないようにする - Margins = Top: 8px, Bottom: 8px
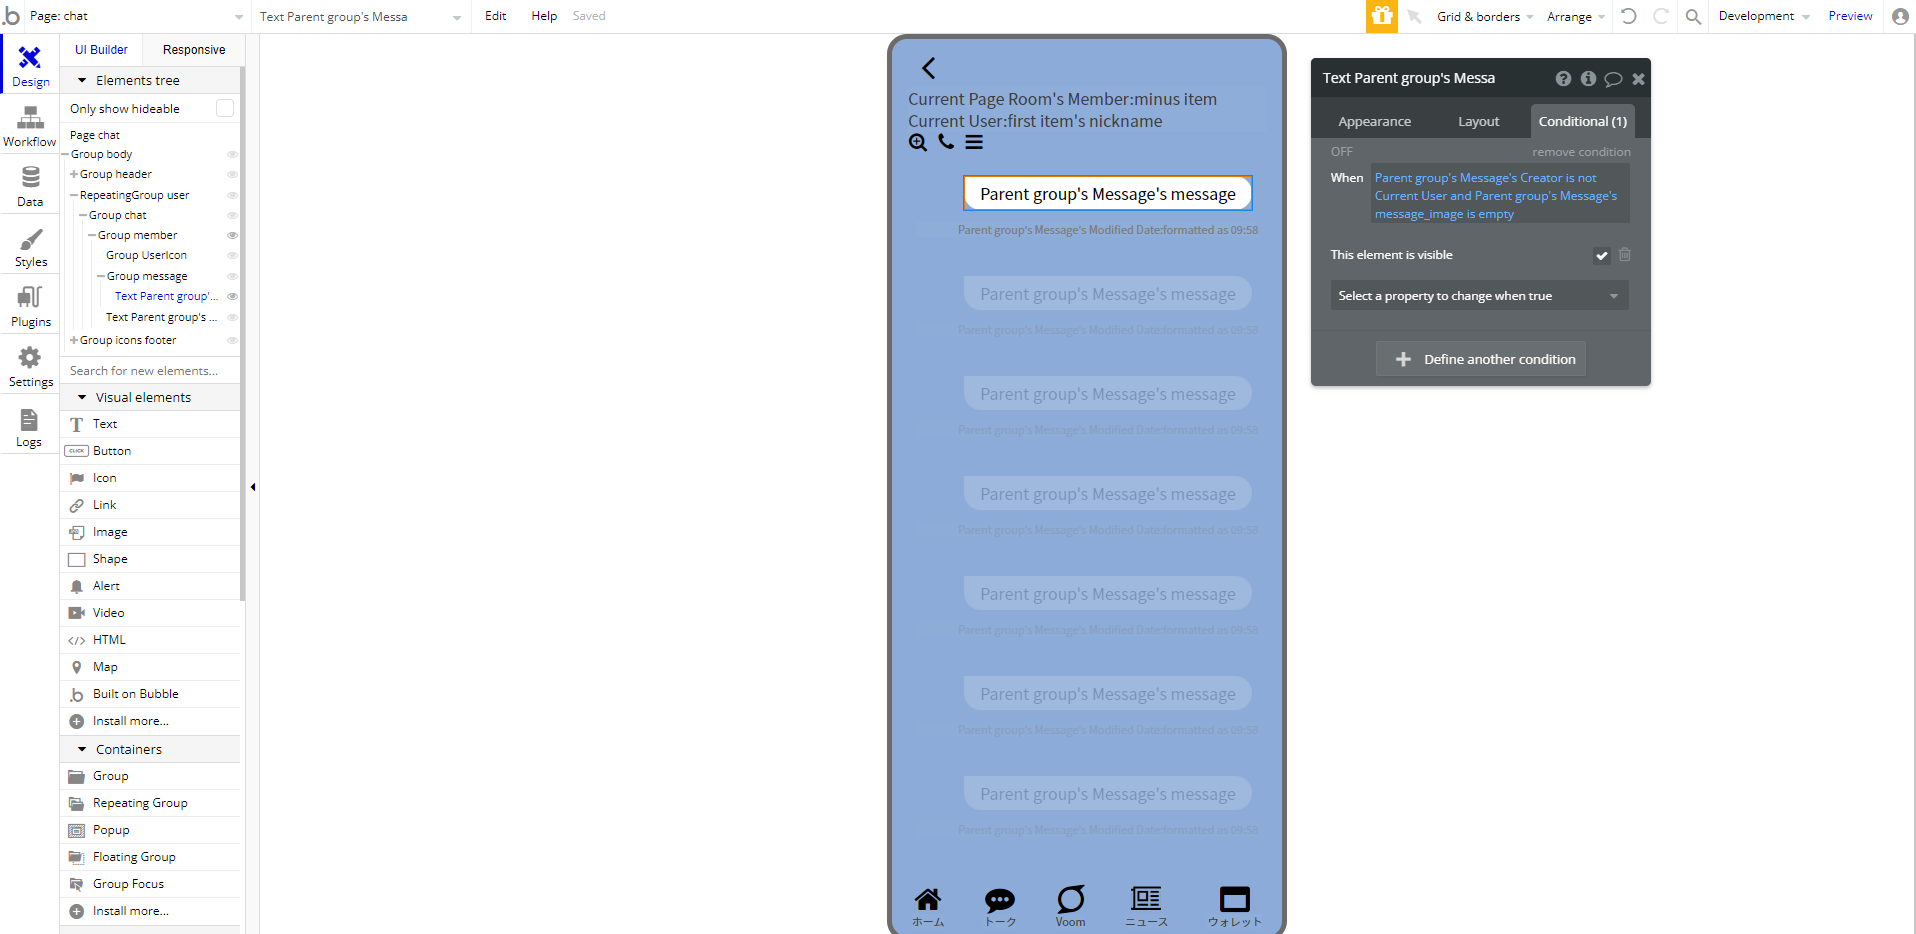
Conditional
- Parent group's Message's Creator is not Current User and Parent group's Message's message_image is empty
メッセージの作成者がログインユーザーでない、且つ画像が投稿されていない場合 - This element is visible = チェック
吹き出しがわかりにくいので、ページ全体の背景色を変更します。
Group bodyのbackground colorを#8CABD8に設定します。

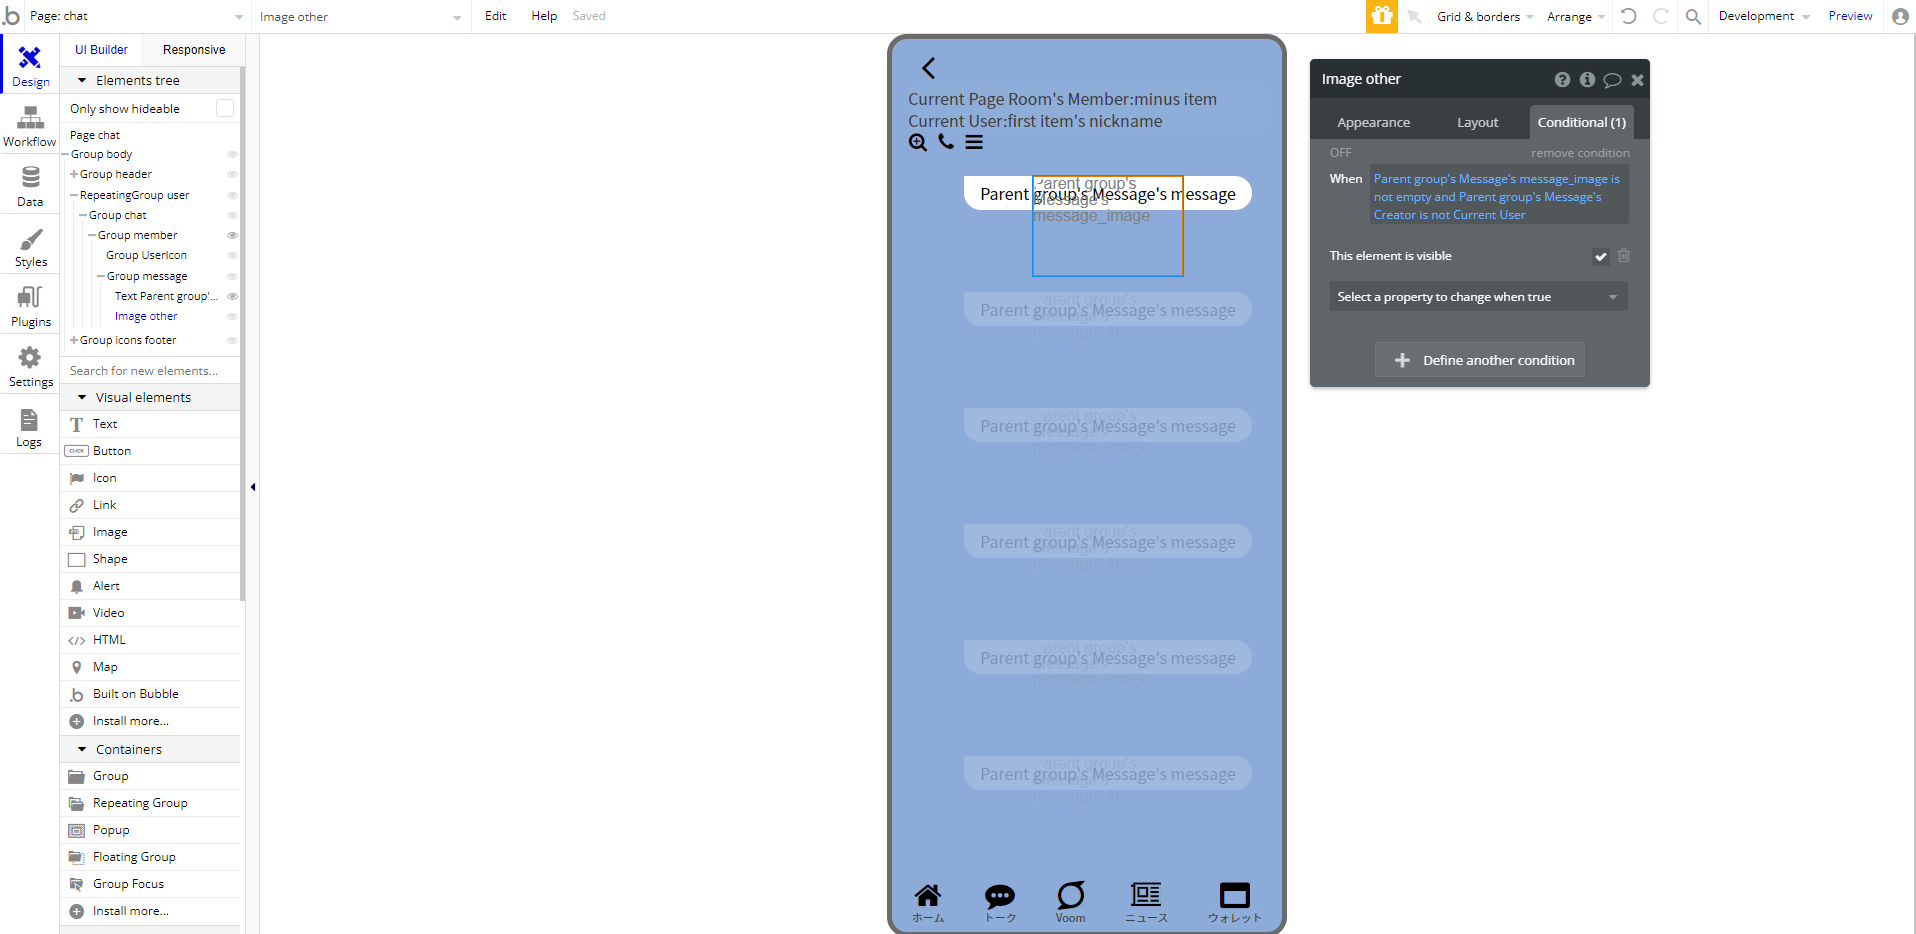
Group message内にElement imageを配置
Text Parent group's Messageは削除しておきます。

Appearance
- Dynamic image = Parent group's Message's messageImage
- Roundness = 20
Layout
- Parent container type = ↑
ストラックアウトでいうと2番 - Width = 150px
- Height = 100px
Conditional
- Parent group's Message's message_image is not empty and Parent group's Message's Creator is not Current User
先ほど作成したテキストの逆の意味です。 - This element is visible = チェック


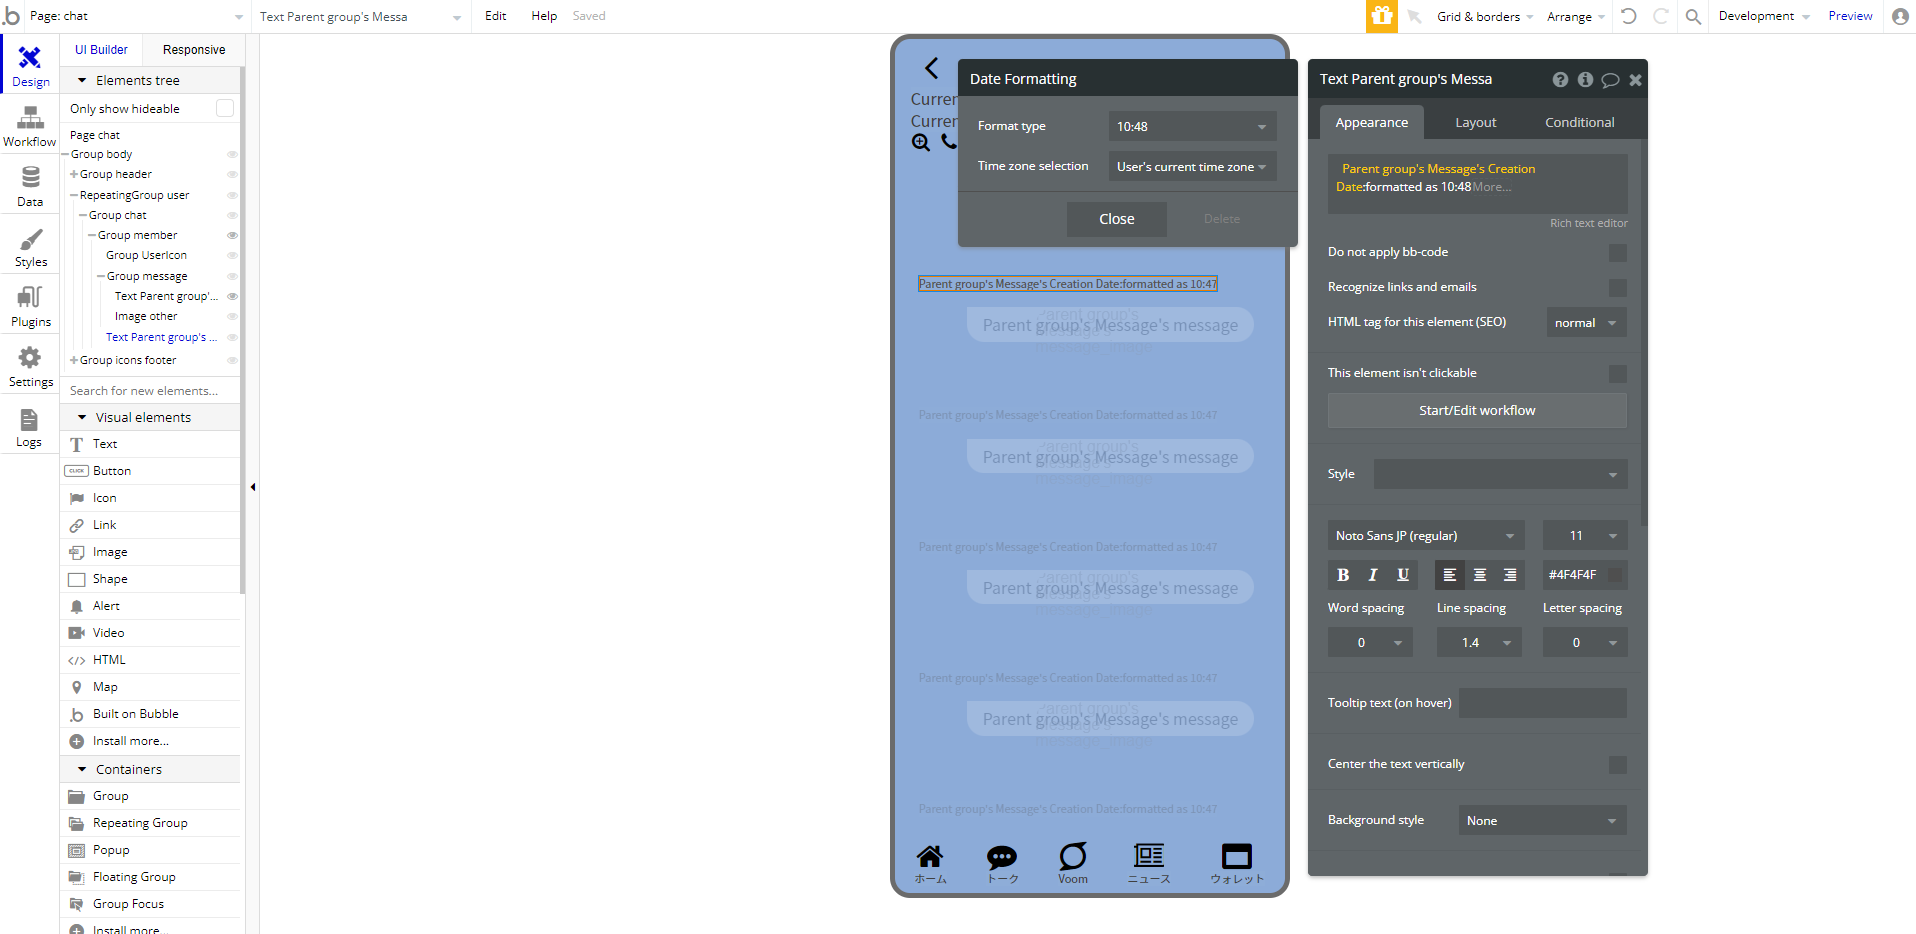
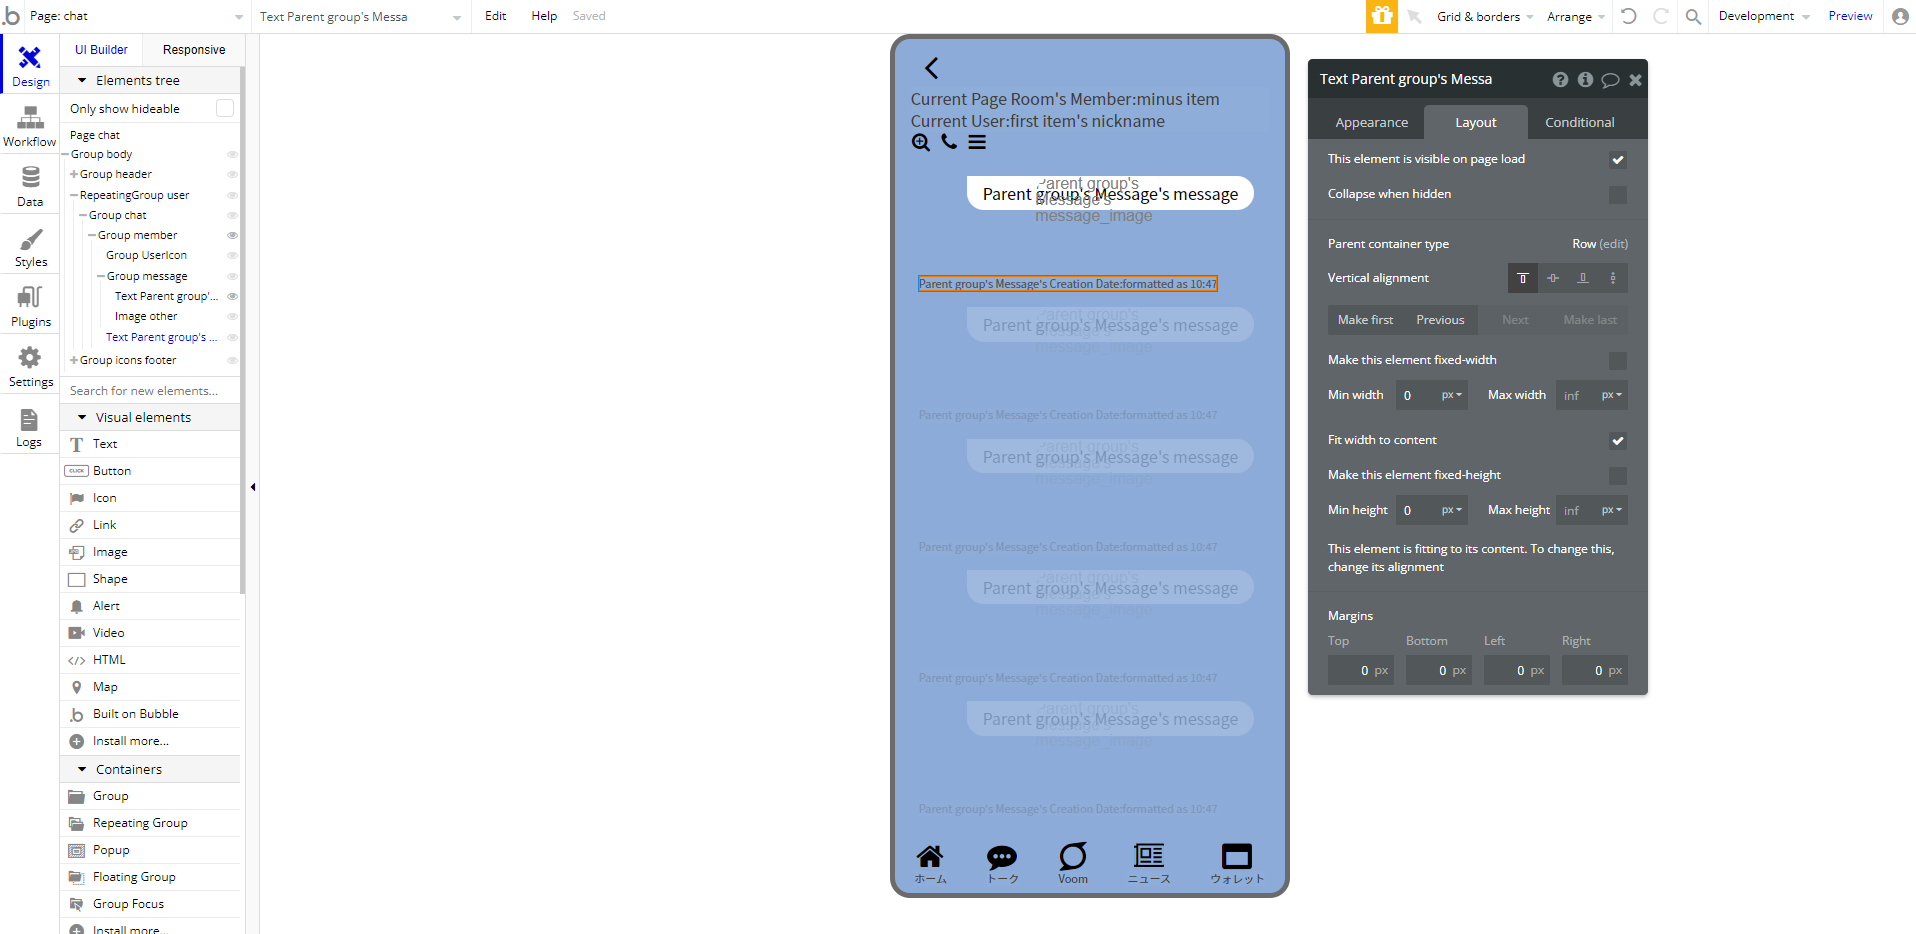
投稿時間を表示するテキストをGroup member内に配置
Appearance
- Parent group's Message's Creation Date:formatted as 10:43
- font-size = 11px
- font-color = #4F4F4F
Layout
- Make this element fixed-width = チェック外す
- Min width = 0px
- Fit width to content = チェック
- Min height = 0px
これでトーク相手の吹き出し設定は完了です。
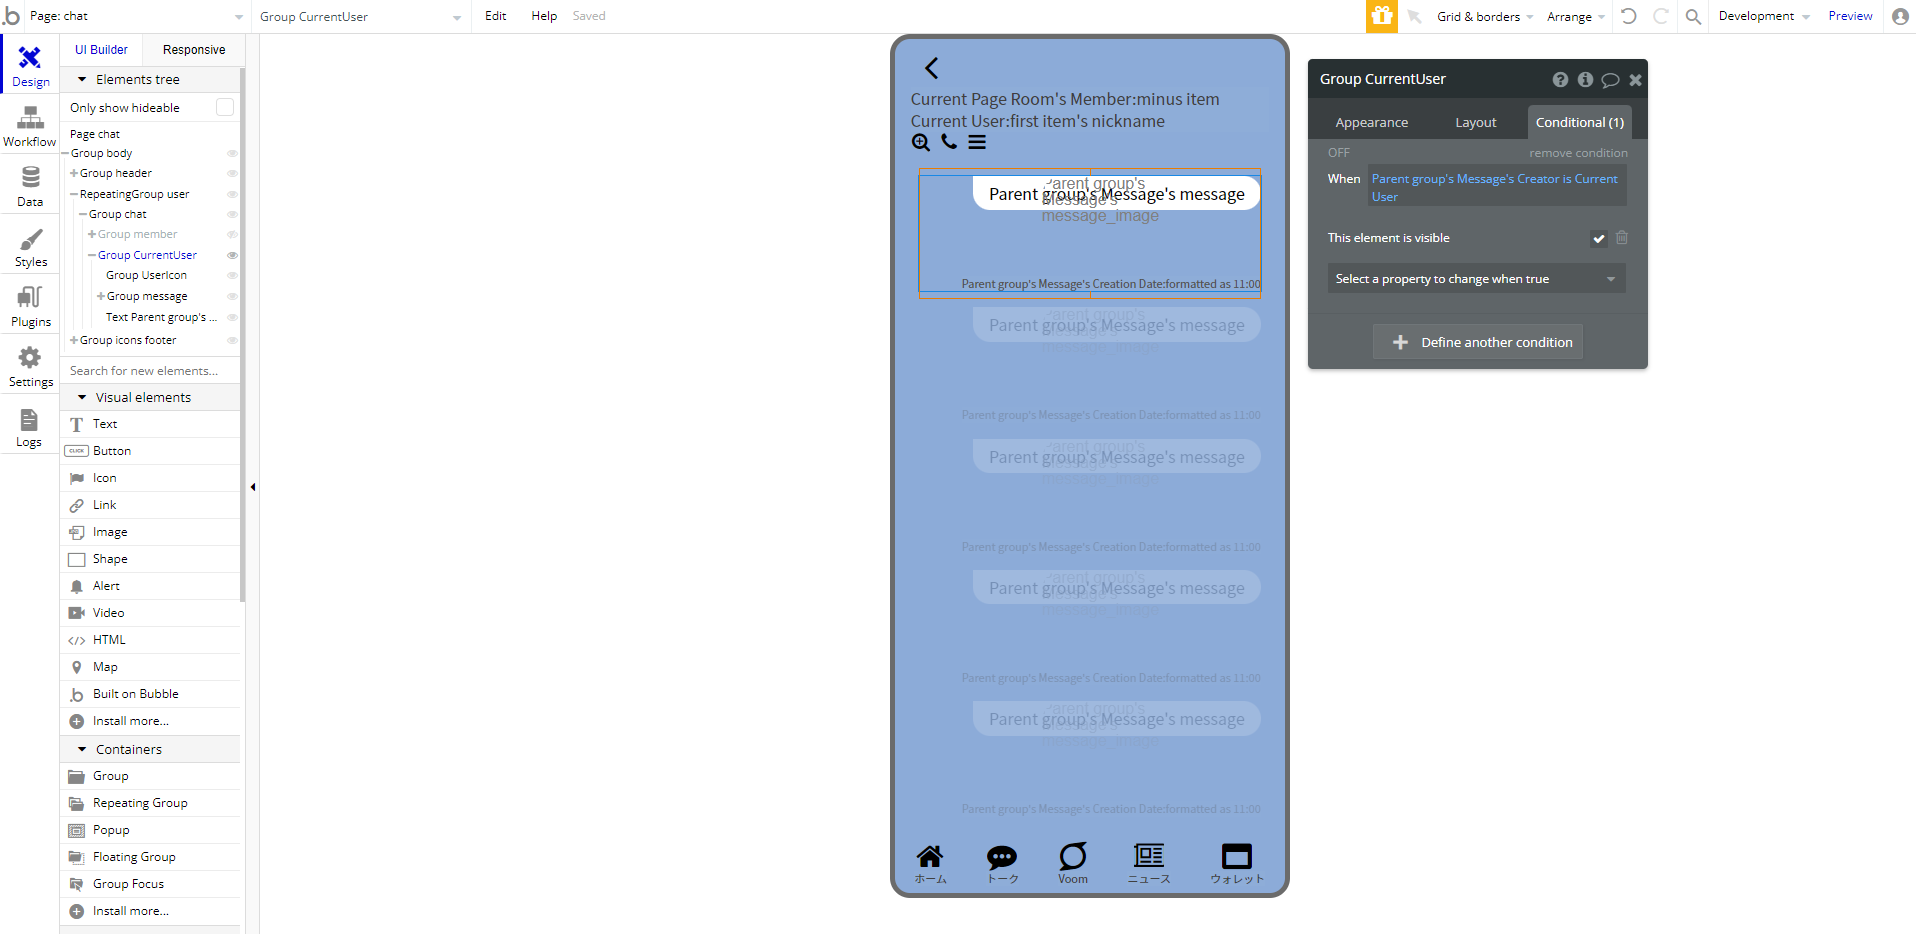
Group memberをコピーしてGroup CurrentUserを作成
Elements tree上でコピペを行うと便利です。
Group CurrentUserの編集
Layout
- Container alignment = Right-aligned
Conditional
- Parent group's Message's Creator is Current User
メッセージ作成者がログインしているユーザーの場合 - This element is visible = チェック

Elementsの位置調整
現状:アイコン>メッセージ>作成時刻
変更:作成時刻>メッセージ>アイコン
PreviousやNextを使うと便利です。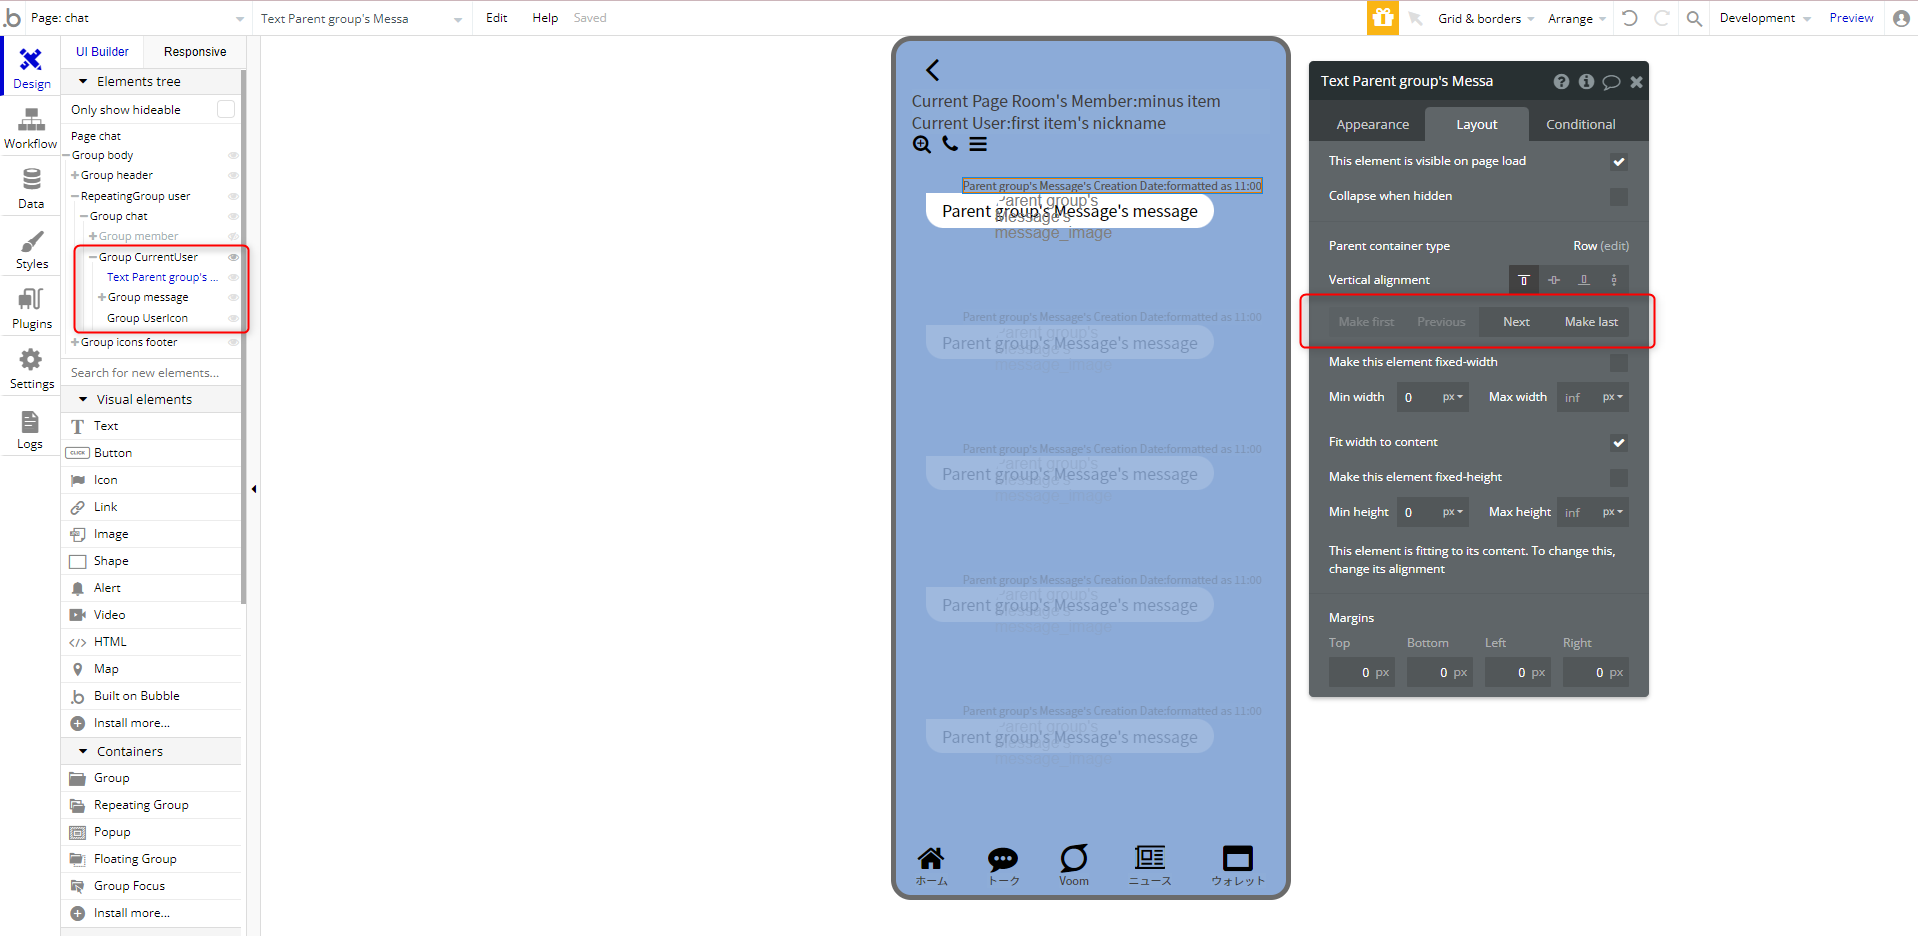
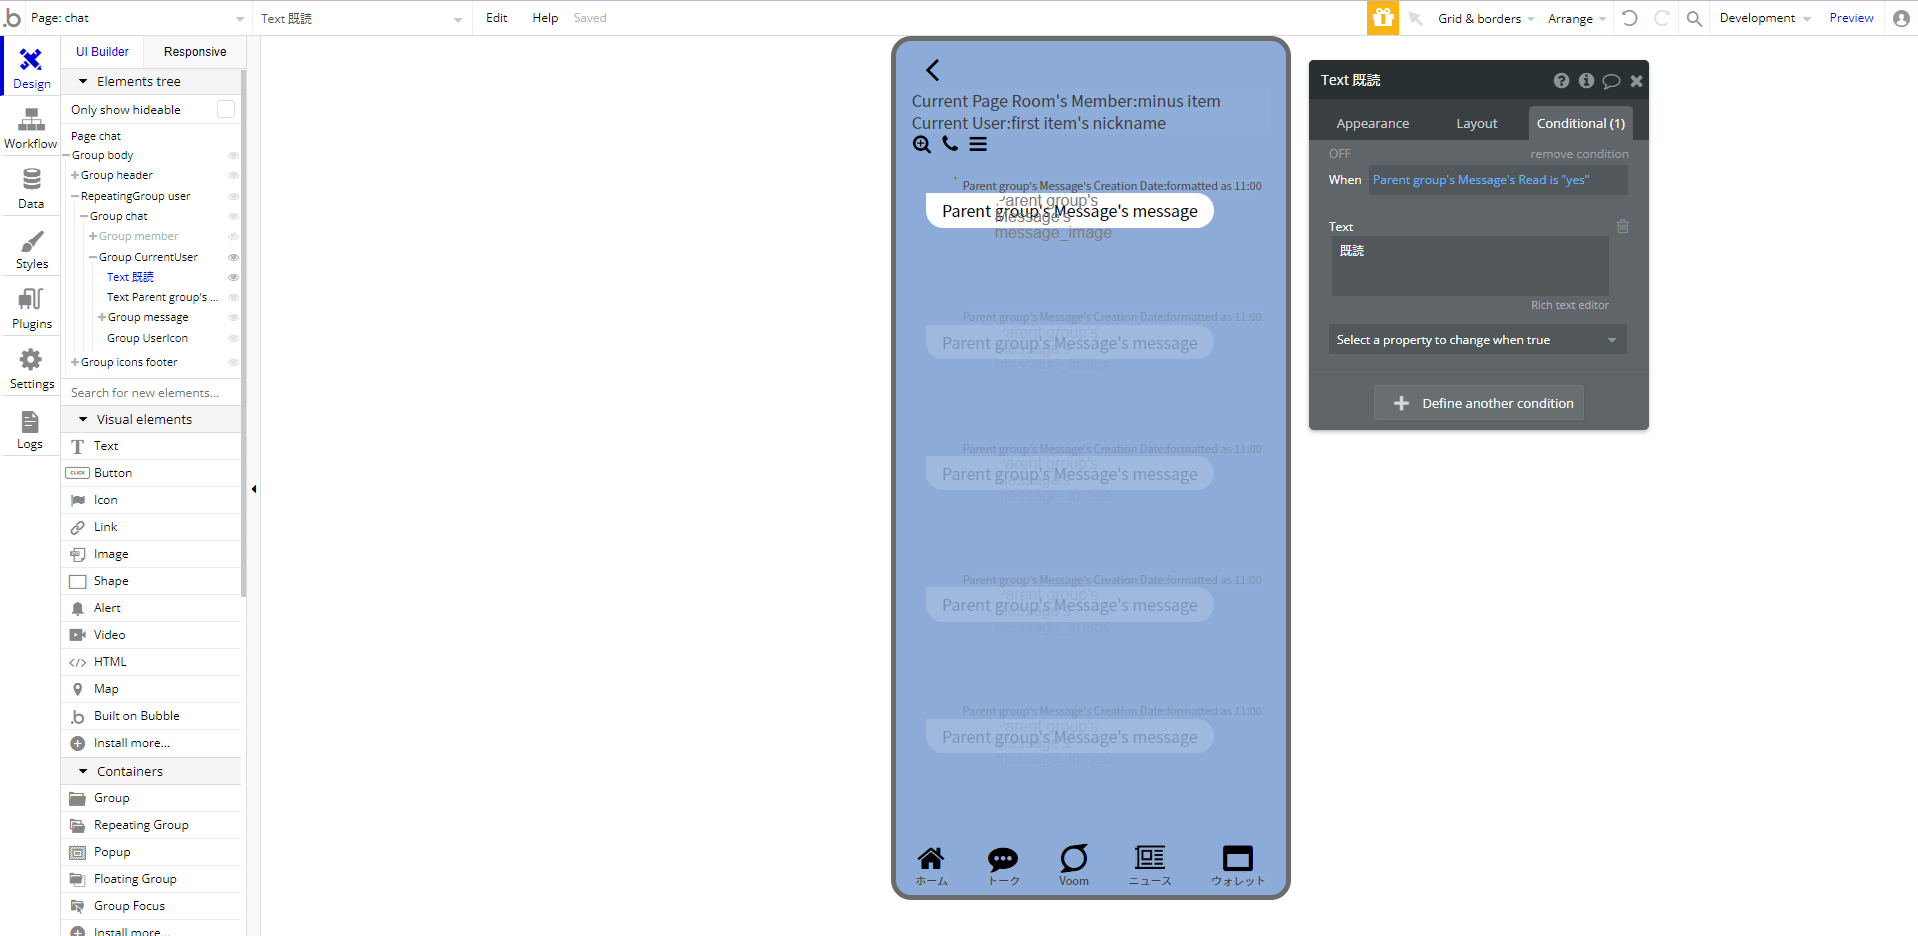
Group CurrentUser内に既読用テキストの配置
Appearance
- 表示文章無し(空白)
- font-size = 11px
- font-color = #4F4F4F
Layout
- This element is visible on page load = チェック外す
- Collapse when hidden = チェック
- Make this element fixed-width = チェック外す
- Min width = 0px
- Fit width to content = チェック
- Min height = 0px
Conditional
- Parent group's Message's Read is "yes"
- text = 既読
- This element is visible = チェック
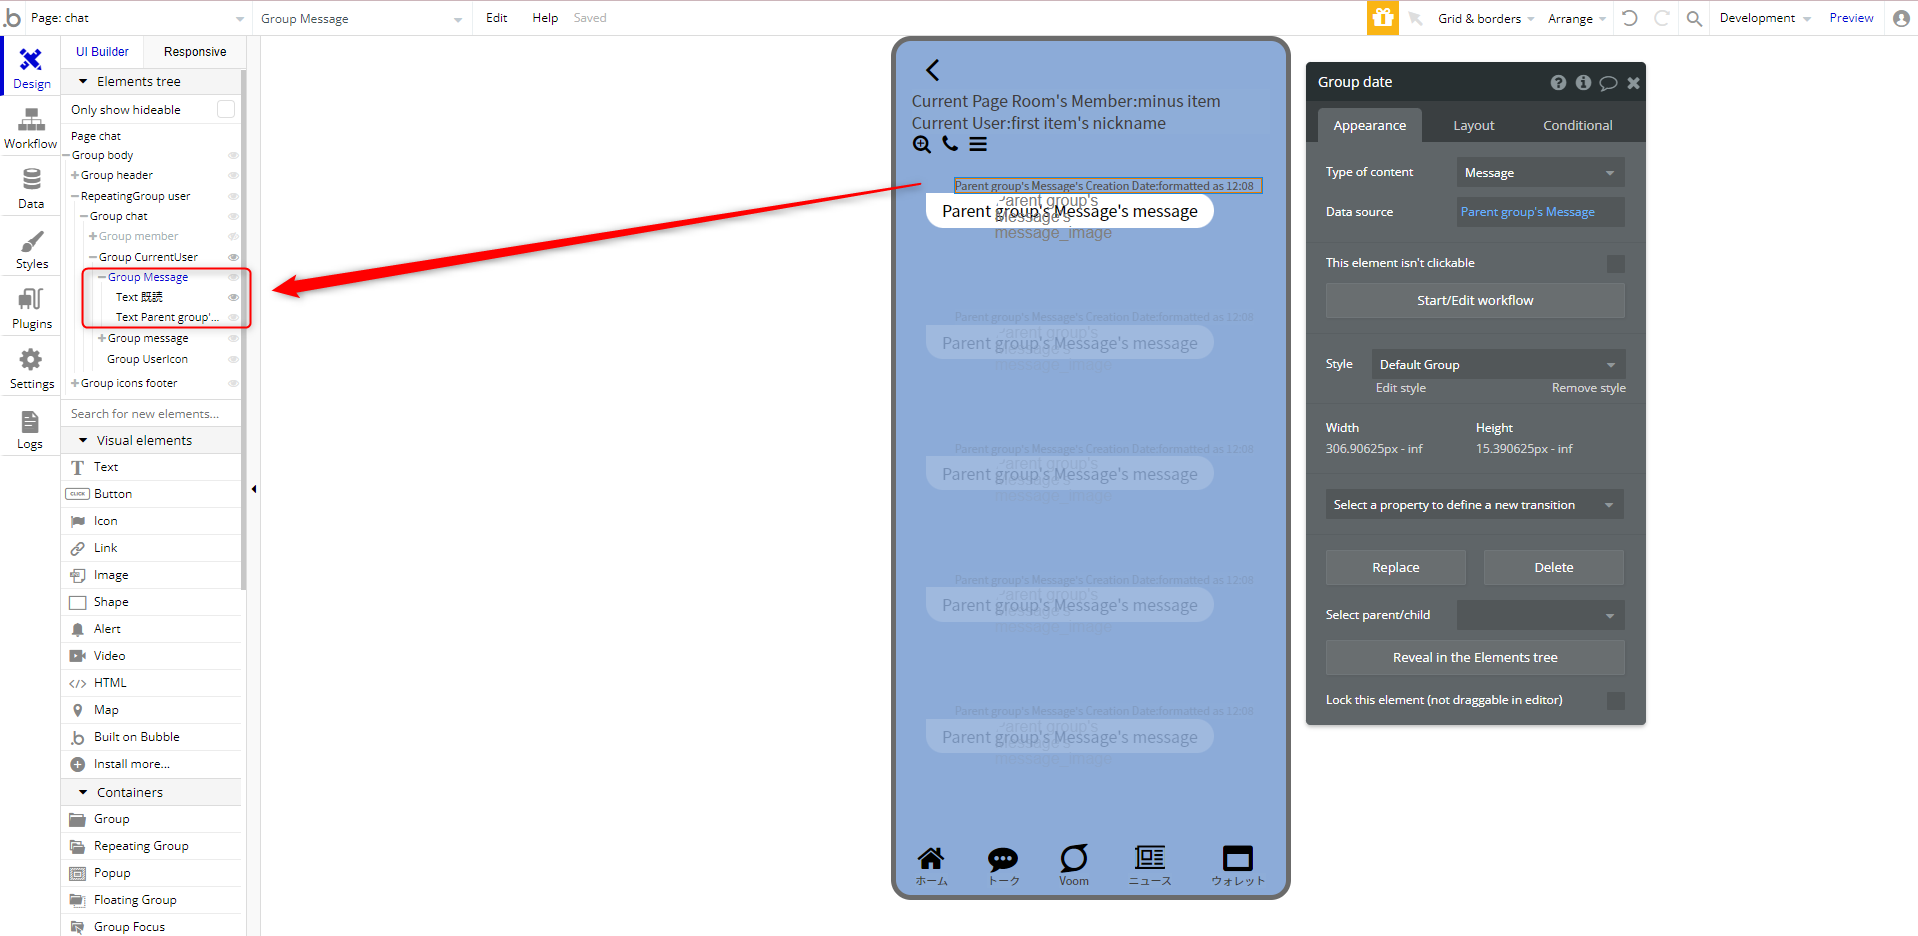
MessageテーブルのReadがyesになった場合、既読というテキストが表示されるようになりました。


既読と作成日は縦並びにしたいので、Group化してRowに設定します。
チャット用の吹き出しを背景色:緑、文字色:白に変更します。
Appearance
- font-color = #FFFFFF
- Background color = #07B53B
- Border style Top-left = 20
- Border style Top-right = 0
Conditional
- Parent group's Message's Creator is Current User and Parent group's Message's message_image is empty
is not を isに変更すればOKです。

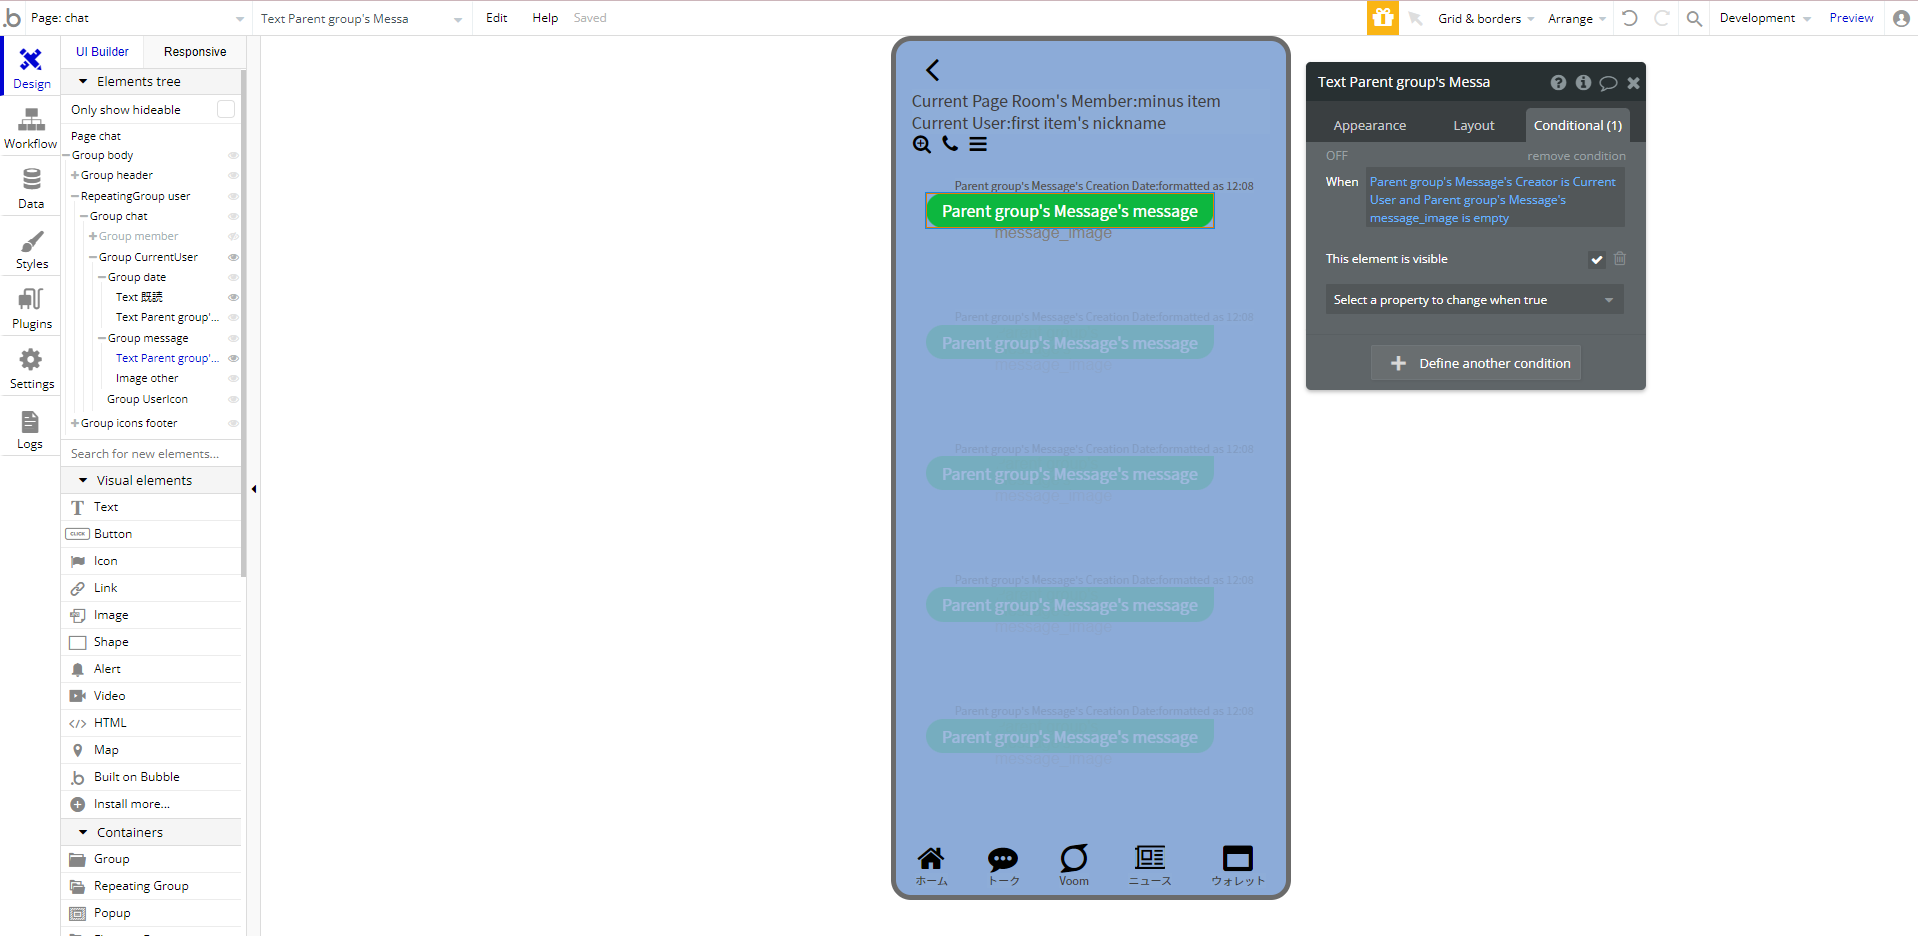
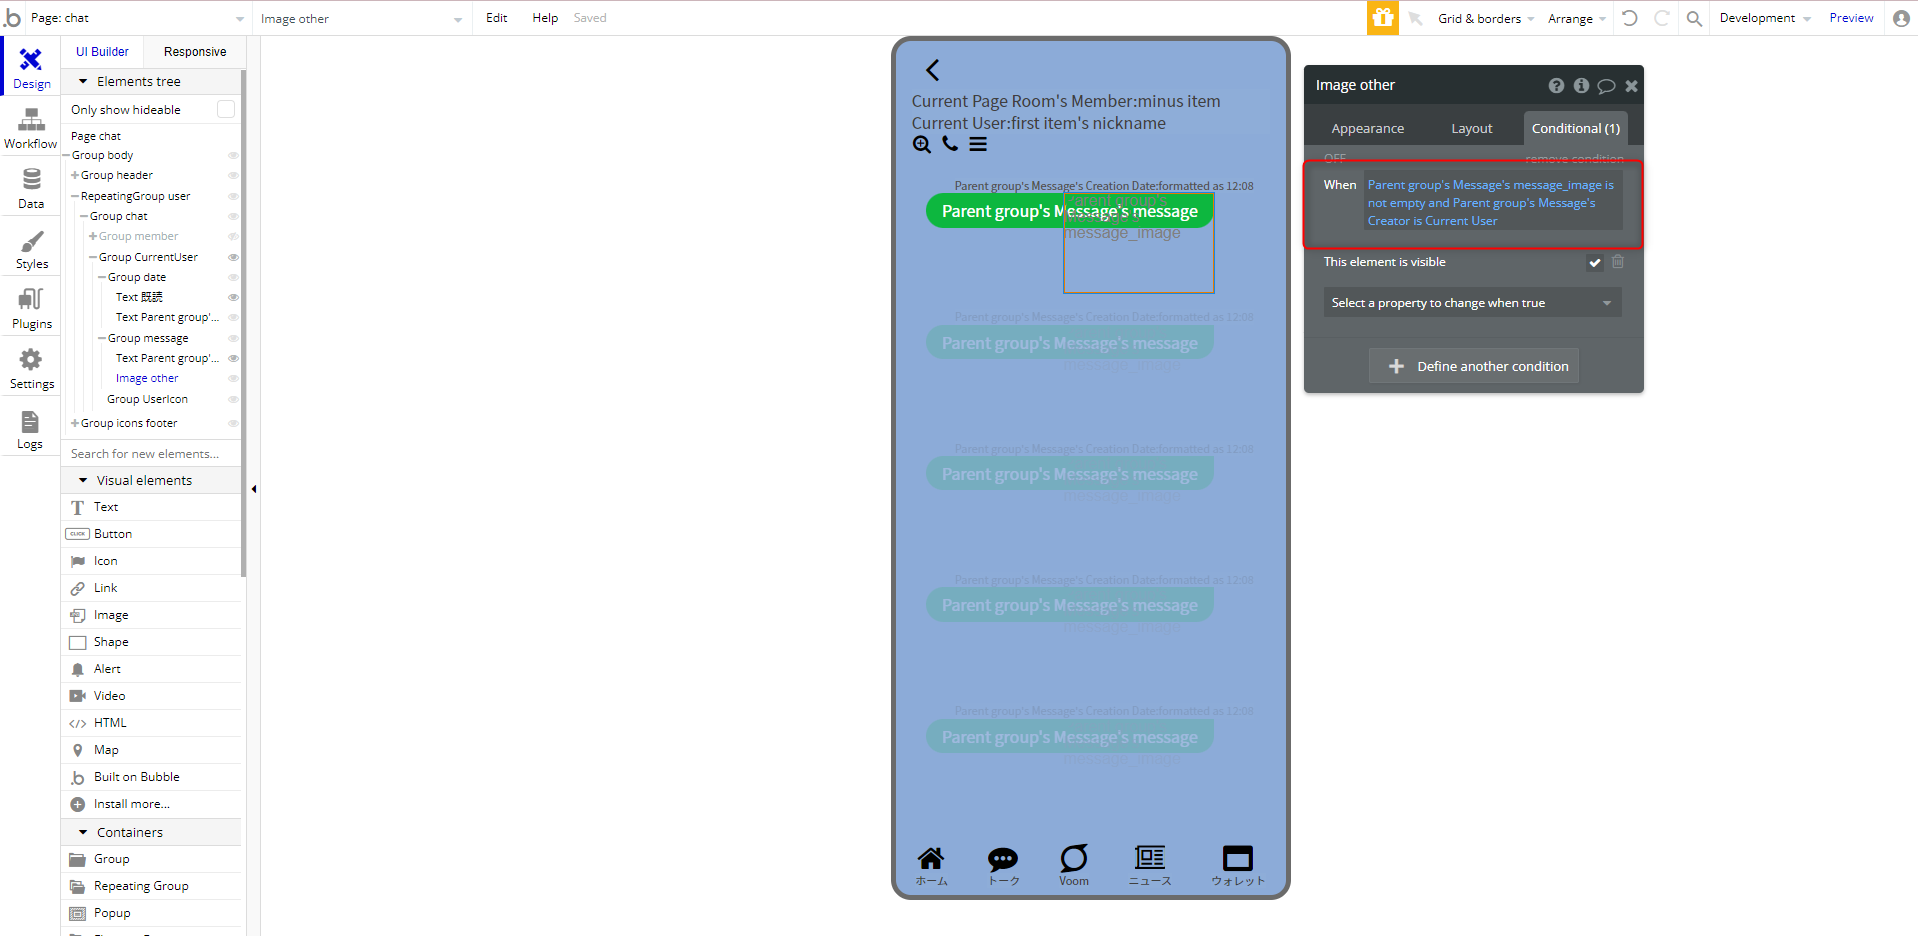
Image other修正
Conditionalを先ほどと同じでis not -> isに変更
表示設定は以上で完了となります。
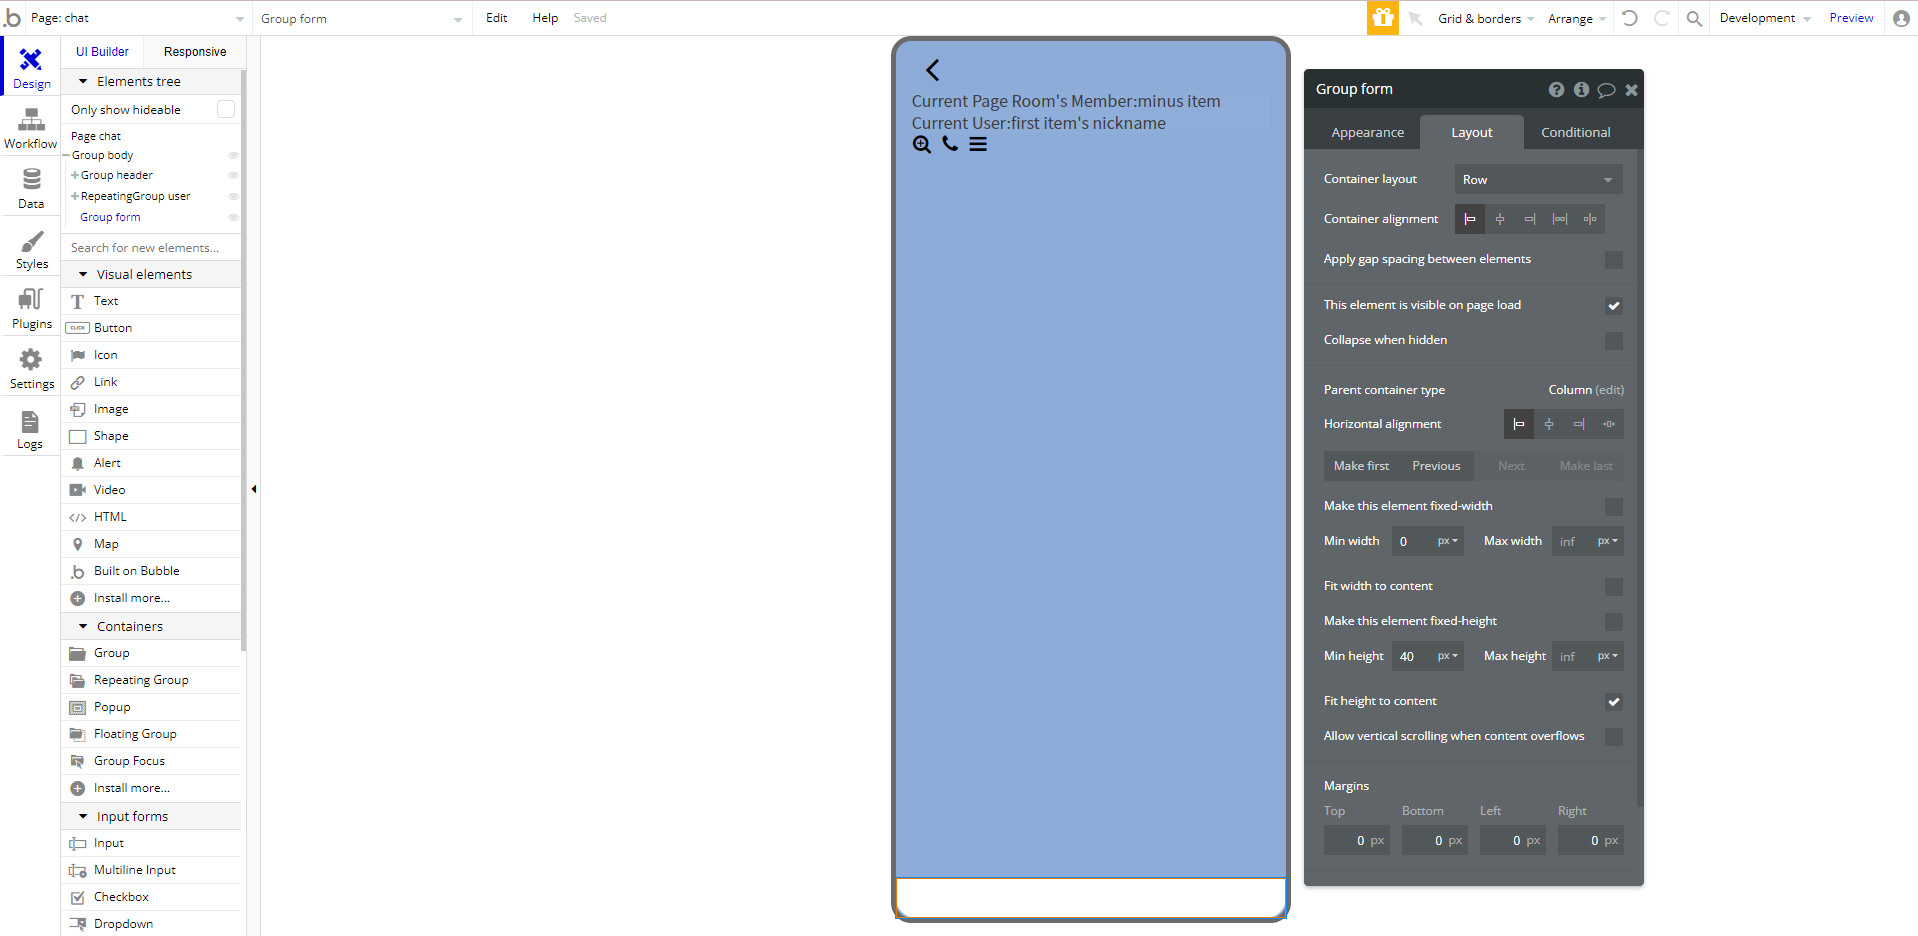
Group Formの作成
Groop icons footerは削除します。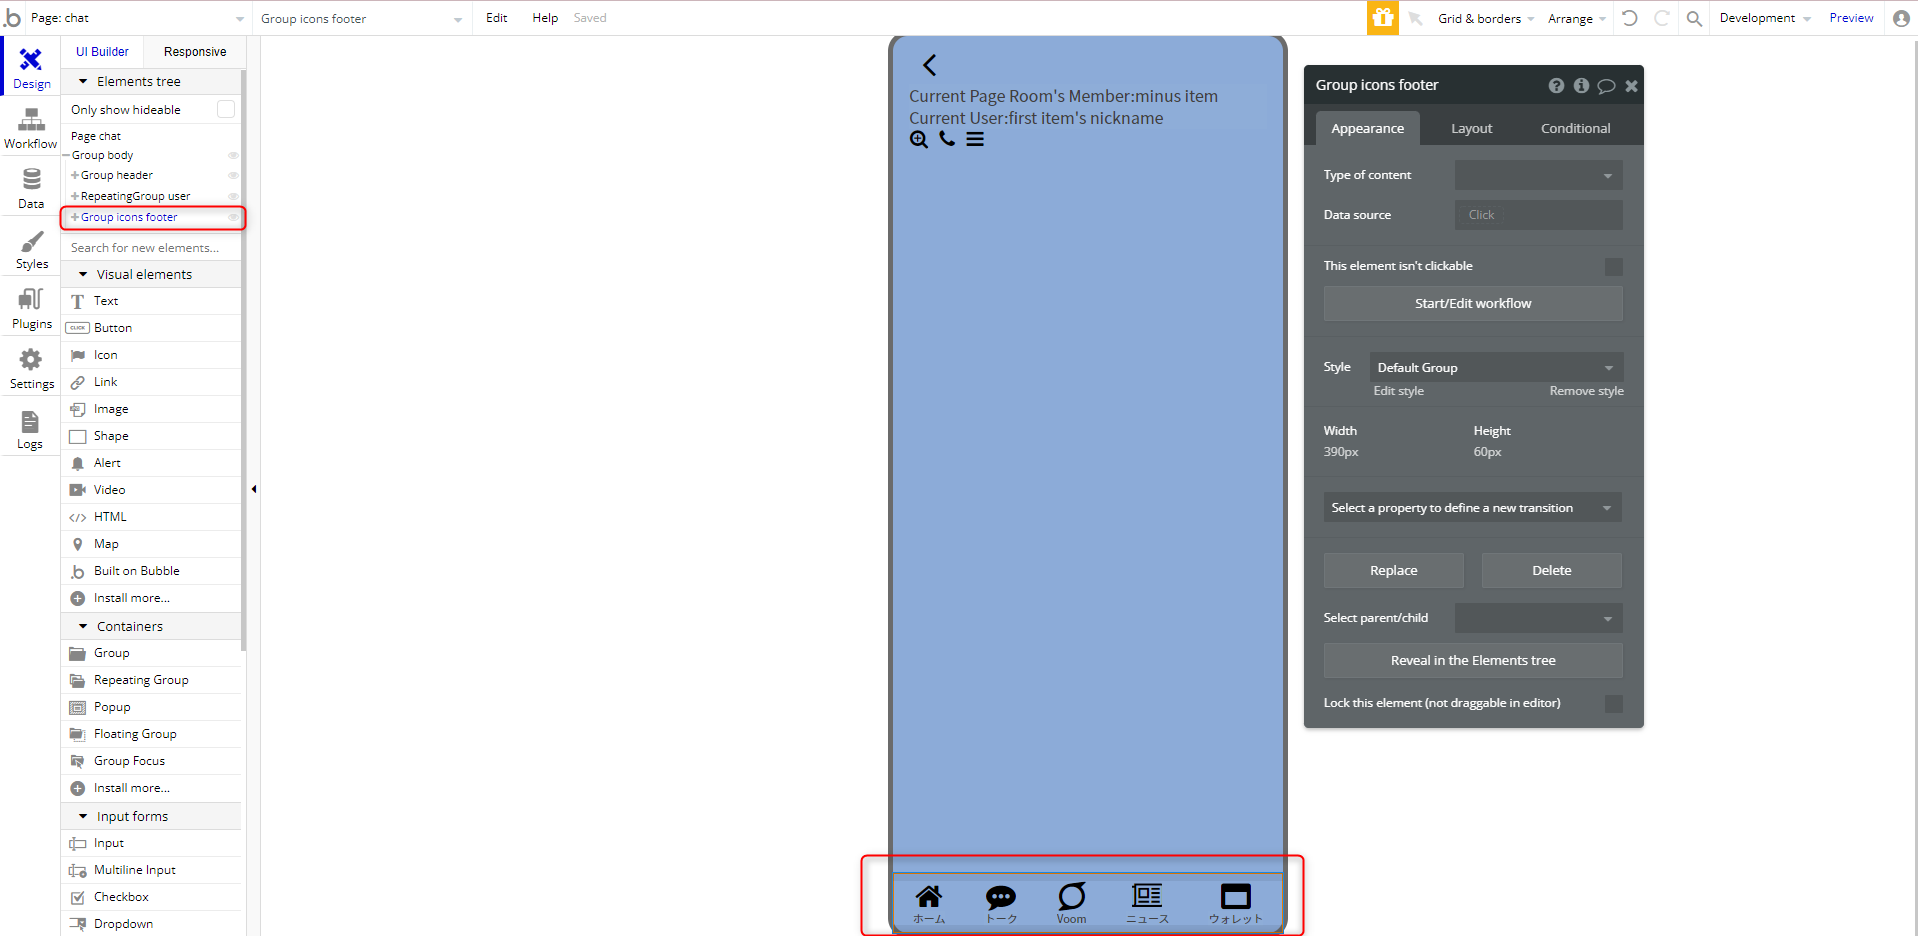
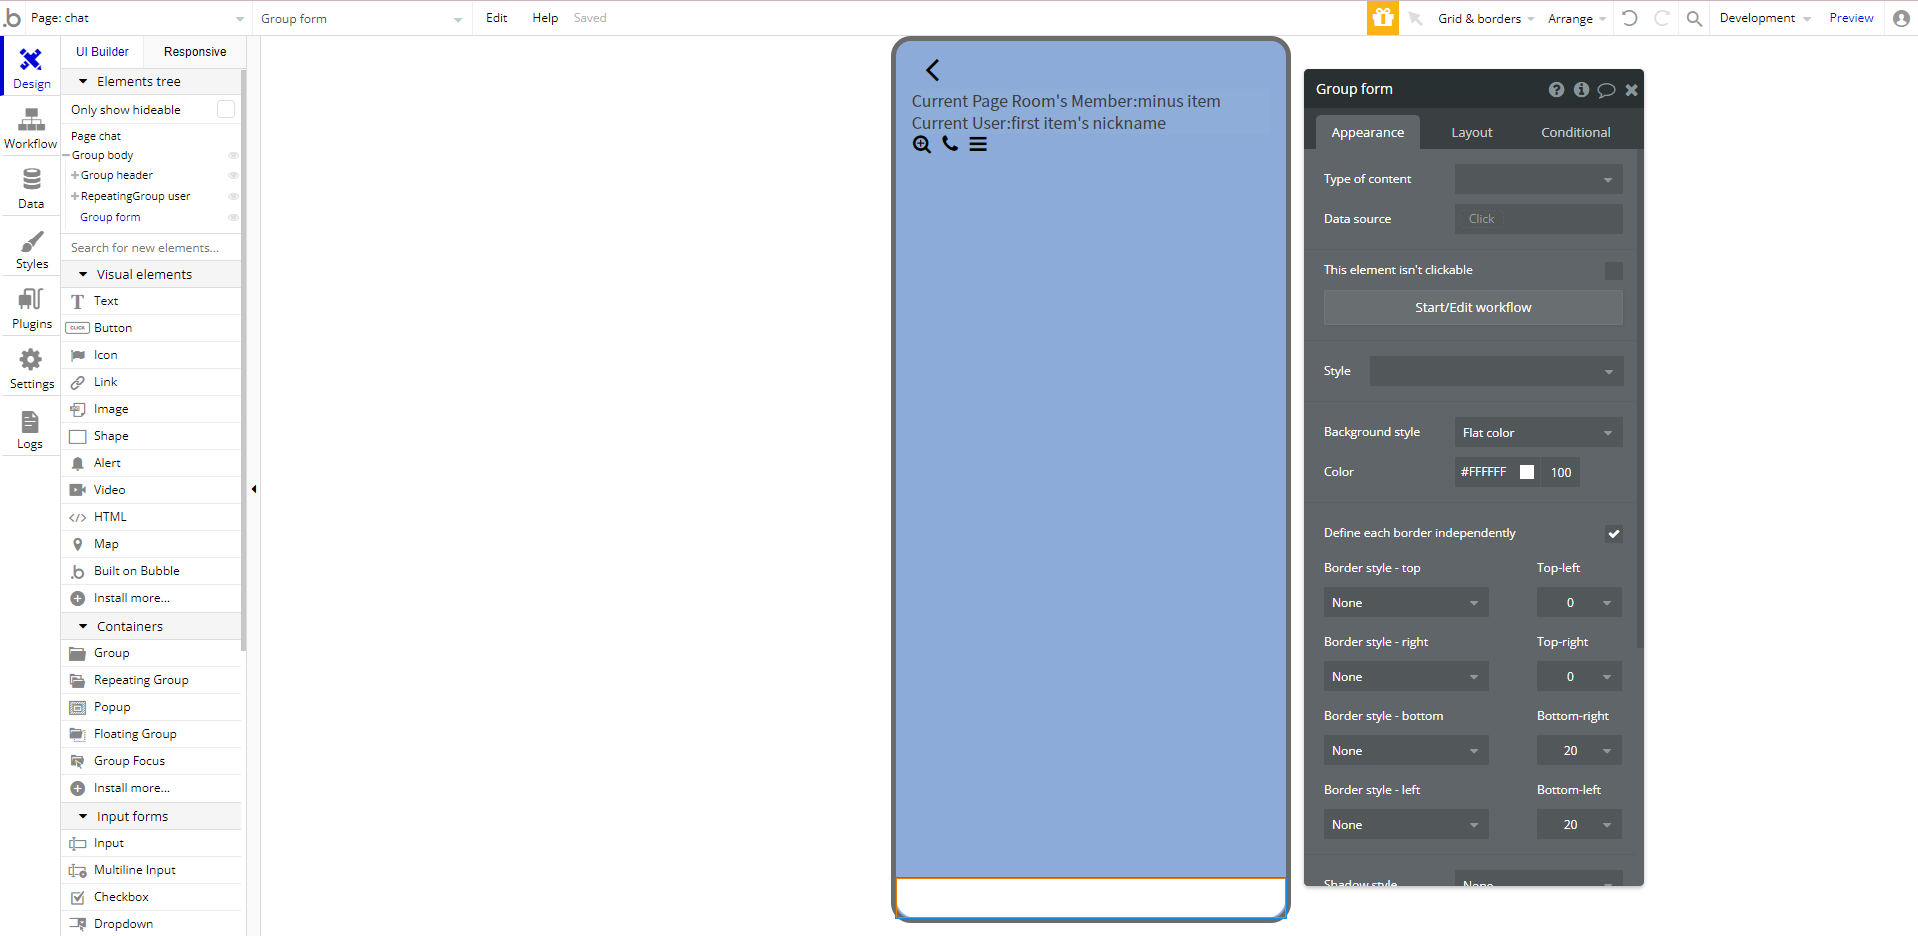
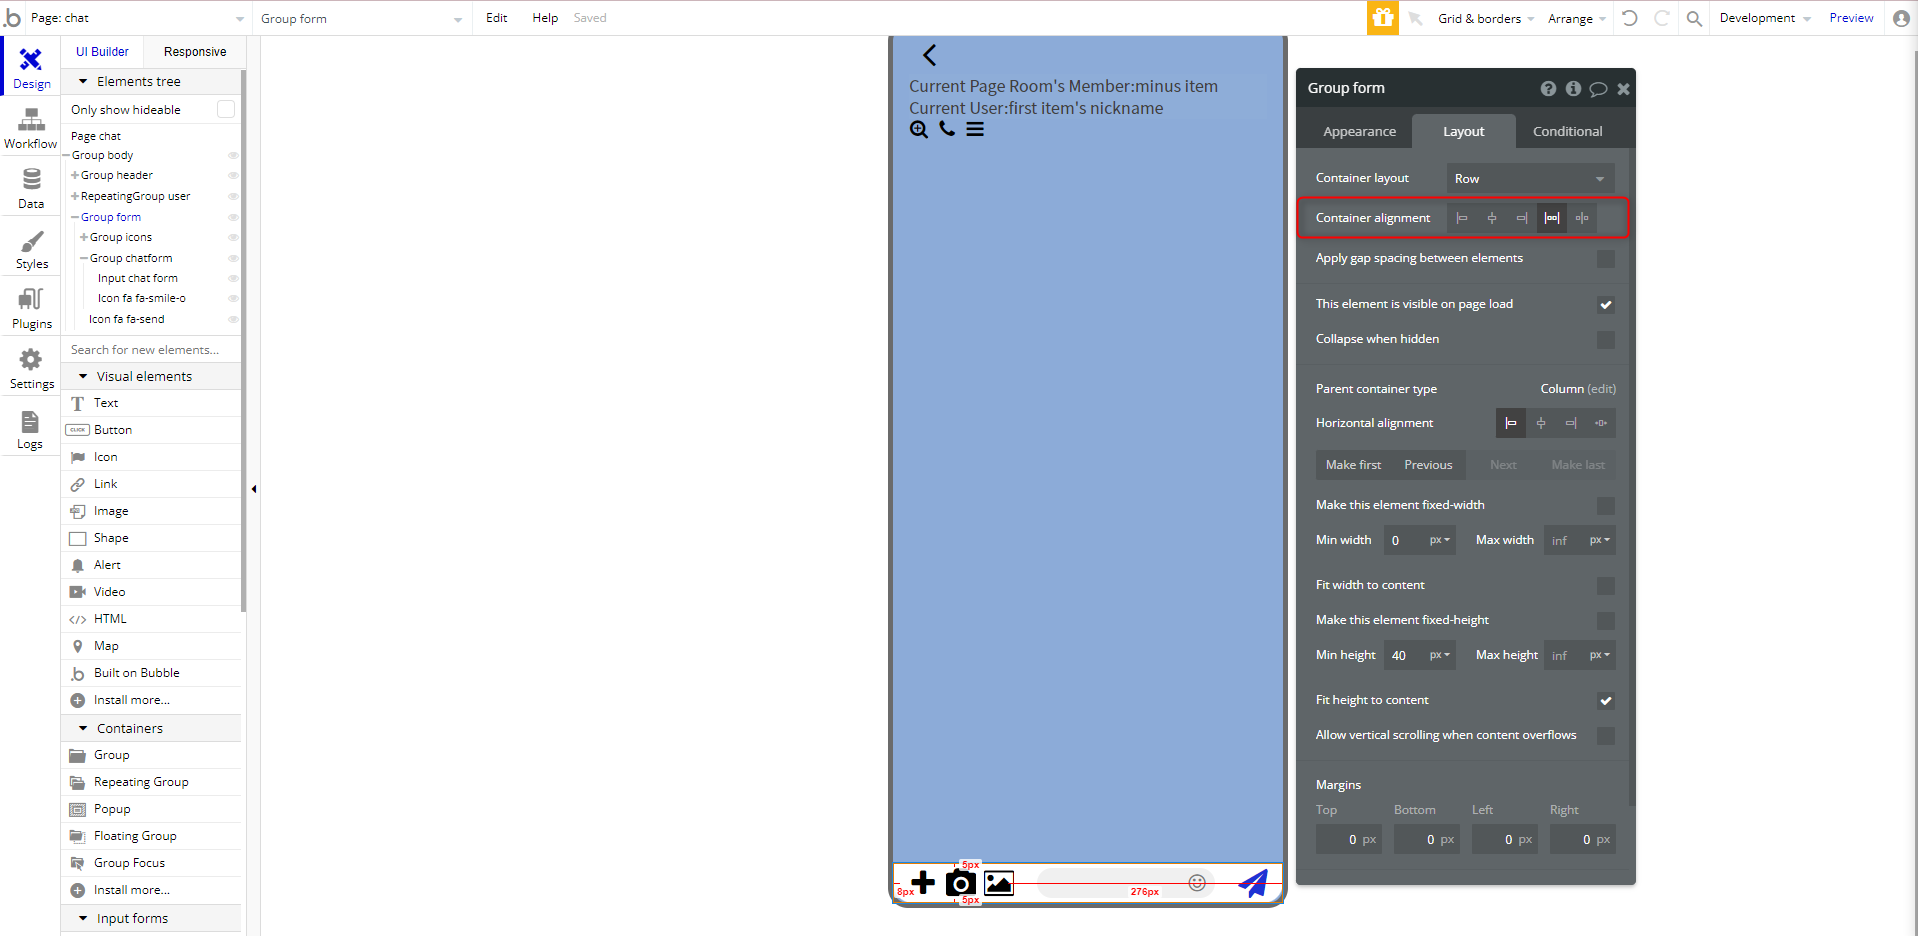
Group formの作成
Appearance
- Background style = Flat color
- Color = #FFFFFF
- Border style-bottom Bottom-right = 20
- Border style-left Bottom-left = 20
Layout
- Container layout = Row
- Make this element fixed-width = チェック外す
- Min width = 0px
- Min height = 40px
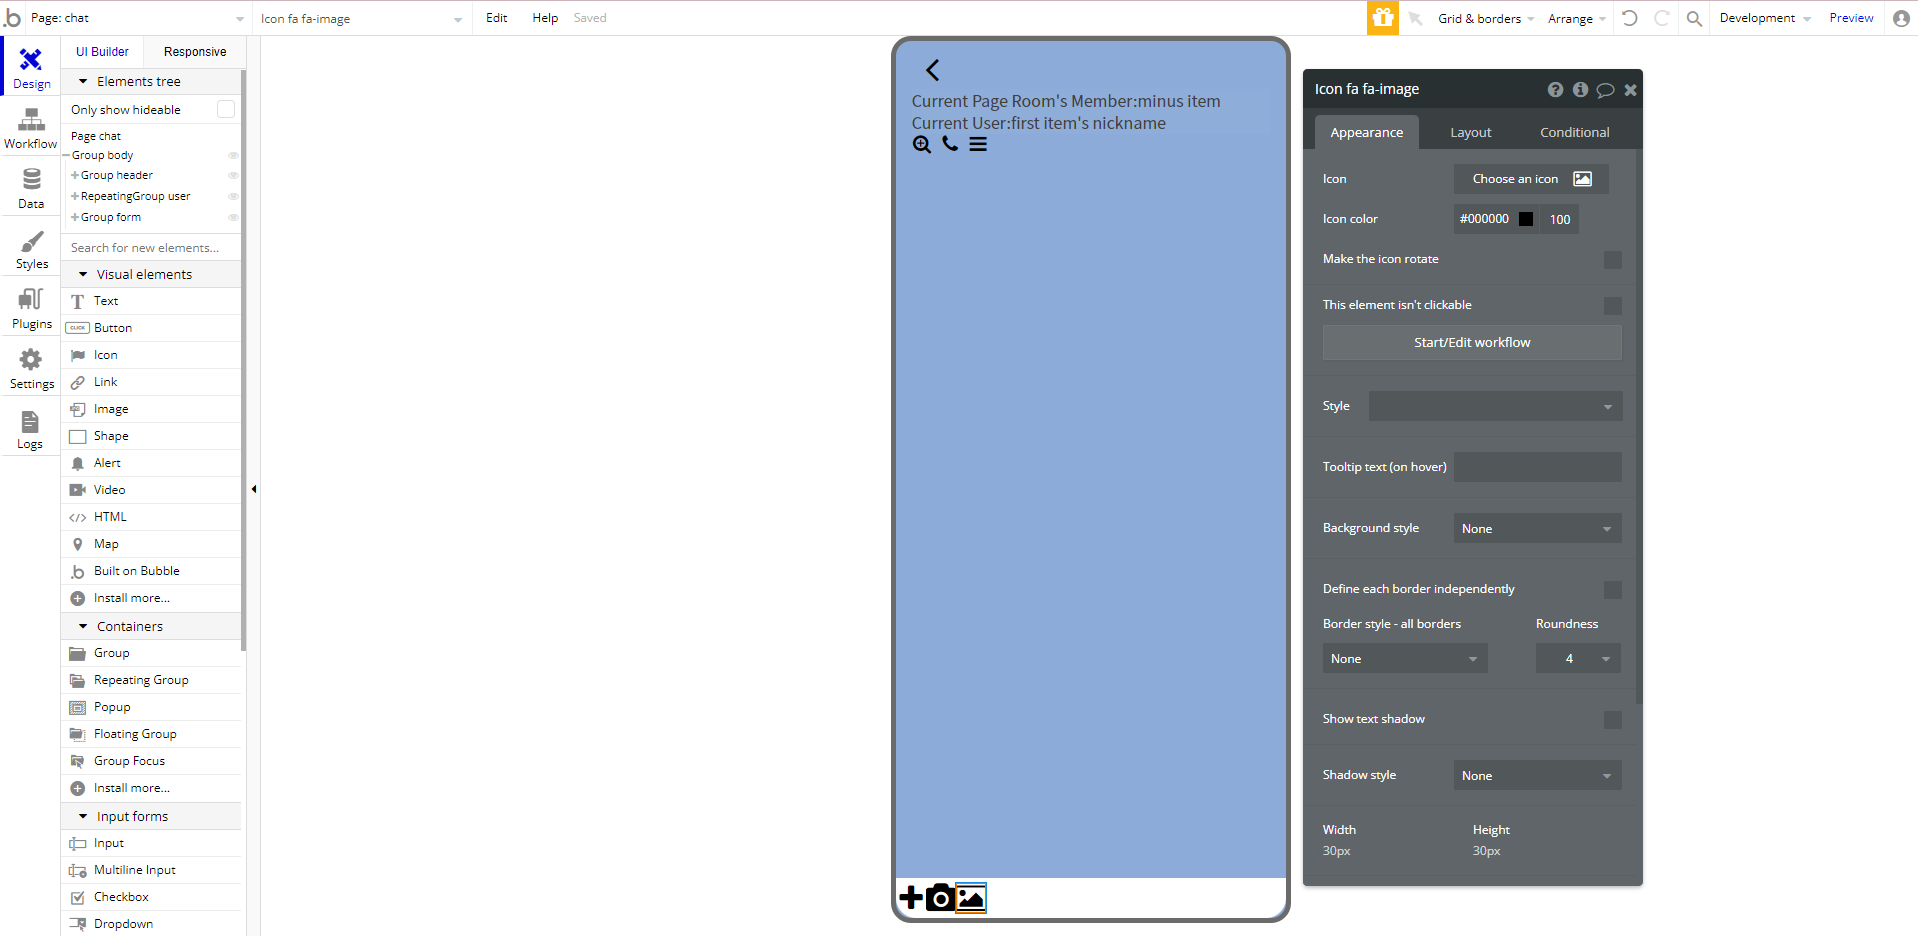
Group form内にアイコンを3つ配置
- fa-plus
- fa-camera
- fa-image
共通Layout
- Vertical alignment = Centered
- Width = 30px
- Height = 30px
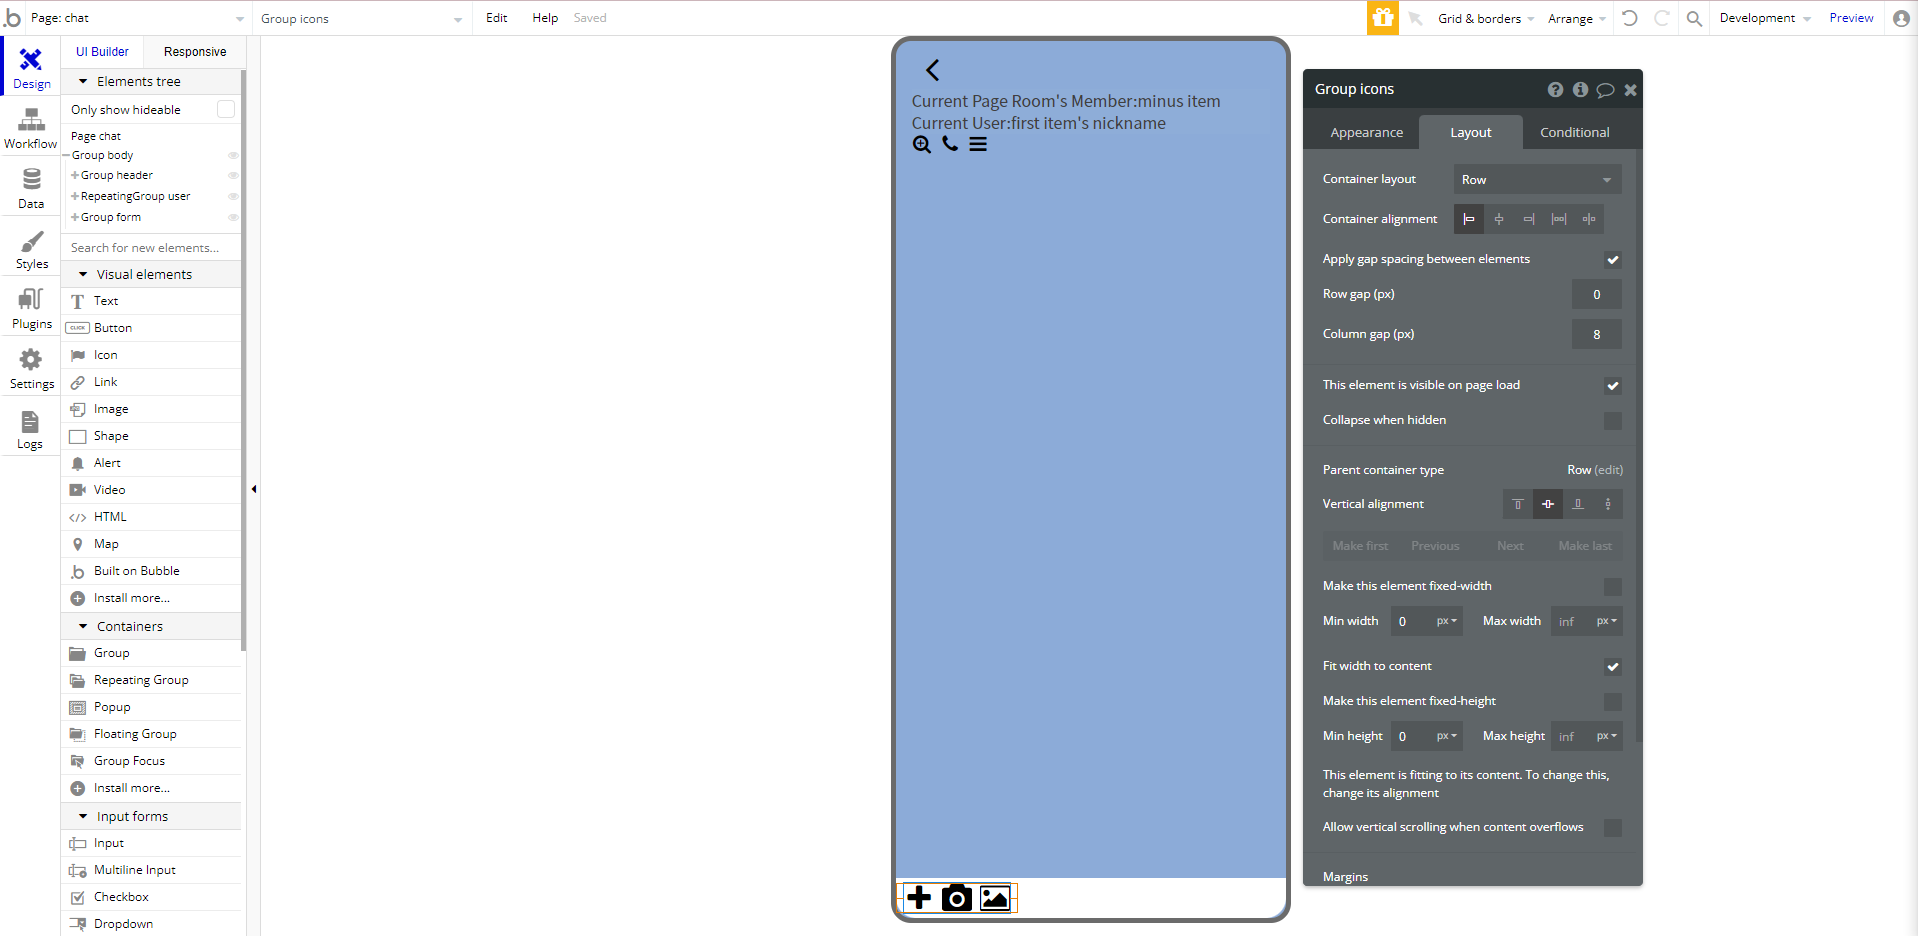
作成した3つのアイコンをグループ化(Row)
- Apply gap spacing between elements = チェック
- Column gap = 8px
- Make this element fixed-width = チェック外す
- Min width = 0px
- Fit width to content = チェック
- Min height = 0px
- Margins = Left: 8px, Right: 8px
input formを設置
Appearance
- Placeholder = 空白
- Background style = None
- Border style - all borders = None
Layout
- Vertical alignment = Centered
- Min width = 150px
- Height = 30px
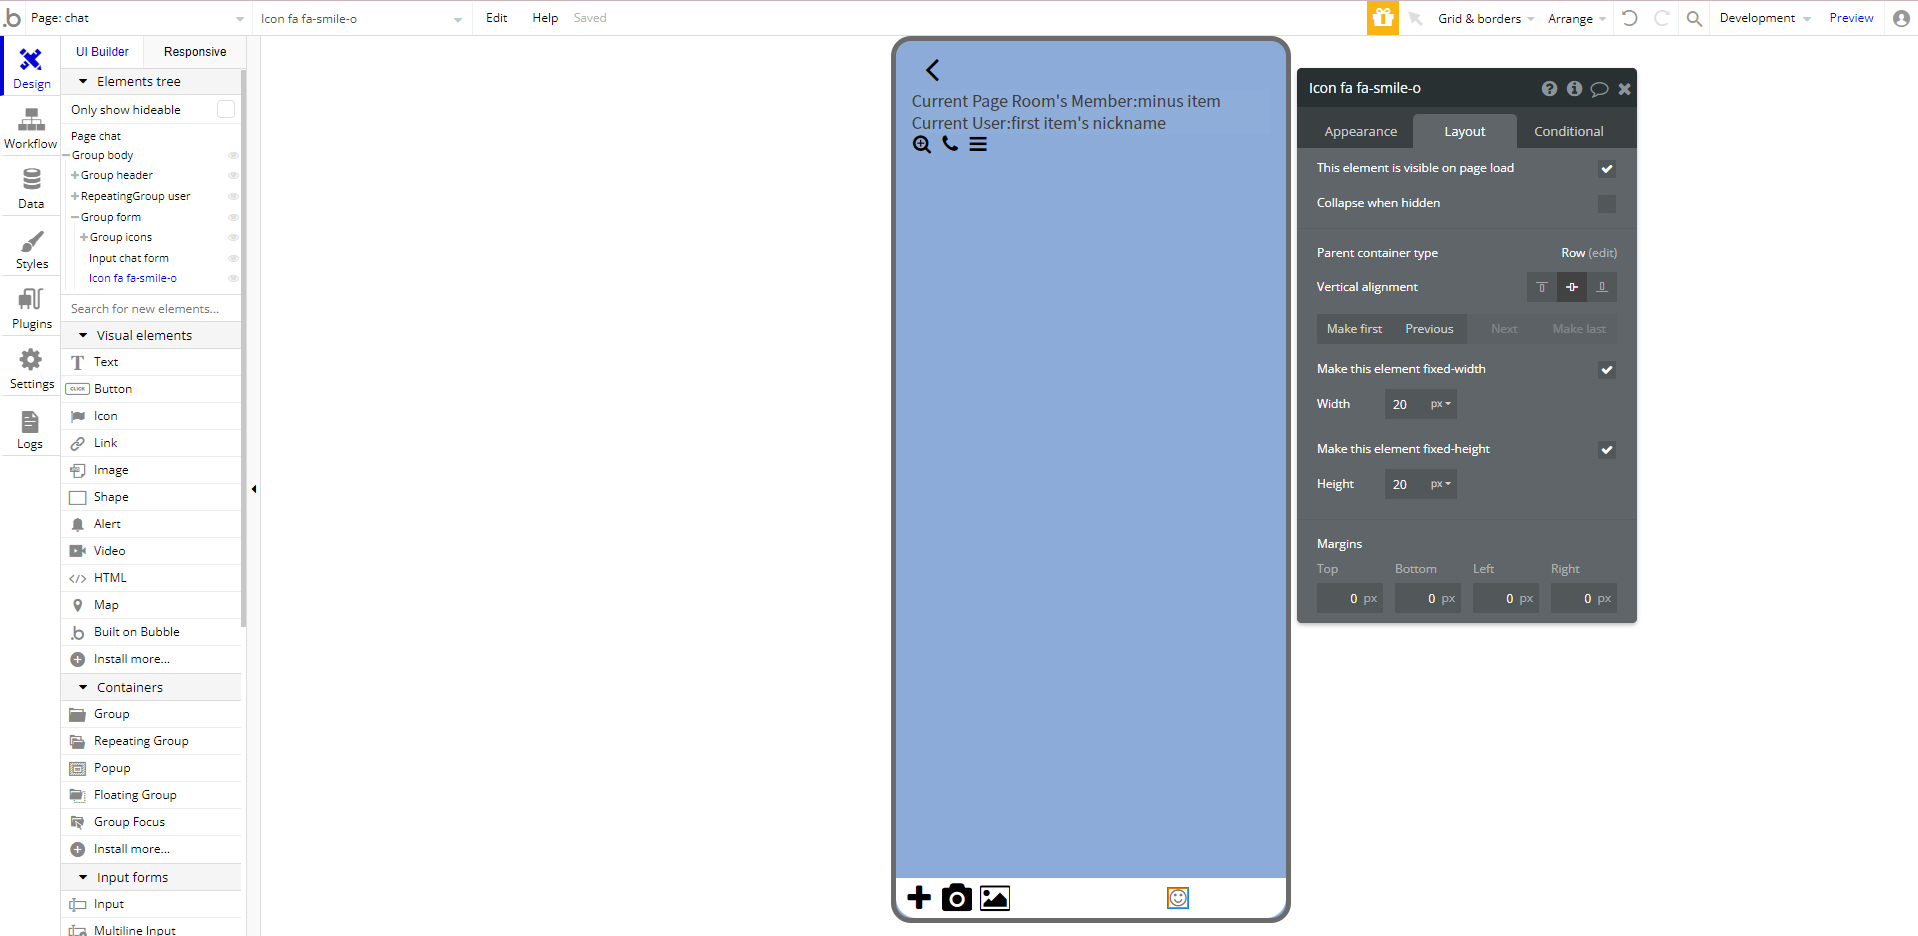
にこちゃんマークアイコンを設置
Appearance
- Icon = fa- smile-o
- Icon color = #7A7A7A
Layout
- Width = 20px
- Height = 20px
Inputformとにこちゃんアイコンをグループ化(Row)
Appearance
- Background style = Flat color
- Color = #F0F0F0
- Roundness = 15
Layout
- Vertical alignment = Centered
- Min width = 0px
- Min height = 0px
- Padding = 8px

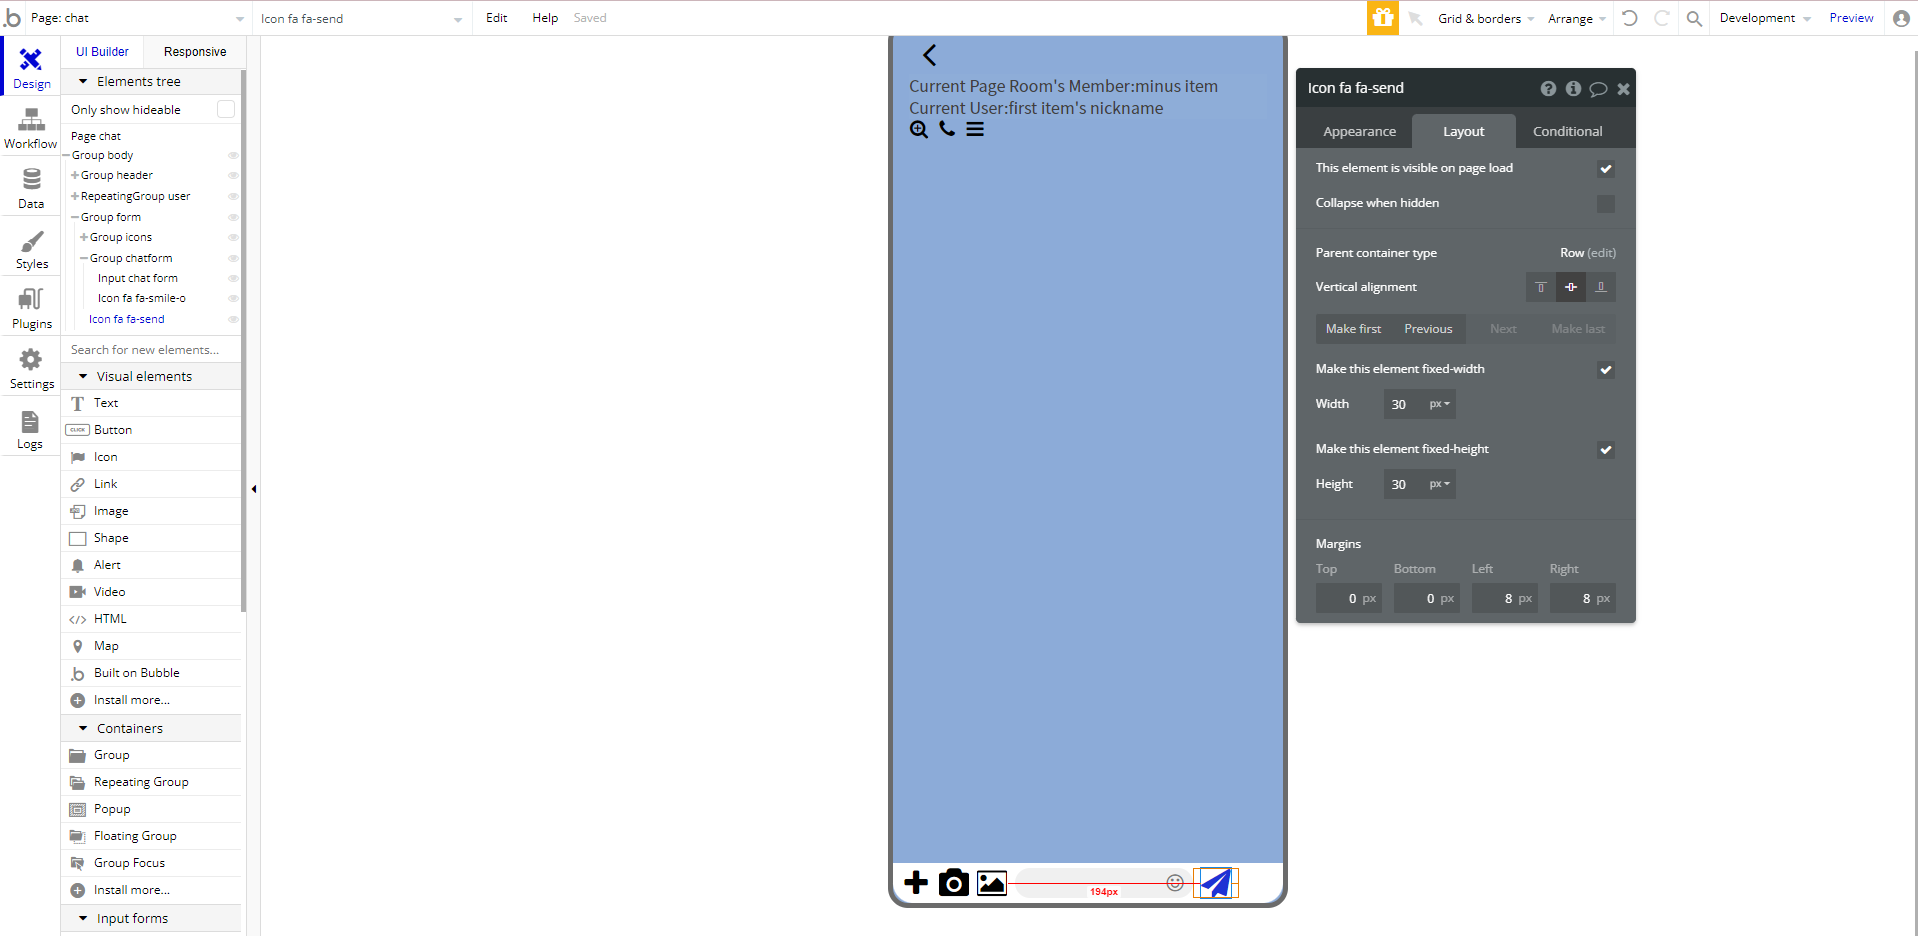
送信用アイコンを設置
Appearance
- Icon = fa-send
- Icon color = #1E33D4
Layout
- Width = 25px
- Height = 25px
- Margins = Left: 8px, Right: 8px
全体的に左に寄っているので、Group formのContainer alignmentをSpace aroundに変更します。
Picture Uploaderを設置
アイコンクリックして画像が投稿できるようにimageアイコンに重ます。
Picture Uploaderを作成したら、Icon fa fa-imageとグループ化(Align-to-Parent)
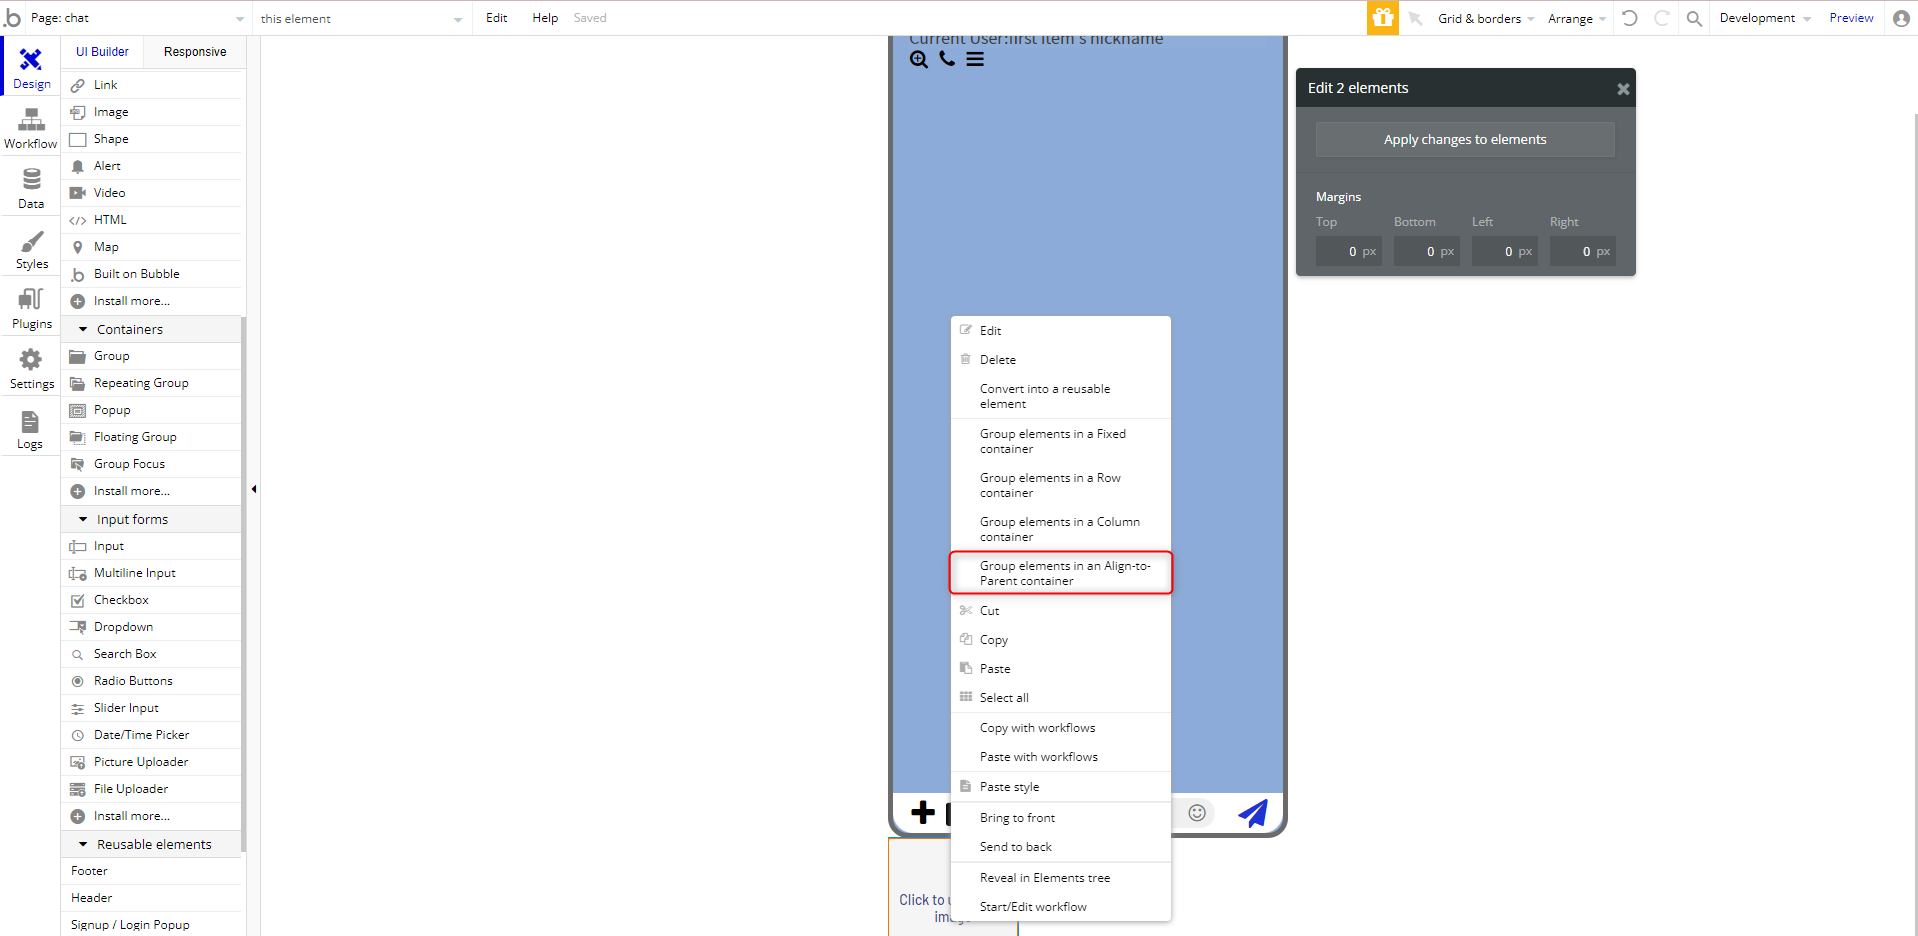
- Make this element fixed-width = チェック外す
- Min width = 0px
- Fit width to content = チェック
- Min height = 0px

Picture Uploaderを透過させます
- Placeholder = 空白
- Background style = None
- Border style - all borders = None

一度Previewで確認してみましょう。
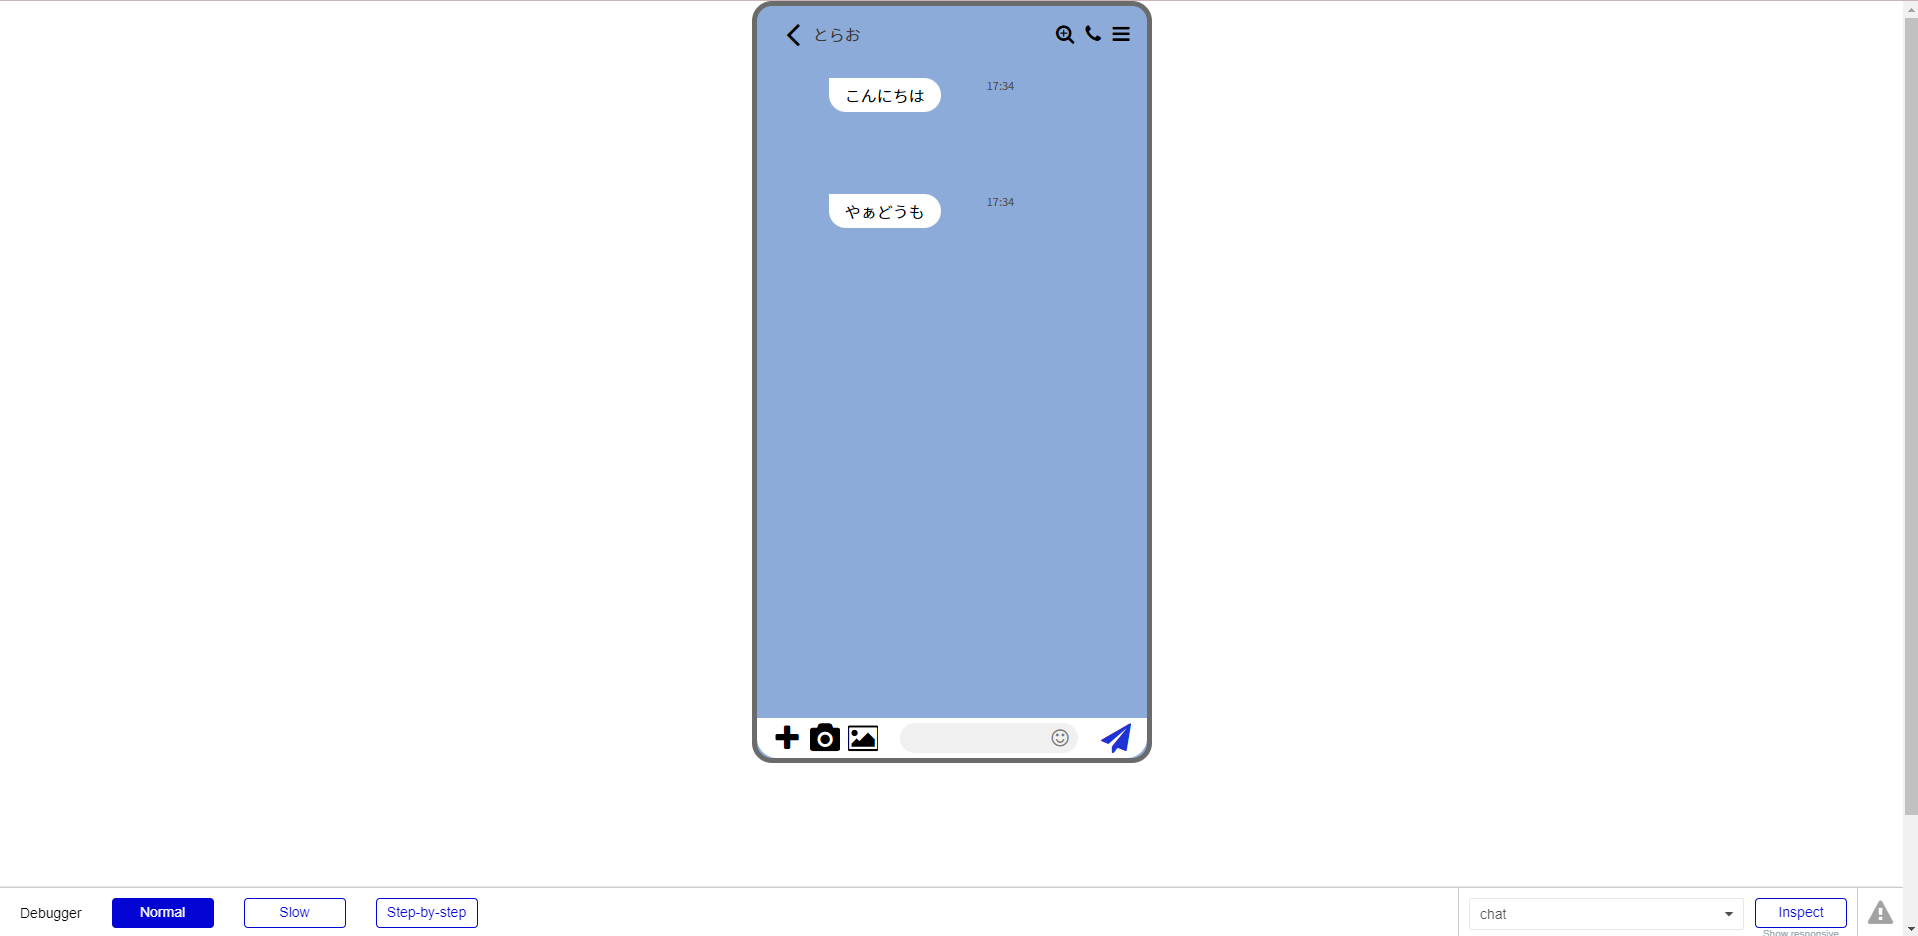
レイアウト崩れが無ければ完成です。
長くなってしまいますが、このままメッセージ送信機能も付けてしまいましょう。
メッセージ送信機能
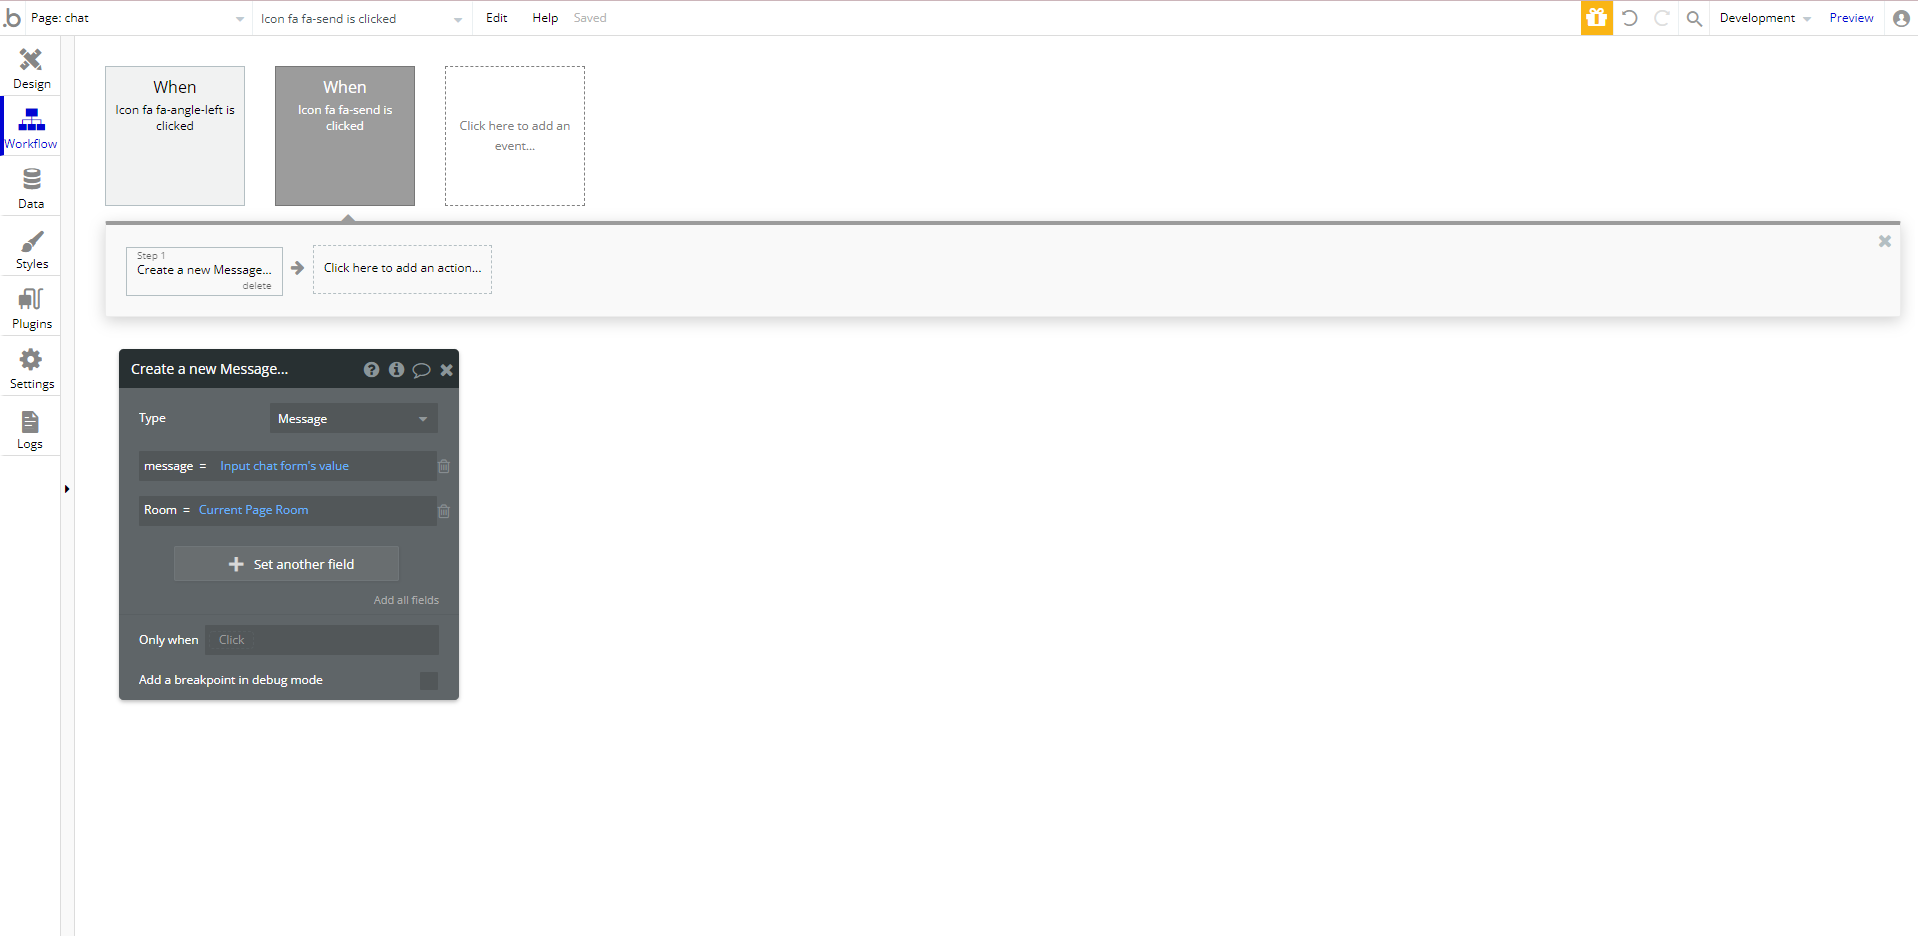
Step 1
Icon fa fa-sendのStart/Edit workflowよりData->Create a new thing...
MessageテーブルにInputformに入力したメッセージを登録します。
- Type = Message
- message = Input chatForm's value
- Room = Current Page Room
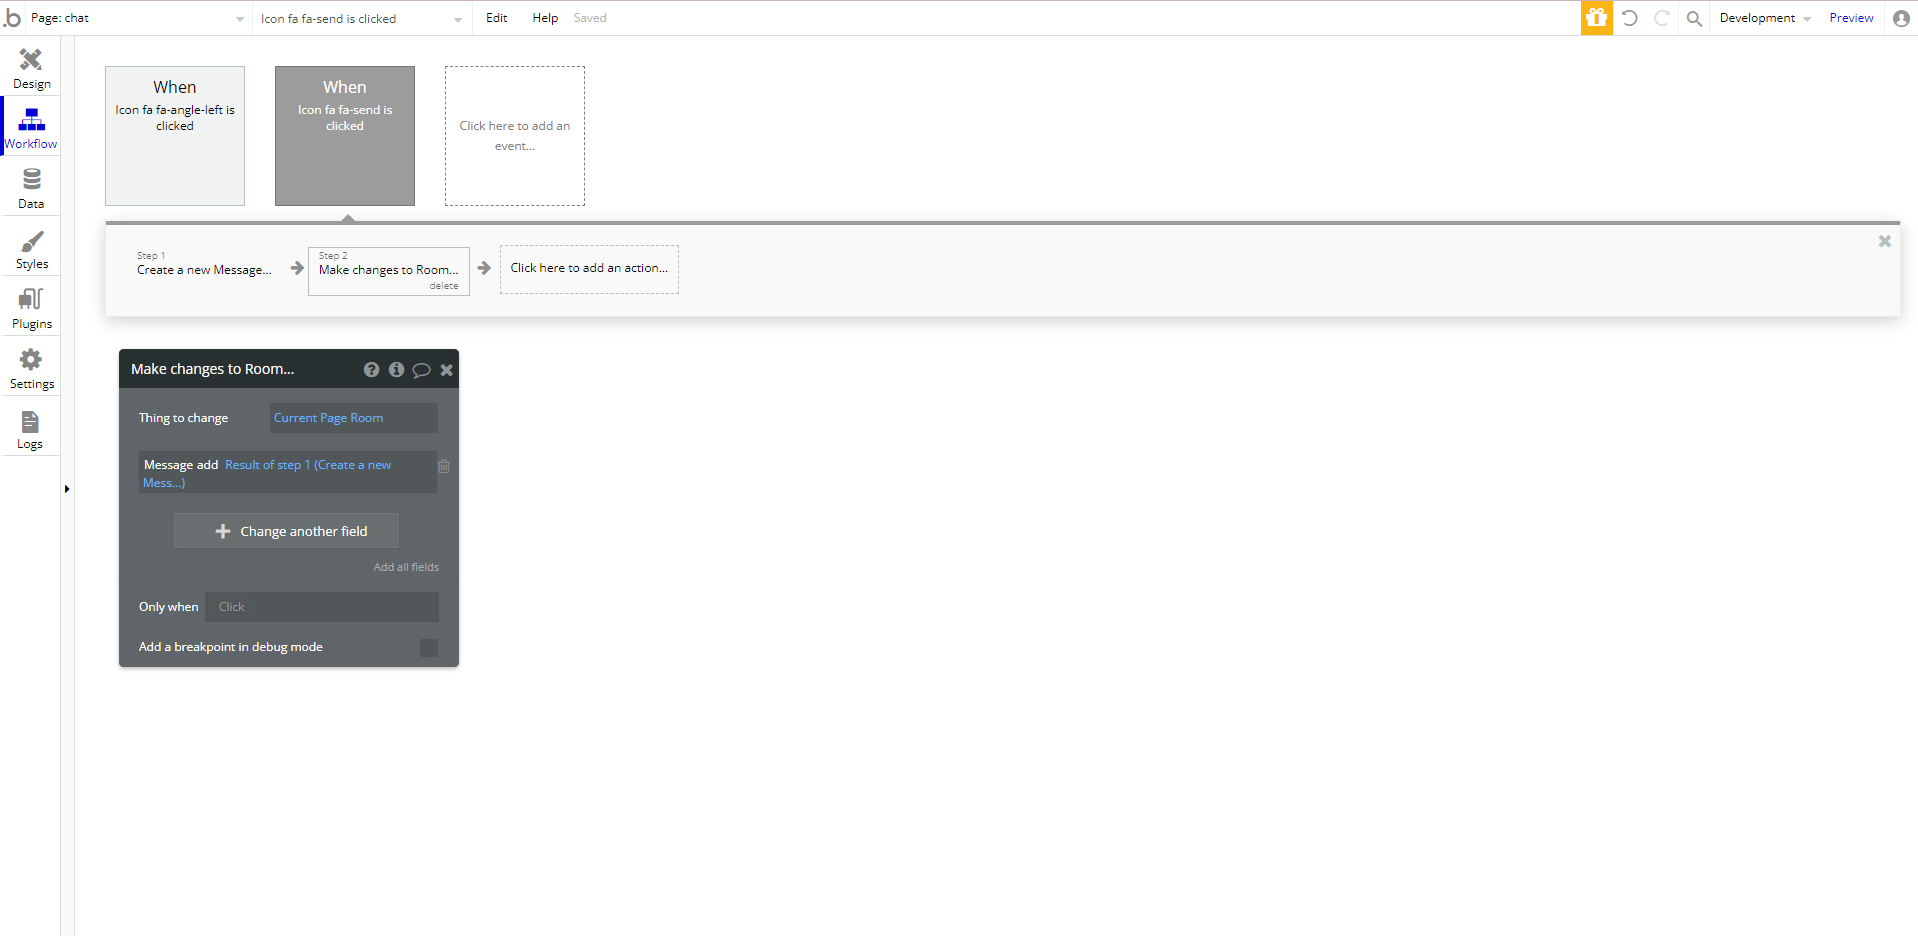
Step 2
Data -> Make change to thing...
Step1で作成したメッセージをRoomテーブルに登録します。
- Thing to change = Current Page Room
- Change another field = Message add Result of step 1 (Create a new Mess...)
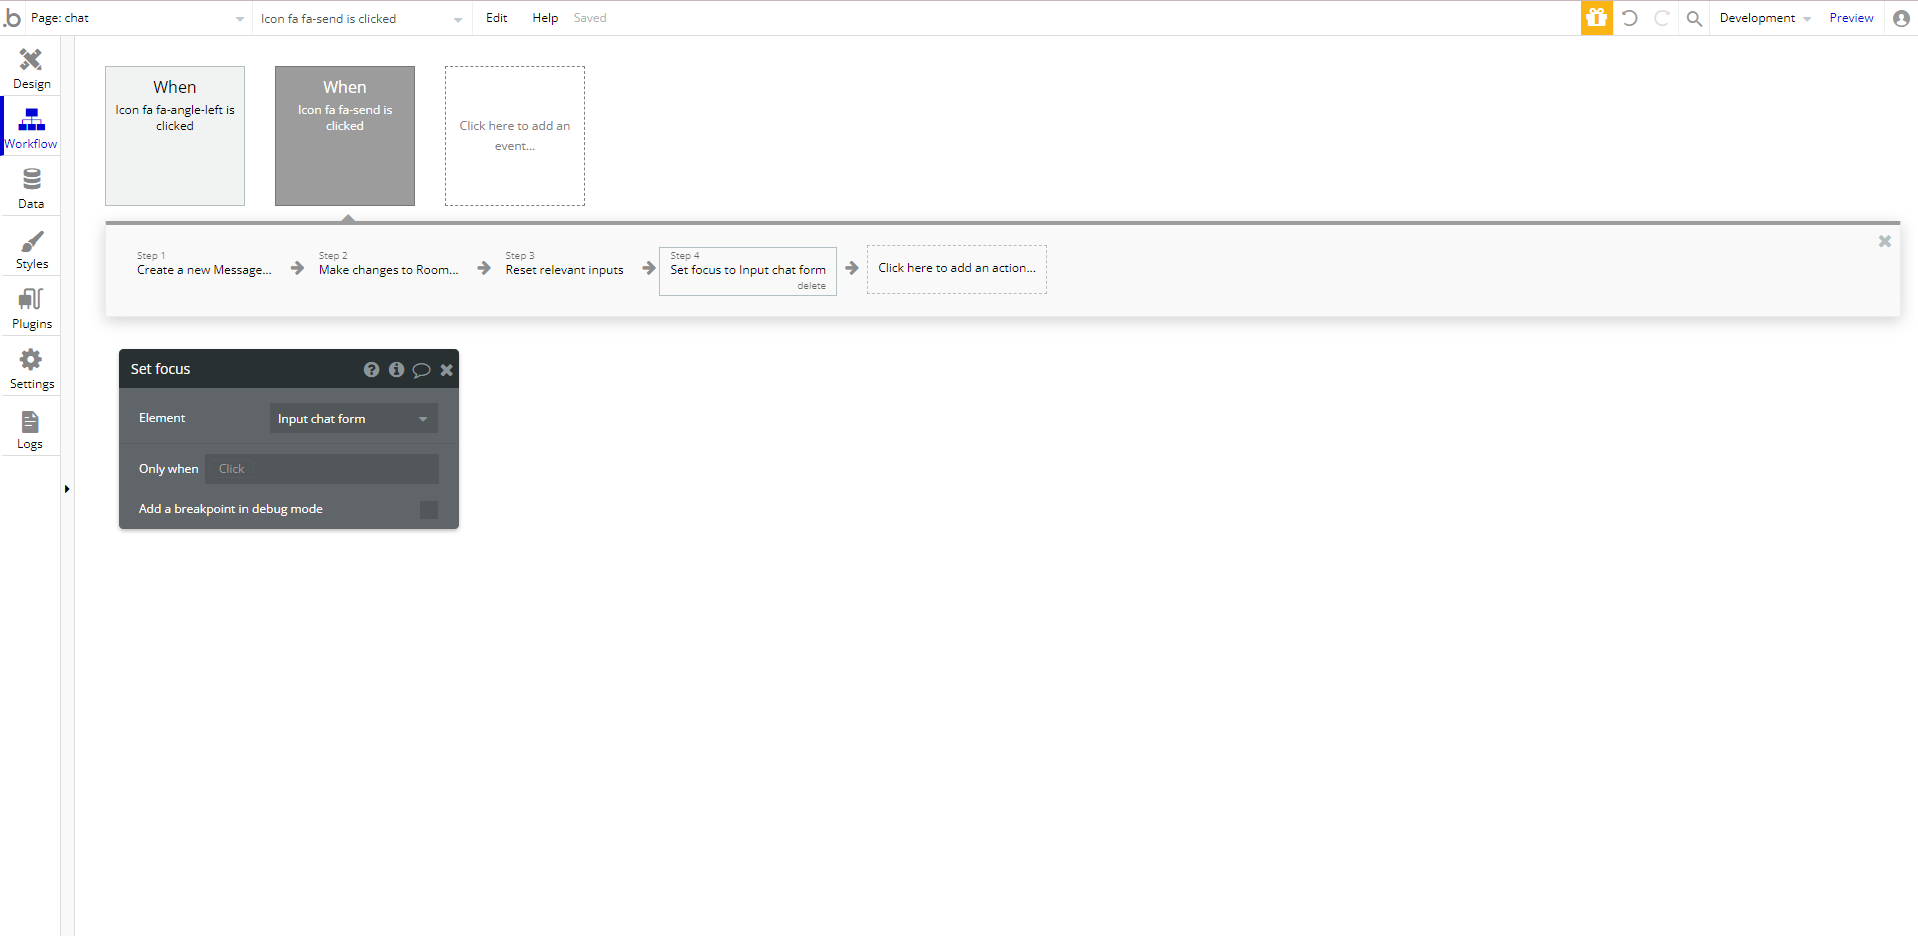
Step 3
Element Action -> Reset inputs
Inputformの内容をクリアします。
※Step3にはReset relevant inputsと表示されます。

Step 4
Element Action -> Set focus
Inputformに再度フォーカスが当たるようにします。
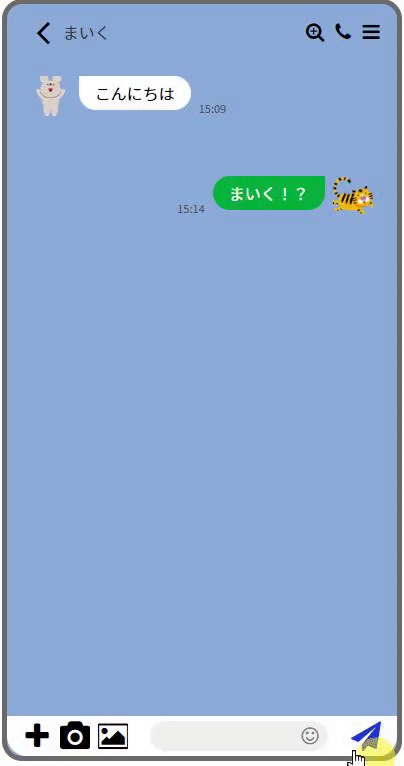
入力して確認してみましょう。
DataタブのApp dataより登録済みユーザーでログインして試してましょう。

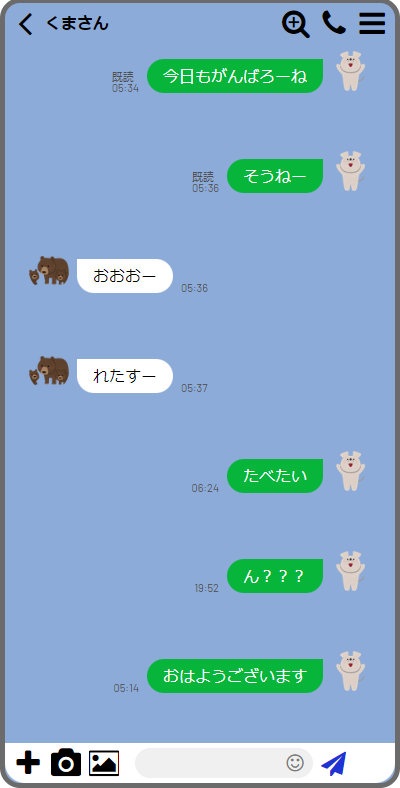
以下のように入力内容が反映されていれば成功です。
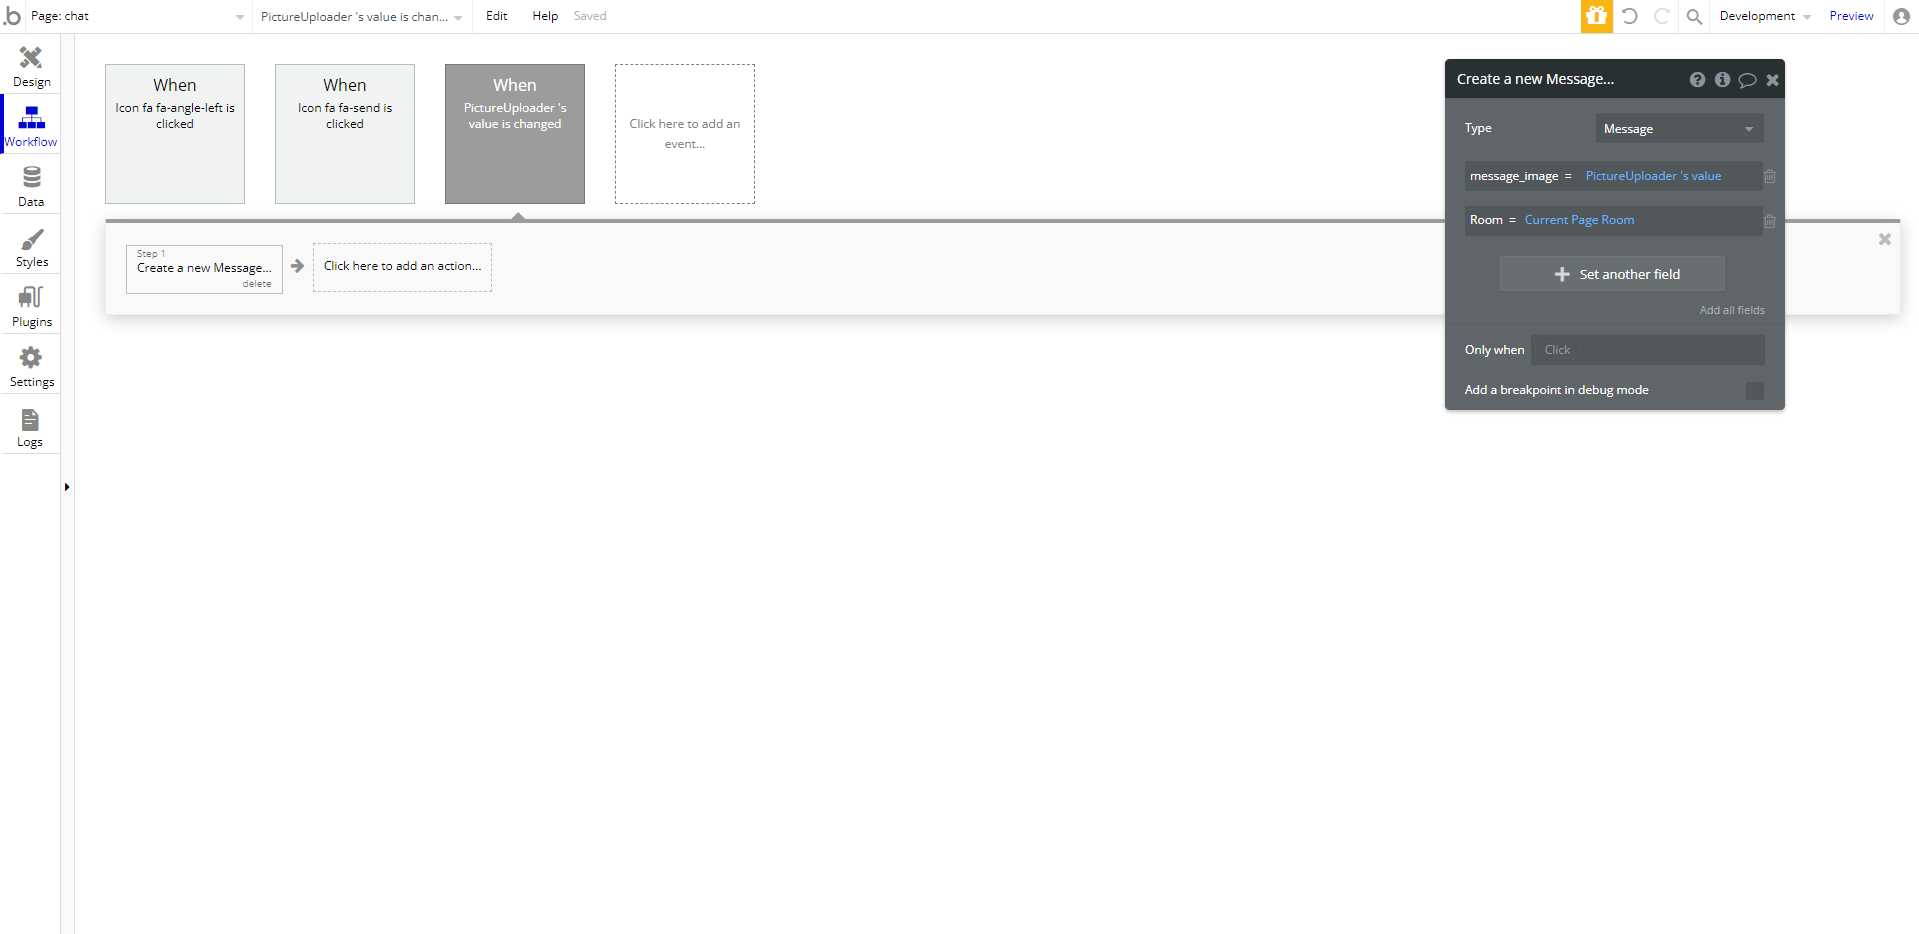
画像投稿機能
Picture Uploaderから画像を投稿できるようにします。
WorkFlowタブ -> Click here to add an event... -> Elements -> An input's value is changed
Step 1
Data -> Create a new thing...
- Type = Message
- messageImage = PictureUploader's value
- Room = Current Page Room
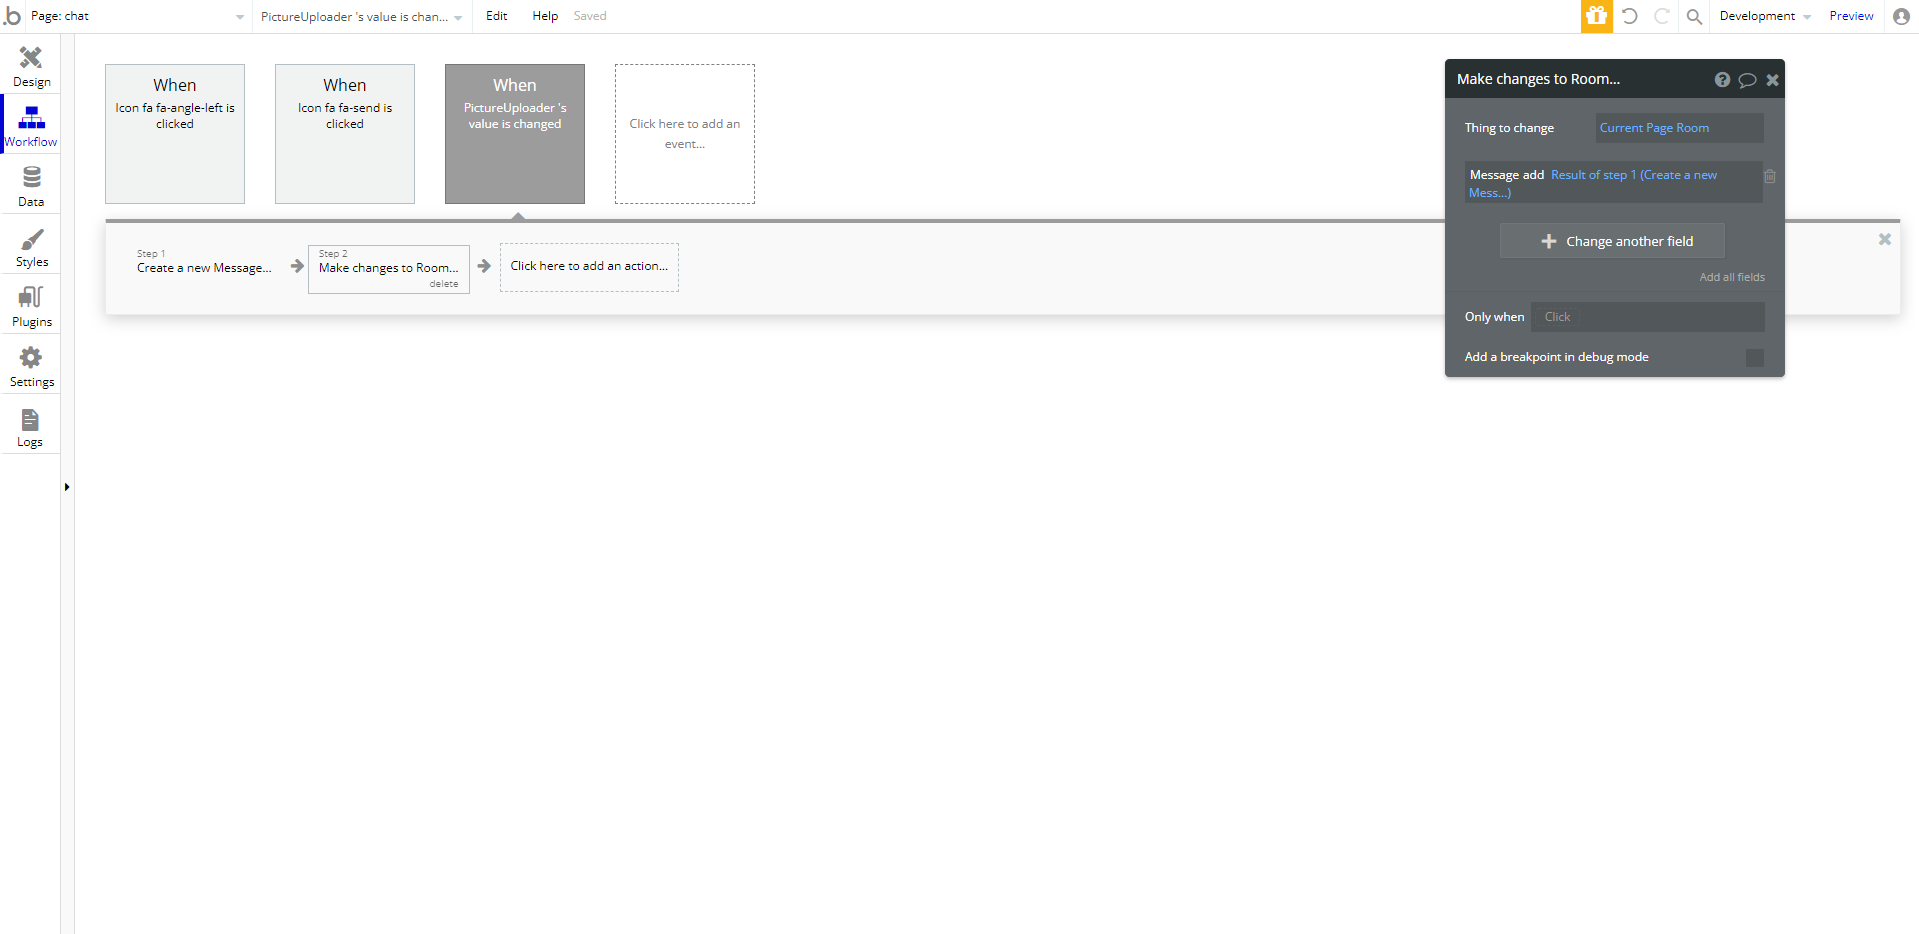
Step 2
Data -> Make changes to thing...
- Thing to change = Current Page Room
- Change another field = Message add Result of step 1 (Create a new Mess...)
Step 3
Element Actions -> Reset inputs

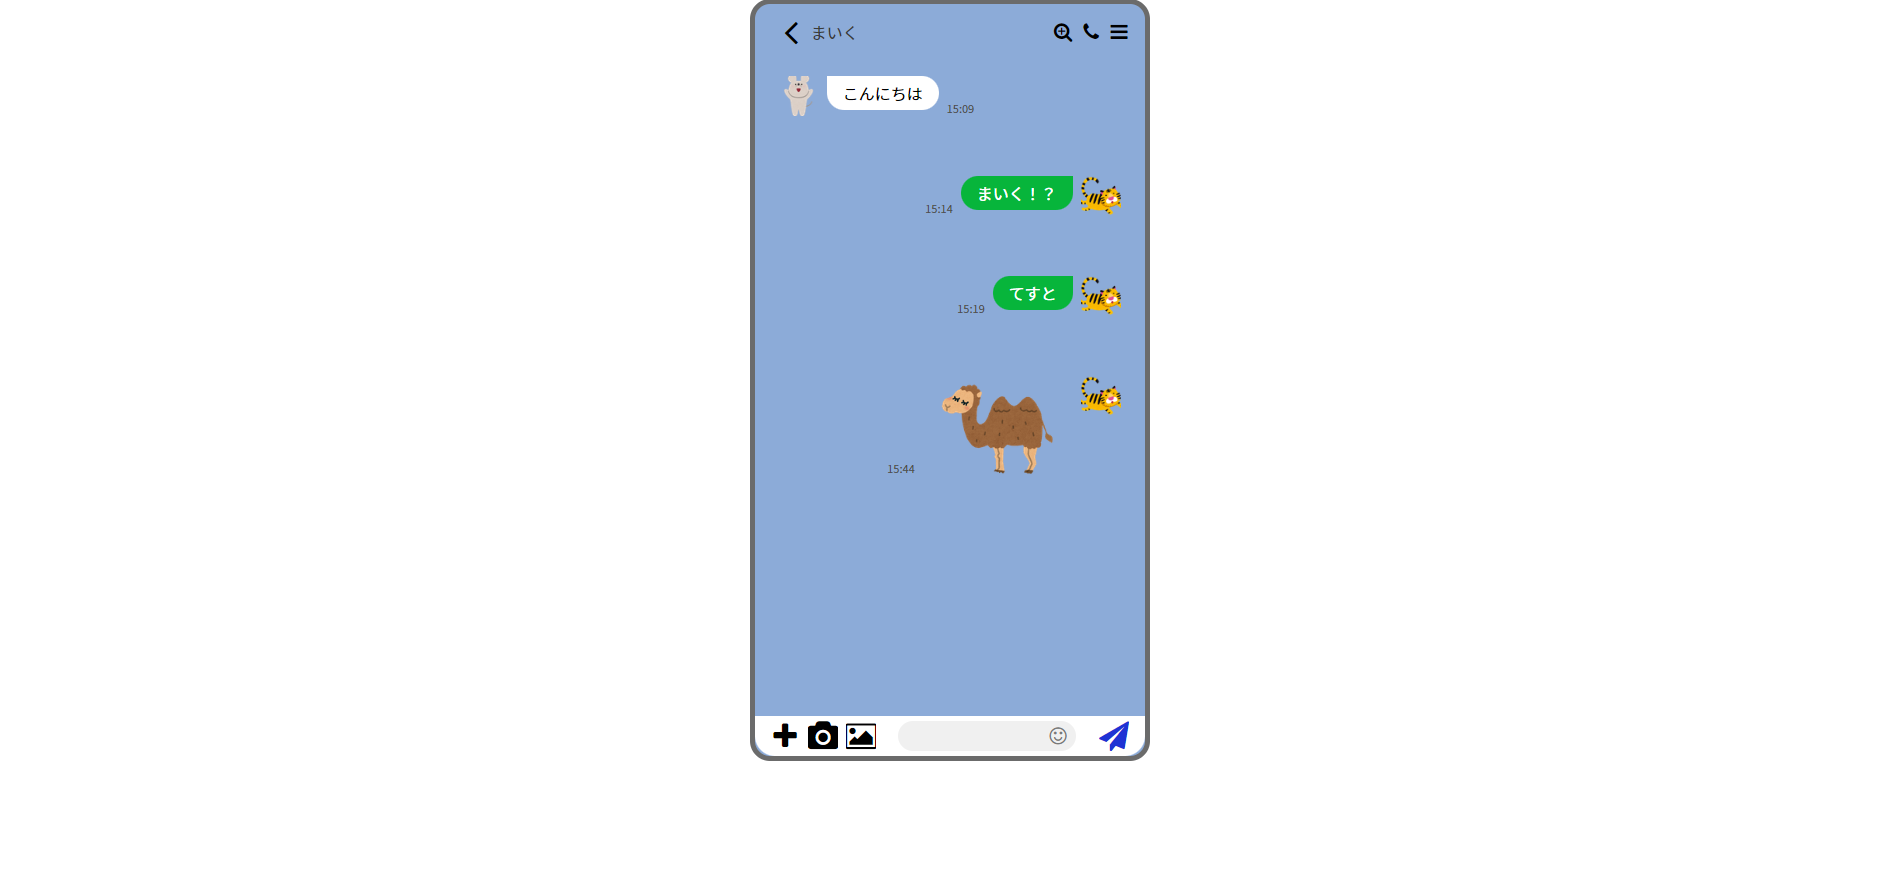
これで画像送信機能は実装出来たので、試しに何か投稿してみましょう。
うまく画像表示できているので、基本のチャット機能は実装完了です。
まとめ
かなり長くなってしまいましたが、チャットページの作成完了です。
次回は応用編として、自動スクロールと既読機能を追加していきます。
ここまでご覧いただき、ありがとうございました。
分からないところがあれば、お気軽にコメントください。
-

-
BubbleでLINE風チャットアプリ作成方法解説【おまけ】 ~新レスポンシブ対応~
こんにちは! WEB制作、Bubble開発で生計を立て、2023年までにフィンランド起業を目指している、まさひで(@john01tgmck)です。 2021年10月よりフリーランスになりました! 主な ...
-

-
BubbleでLINE風チャットアプリ作成方法解説【その5】 ~新レスポンシブ対応~
こんにちは! WEB制作、Bubble開発で生計を立て、2023年までにフィンランド起業を目指している、まさひで(@john01tgmck)です。 2021年10月よりフリーランスになりました! 主な ...
-
-
BubbleでLINE風チャットアプリ作成方法解説【その4】 ~新レスポンシブ対応~
こんにちは! WEB制作、Bubble開発で生計を立て、2023年までにフィンランド起業を目指している、まさひで(@john01tgmck)です。 2021年10月よりフリーランスになりました! 主な ...
-
-
BubbleでLINE風チャットアプリ作成方法解説【その3】 ~新レスポンシブ対応~
こんにちは! WEB制作、Bubble開発で生計を立て、2023年までにフィンランド起業を目指している、まさひで(@john01tgmck)です。 2021年10月よりフリーランスになりました! 主な ...
-
-
BubbleでLINE風チャットアプリ作成方法解説【その2】 ~新レスポンシブ対応~
こんにちは! WEB制作、Bubble開発で生計を立て、2023年までにフィンランド起業を目指している、まさひで(@john01tgmck)です。 2021年10月よりフリーランスになりました! 主な ...
です。 2021年10月よりフリーランスになりました! 主な)